Thursday, May 15, 2014

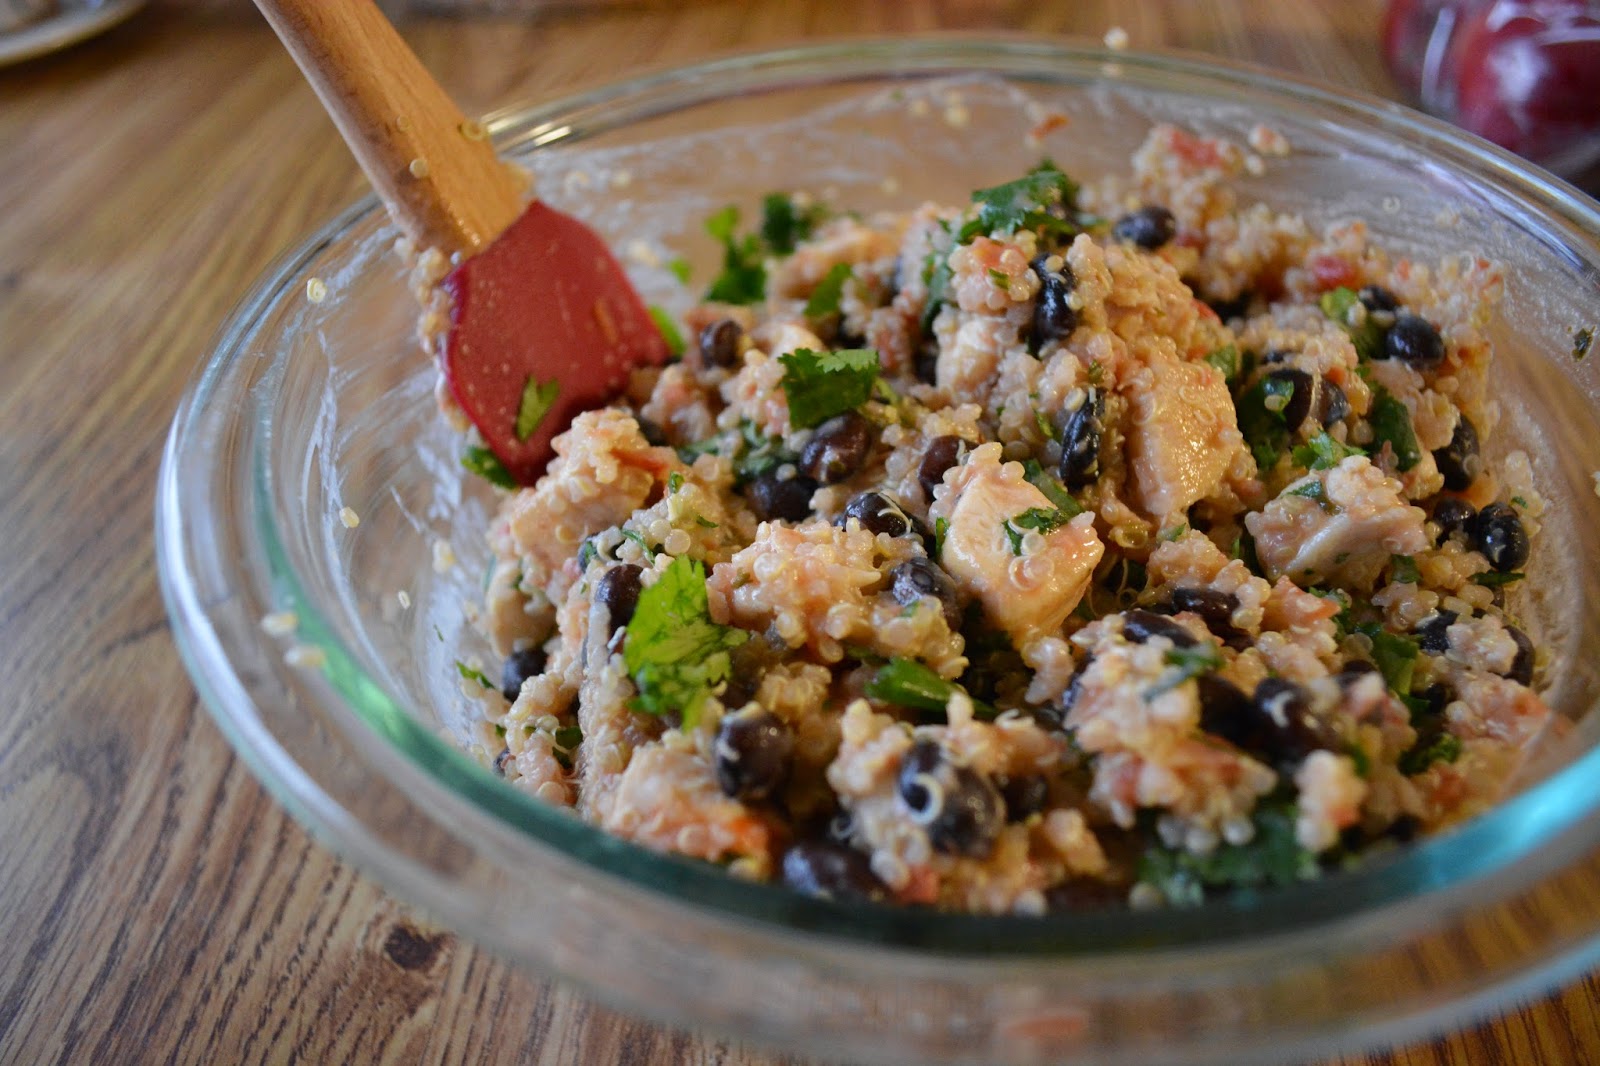
Chicken Quinoa Pita Pockets

Guys, I have a confession to make.  Sometimes when a new fad or trend comes around I will be super resistant to jump on the bandwagon.  But then eventually I will fall for it, and fall hard.  Skinny jeans for example.  I used to be super critical.  Why would I want denim all up on my calves all day long?  And now, skinny jeans are all I wear.  Well, except for jeggings.


Or quinoa.  Four years ago had anyone ever even heard of quinoa?  No.  And then it made it's breakthrough and took the food magazine and blogging worlds by storm.  It appeared in anything and everything, being dubbed a superfood or something like that.  I eventually won a bag in a giveaway, and it sat in my cupboard for months untouched.  Until finally a couple of weeks ago while (sort of) participating in a week long healthy eating challenge (another fad, I know) it was called for as a side so I finally dusted off the bag and gave it a shot.


Let me tell you I am hooked; hook, line and sinker.  I'm looking forward to trying out many more quinoa recipes, but for now here is the version of healthy chicken quinoa pita pockets that I came up with, inspired by my big sister.  Feel free to adjust any of the ingredients as you please.  Depending on what type of salsa you use and how much kick you like, you may want to use more or less.  It's a pretty quick weeknight meal to make, the longest part being cooking the quinoa.

Ingredients
1 package of pita pockets
12 oz chicken breasts, cut into 1/2 inch pieces, cooked
1 cup cooked quinoa
1 can black beans, rinsed
2 tablespoons plain greek yogurt
1/2 cup salsa
1/4 cup cilantro, diced
Avocado (for garnish)

Directions
  1. Combine chicken, quinoa, black beans, greek yogurt, salsa and cilantro in a medium bowl.  Stir until ingredients are dispersed evenly.
  2. Spoon desired amount into pita pocket. Garnish with an avocado slice.
I'm thinking next time I make this I might shred the chicken instead of cubing it so that it sits in the pitas better.  The leftovers reheated well and tasted great just eaten plain.  Don't have plain greek yogurt on hand?  Try substituting sour cream, it will just be a little less healthy.  You could also substitute tortillas for the pita pockets if you prefer.


Sunday, May 4, 2014

New favorite kitchen essential: the cast iron skillet


A Gift of Gold

About two years ago, a large and quite heavy birthday gift waited to be opened on my lab. We have a tradition in my family where we try to guess the gift before opening it. I had no idea. Was a brick wrapped with my gift to throw me off? Needless to say, I guessed the gift completely wrong. But discovering that I was given a cast iron skillet left me giddy with glee! I couldn't wait to try it out. Ever since, this cast iron skillet has only helped leave my stomach full and happy.


A Kitchen Essential

I never knew what a cast iron skillet could do until I started using mine. Every kitchen needs a cast iron skillet for a few reasons. You may not understand it, until you try it. Why a cast iron? What makes it different from a regular skillet? It's like the question, why mix the dry ingredients from the wet in a cookie recipe? It doesn't seem like it would make a difference, but it does. So here is a short list why a cast iron skillet should be your friend in the kitchen.

1. There's something about searing the meat - Whether it is chicken, steak or pork chops, this skillet can handle it. And it handles it well. With a cast iron skillet, meat will be seared leaving the juices and flavor sealed in until you take your knife and fork to it. Pure deliciousness.

2. Universal Utility - Stove top. Oven. Campfire. The cast iron skillet can do it all. Just remember, oven mitts are always necessary when the heat is on. That handle, along with the entire skillet, will be hot. And stay hot for awhile, even when off the heat source.

3. An All Courses tool - The cast iron skillet is not only for meat. It can be for any course. Main dishes, dessert or side dishes, I've seen all sorts of recipes made for the cast iron skillet. Actually, a recipe on my to-do list includes an apple crisp made in a cast iron. My mouth is already watering.

4. It gets better with time - With each use, the cast iron skillet becomes seasoned. With more use, the skillet just gets better, providing food with full-bodied flavor. So the more you use your cast iron, the better the outcomes.

5. Easy cleaning - The cast iron skillet has a special maintenance plan. No soap necessary for this bad boy. To preserve the seasoning explained in #4, all you want to do is wipe it down with water and a damp cloth or paper towel. Also, as an extra bonus, there is no fear of warping the skillet under hot water!

A Recipe for the Kitchen Essential

As I was brainstorming what to do for some pork chops thawing from the freezer, the cast iron skillet popped in my head. I raced for my cast iron skillet cook book and found the perfect recipe! Let's just say it includes some of my favorite flavors: onion, garlic and wine! Yum! Be sure to stop back for the recipe release of Braised Pork chops in Merlot sauce coming soon.


Thursday, April 24, 2014

Broccoli Cheddar Grilled Cheese


I've been inactively watching nature shows on PBS for the past hour or three while putzing around on the Internet and editing these here photos. Not a lot has been learned, but I have noticed that the music has a very ominous almost spooky thing going on. The scientists and narrator's voices also have a similar vibe happening. Why is this? Has anyone else noticed this?

Maybe it is time for me to change the channel. They must be going for that feel. After all, science can have a sort of awesome and ominous quality to it. Right? Enough of my ramblings about the production qualities of PBS nature shows and more about grilled cheese.


April is grilled cheese month and quite possibly the best month EVER. I don't care if it rains a lot. It is named after me and involves warm cheese between delicious carbs. Enough said.

Broccoli cheddar soup is up there on my favorite soups list. Roasted broccoli is also like vegetable candy for me. It gets all crunchy and roasty on the outside. You can sometimes find me on a wild Friday night drinking wine, watching trashy TV and shoveling a whole head or two of roasted broccoli in my face. You should try it sometime. I live a wild life. No big deal.


I roast extra broccoli and grate extra cheese in anticipation of snacking while I make my sammie. You should do the same. Snacking is inevitable. The addition of the Havarti adds a good melty and creamy quality to the sandwich, mimicking the creaminess of soup.  While the cheddar is obviously necessary to the sandwich and adds a good sharpness.

I have made this sandwich using both sourdough and whole wheat bread, they are equally as good. Go ahead and make your life a bit easier and use whatever bread you have on hand. Celebrate the end of the best month ever and grilled cheese month with this sammie; you won't regret it.

April
 
Ingredients:
Roasted broccoli:
1 head of broccoli
1 tbsp extra virgin olive oil
Kosher salt
Pepper

Sandwich:
1/4 cup roasted broccoli, chopped
2 slices sourdough or french bread
1/3 cup extra sharp cheddar, grated
1/4 cup Havarti, grated
Onion powder
Garlic powder
Pepper
1 tablespoon unsalted butter, softened

Instructions:
Broccoli:
Preheat the oven to 425 degree Fahrenheit. Cut the broccoli florets into bite sized pieces. Toss the broccoli with the olive oil, generous pinch of salt and freshly ground black pepper. Spread the florets evenly onto a baking sheet and roast for 20 minutes or until tender and beginning to brown slightly.

Sandwich assembly:
Spread 1/2 tablespoon of butter on both pieces of bread. Flip the slices over (the buttered sides are the ones that are going to hit the pan) and place half the grated cheddar on one piece of the bread. Add the chopped broccoli on top of the cheddar. Sprinkle a pinch of onion powder, garlic and generous pinch of pepper on top of the broccoli. Then add the Havarti, remainder of cheddar and final piece of bread.

Heat a heavy bottomed skillet over low heat. Carefully transfer the sandwich to the skillet and cook until the bread is toasty and golden on both sides and the cheese is gooey and melty. About 7 to 10 minutes. Remove from the pan and let sit for a few minutes before enjoying.

Thursday, April 10, 2014

Dijon Brussels Sprouts

Brussels sprouts are more of a fall and winter vegetable, but you can get them all year round and they are green. Green is a very spring like color, right? I think so and that is what I am going for. This here little recipe came about around new years time. Its been a long time since I've updated the blog regularly, but I had not forgotten about it! I'm always thinking and creating.


My New Year's Eve plans were pretty disorganized and last minute. Most of my friends were doing dinner or something that didn't involve me with their boyfriends. Silly couples. I decided to hell with them and planned to make myself a steak and brussels sprouts.

Just when I had come to terms with spending the start of my new year with a steak and bottle of wine, my married friends got down with the steak dinner plan to start the night. This is how these dijon sprouts came to be.


We were crunched for time. It was "late". There were places to go and people to see. My friends brought mushrooms, bread, brie and steaks. For the sake of time we decided to combine the only two veggies we had into one dish. Dinner came together in 30 to 40 minutes, snacking on cheese and drinking wine can be distracting.

Shredding the sprouts is the most time consuming part, but I've made this three or four times, using several different methods. I've used my mandolin, food processor slicing blade and pre-shredded brussels sprouts from Trader Joe's. You could also slice them carefully with a knife. Up to you. I prefer the mandolin or food processor. The texture is more delicate and frilly. Using a food processor is probably the quickest. Just trim off the stems and toss 'em in there.


Slice up some shrooms. Use any kind you want. As many as you want. I've used pre-sliced variety packs of mushrooms, little bellas and shitakes. Don't like mushrooms? Don't use 'em. Try adding a extra cup of brussels sprouts.

Cooking time is maybe 7 to 10 minutes. No time at all. More than enough time to throw some meat in a hot pan to go along with your brussel sprouts. I would recommend starting the meat before the brussel sprouts though. Just a thought.


This is so easy and flexible that it is really up to you. It was my go to dinner side for a few months. I went through a phase of eating steak and these for dinner anytime I had company. It got rave reviews every single time.

April


Ingredients:
4 ounces sliced mushrooms
1 tablespoon unsalted butter
1 teaspoon olive oil
3 cups shaved brussels sprouts (about 6 ounces)
1 3/4 teaspoons whole grain Dijon mustard
Freshly ground black pepper
Kosher salt

Instructions:

In a medium skillet, heat the butter and olive oil over medium heat. When the butter is melted, add the mushrooms and saute for 2 to 3 minutes.

Add the brussels sprouts, Dijon mustard and a generous pinch of freshly ground pepper; toss the mixture together and cook until softened, 3 to 5 minutes. Salt to taste (my Dijon mustard was fairly salty so I added only a pinch). Transfer to a plate or bowl and enjoy.


Monday, April 7, 2014

Apple Cheddar Pupcakes


It's the Berner Bear's first birthday and we couldn't celebrate without some homemade, puppy-friendly treats. I have to be honest, I was searching for the perfect treat to make Bear for his birthday months ago! I love when I have a reason to spoil my not-so-little puppy! I have made him peanut butter treats and pumpkin cookies before but I wanted something different. Something with a new flavor for him. Which made me think of cheese. Bear loves when we slip him some cheese. Must be his native Wisconsin roots. So, I landed on this recipe. Super easy and healthy, I couldn't resist trying to make these pupcakes.


Why so easy? It's a recipe where you add, mix and bake. That simple! Also, it contains many ingredients that may be in your kitchen already, like apples, flour, rolled oats and cheese. For this recipe, I used whole wheat flour and all purpose flour but it can easily be altered to contain all of either kind of flour. Your puppy will love these pupcakes either way! Bear, my taste-tester and birthday boy, absolutely loved these. He was lifting his paw to shake before I even muttered the command. And as a bonus, these pupcakes made the house smell (surprisingly) oh-so-good!

Happy First Birthday, Bear!


3mo. 14lbs

1yr, 105lbs

Apple Cheddar Pupcakes

adapted from brown eyed baker

Ingredients
1/2 c. all purpose flour
1/4 c. whole wheat flour
1/8 c. rolled oats
1 tsp. baking powder
1/4 tsp. baking soda
1/4 c. applesauce 
1/4 c. water
2 tbsp. canola oil
1 tbsp. honey
1 egg
1/2 apple, peeled and minced
1/2 c. grated cheddar cheese

Instructions
1. Preheat the oven to 400 degrees and line 6 cups of a cupcake pan.
2. Combine and mix flours, oats, baking powder and baking soda.
3. In a separate bowl, mix water, oil, applesauce, honey and egg.Then add the apple and cheese.
4. Add the wet ingredients to the dry. Mix until just combined.
5. Fill the cupcake liners almost all the way full.
6. Bake for 15 to 20 minutes.
7. Cool on a baking rack.
8. Feed to the lucky pooch!

LinkWithin

Related Posts Plugin for WordPress, Blogger...