Pages

Monday, January 30, 2012

Peanut Butter Blossoms


These are a perfect Valentines treat. You could make them for a special someone. If you don't have a special someone, a chocolate peanut butter kiss is better than no kisses! The Valentines Day packaging on the Hershey's Kisses got my mind on Valentines, but these are perfect for anytime too.


They were ridiculously easy to make. I compiled various recipes and came up with this. Some of the recipes I came across had even fewer ingredients, but the reviews on them were mixed. Be generous with the peanut butter. The texture was almost like eating a spoonful (without the feeling of not being able to breathe or swallow for a minute) of peanut butter and moist. If you over cook them, I would guess they would loose that moist gooey texture.


A quick tip I came along was to place the unwrapped kisses in the freezer. This way the kisses do not completely lose their shape, when you put them on the cookies.


Yields: 2 dozen
Ingredients:
1/4 cup unsalted butter, softened
1/4 cup white sugar
1/4 cup light brown sugar
1/4 cup, heaping, peanut butter
1 large egg
3/4 teaspoon vanilla
3/4 cup plus 2 tablespoons all-purpose flour
1/2 teaspoon baking soda
1/4 teaspoon salt
24 Hershey's Kisses

Instructions:

  1. Preheat oven to 375F
  2. In a stand mixer, cream the butter, sugar, brown sugar and peanut butter. Add the egg and vanilla, mixing to combine and scraping down the sides. 
  3. In a bowl, mix together the flour, baking soda and salt and add to the peanut butter mixture. Mix until just combined.
  4. Using a tablespoon, roll the dough into 1 inch balls and place two inches apart on an ungreased cookie sheet. Bake for 8 to 10 minutes. 
  5. Remove from the oven and gently press a kiss on top of each cookie. Remove the cookies from baking sheet to a rack to cool.


Garlic Mashed Red Potatoes


I was making a chicken dish for dinner the other night and wanted to have some sort of potato to go with it.  I've made a garlic mashed red potatoes recipe before and they didn't turn out bad, but they also weren't great.  So, I found a new recipe this time that had a trick in it that made these potatoes turn out so good; throw the cloves of garlic in the water to let them soften with the potatoes.  Genius!  Instead of ending up with little minced garlic pieces throughout the potatoes it gets mashed right in, creating an evenly distributed garlic goodness.  You'll find plenty of flavor in these bad boys that you won't even need to add gravy or extra butter.

Ingredients
  • 8 medium red potatoes, quartered (not peeled)
  • 3 cloves of garlic, peeled
  • 3 tablespoons butter
  • 1/2 cup skim milk, warmed
  • 1/2 teaspoon salt
  • About 1/4 cup grated parmesan cheese
Directions
  1. Put quartered potatoes and peeled garlic in a large pan filled with water.  Bring to a boil.
  2. Reduce heat, cover, and let simmer for about 20 minutes or until re potatoes are tender.
  3. Remove from heat and drain water from potatoes and garlic.
  4. Add butter, warmed milk, and salt to pan.  Mash together.
  5. Stir in grated parmesan cheese.  Enjoy!
Recipe adapted from AllRecipes.


Thursday, January 26, 2012

Mexican Macaroni and Cheese


I have been craving cheese like no ones business lately. Maybe I am just getting excited for cheese club to start in a couple of weeks? Anyways, I had some jack cheese and cheddar in the fridge that needed to be used up. In addition I had a jar of jalapeno slices in the cupboard. The combination of those ingredients inspired me to do a macaroni and cheese with a Mexican flair.


I decided to put the jalapenos in the topping because I don't care for things mixed in with the cheese and noodles. A good breadcrumb topping can make or break macaroni and cheese, but I still like to get creative with it sometimes. If you don't mind additions to the cheese and noodles, go ahead and add the jalapenos to the cheese sauce. A quick tip on telling when the milk has thickened to the right point. Using a spoon, run your finger in a line down the back and if it holds the line it is ready.

Ingredients:
1 pound pasta (penne, rigatoni, spirals, fusilli etc.)
Salt
Pepper
4 tablespoons unsalted butter
4 tablespoons flour
2 cups skim milk
1/2 cup heavy cream
2 cups (6 ounces) monetary jack cheese, grated
1 cup (4 ounces) sharp cheddar cheese, plus some for the topping, grated
4 slices of whole wheat bread
1 teaspoon dried oregano
1/4 teaspoon ground cumin
1/2 cup jalapeno slices


Instructions:
  1. Preheat oven to 400F. Bring a pot of water to a boil and cook the pasta to al dente (under cooked, about 2 minutes less than normal).
  2. In a food processor, combine the bread slices, oregano and cumin, pulsing to make crumbs. Add the jalapeno slices into the food processor, and pulse 4 times to give them a coarse chop and to combine. 
  3. In a medium pot heat 4 tablespoons of butter over medium heat and add 4 tablespoons of flour, whisking constantly until thickened and golden. Add both milks and increase heat to medium-high. Whisk until combined and small bubbles form around the edge, reducing heat to medium until thickened. 
  4. Add the jack cheese and cheddar, stirring until melted. Add the noodles stirring to combine. Pour the mixture into a baking dish and top with the bread crumb and cheese mixture. Place in the oven and cook until the top is melted and golden (about 10 minutes). Enjoy!

Tuesday, January 24, 2012

Farro Salad with Smoked Trout

I have a habit of stealing my mom's cooking magazines when I go home to visit. I have given in an gotten my own subscriptions now, except for Food and Wine. Flipping through, I came across several recipes that caught my eye. This was one of them! It is even better after it sits for awhile or even the next day.


This would make a wonderful recipe in the summer too, with fresh beets, greens and trout from the market! I made some small changes for things I didn't have. I only had fresh rosemary, if you don't I would suggest using 1/4 teaspoon dried. I increased the number of beets, because I love them! This would also be good with some goat cheese mixed in, but I did not have any on hand. Don't be daunted by how long the ingredient list looks, it is very easy to make. The active cooking time was about 20 to 30 minutes. If you make it ahead for guests, don't add the greens or trout until or they may become too moist.


Adapted from Food and Wine
Ingredients:
3-5 small beets, rinsed
2 garlic cloves, crushed
2 thyme springs or 1/2 teaspoon dried
1 rosemary spring or 1/4 teaspoon dried
Kosher salt
4 cups water
1 1/2 cups semi-pearled farro (8 ounces)
1/2 small red onion or 1 large shallot
Juice of 1 lemon
1 tablespoon honey
1/4 cup olive oil
Freshly ground pepper
8 ounces skinless smoked trout fillet, flaked
1/2 pound beet greens, swiss chard, arugula or spinach (1 cup)

Instructions:
  1. Preheat the oven to 375F. Placing the beets on a long sheet of tinfoil, drizzle the beets with olive oil, salt and pepper and wrap them up to make a packet. Put the tinfoil packet on the oven rack, cooking for an hour to an hour and half or until fork tender.
  2. While the beets cook, in a medium saucepan, combine the garlic, thyme, rosemary and 1 1/2 teaspoons kosher salt (if using table salt, use less), and bring it to a boil. Add the farro and reduce to a simmer over medium heat until tender, about 15 to 20 minutes. Drain well and discard the garlic and herb stems. Let cool to room temperature. 
  3. In a small bowl, combine the onion, lemon juice and honey. Gradually whisk in the 1/4 cup olive oil and season with salt and pepper.
  4. In serving bowl, combine the farro, beets, trout and greens, tossing to combine. Season with salt and pepper. If you let it sit for awhile, the flavors start to develop more. Enjoy!


Banana-Pecan Bread


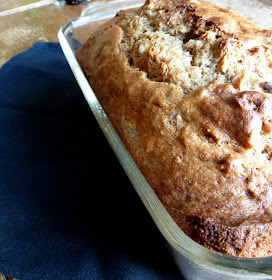
Spring semester started yesterday, so last night I decided what better way to celebrate the start of a new semester before all of my time is consumed with reading about Spanish phonetics and political philosophers, than by baking!  I have a break in between my morning classes so I stopped by a grocery store on campus to pick up those pecans that I had previously forgotten so that I could finally get around to baking the banana-pecan bread that I had hoped to bake this weekend.  

This recipe comes from Ellie Krieger's cookbook Comfort Food Fix which I received as a Christmas present this year.  She takes the recipes of many foods that people may consider "comfort foods" and makes changes to them so that they still keep their delicious flavor and give you that "fix", but do so in a healthier way.  My favorite part is that she provides you with nutritional information for before and after the changes are made.  This goes perfectly with my plan of eating healthier this year!  This was the first real recipe I made from this cookbook (whole wheat bread crumbs don't count) and it turned out delicious.  You can count on there being many more to come.


Ingredients
  • 1/3 cup pecan pieces
  • 3/4 cups all-purpose flour
  • 1 cup whole wheat flour
  • 1/4 cup sugar
  • 1/4 cup brown sugar
  • 1 teaspoon baking soda
  • 1/2 teaspoon baking powder
  • 1/4 teaspoon salt
  • 1/4 cup canola oil
  • 1/4 cup plain nonfat yogurt
  • 2 large eggs
  • 1 teaspoon vanilla extract
  • 3 (or about 1 1/2 cups) very ripe bananas
Directions
  1. Preheat oven to 350 degrees.
  2. Peel and mash bananas in a small bowl.  Set aside.
  3. Spread pecan pieces out evenly on a baking sheet and toast in the oven for about 8 minutes, or until they are fragrant.  Set aside.
  4. Whisk all dry ingredients (flours, sugars, baking soda, baking powder, and salt) together in a large bowl.  Set aside.
  5. Whisk together wet ingredients except for bananas (oil, yogurt, eggs, and vanilla) in a medium bowl.
  6. Add the mashed bananas to medium bowl and whisk.
  7. Combine dry and wet ingredients together and stir until combined.
  8. Stir in toasted pecan pieces.
  9. Pour batter into a greased 9x5 inch bread pan.
  10. Bake for 50-55 minutes.  Let cool in pan for 15 minutes and then remove bread from pan and continue cooling.
Recipe from Comfort Food Fix by Ellie Krieger


Saturday, January 21, 2012

Roasted Tomatillo-Serrano Salsa

My love affair with Rick Bayless continues! I made this to go along with homemade quesadillas, yummy. You can find everything in a regular grocery store and the process is very simple. In total, thirty minutes are spent actively cooking.


Tomatillos are a pale yellow to green fruit, covered in a papery lantern like husk. They are not green tomatoes though. Tomatillos are more tangy and citrusy than a green tomato. Make sure to pick ones that have grown fully into their husk. When you peel off the husk, rinse the sticky coating off that can sometime make them hard to peel.


The recpie asks you to rinse the chopped onion under cold water. This may seem silly, but is really worth it. When you give the chopped onions a rinse, the taste of onion does not overpower everything else like it sometimes can. I would suggest using this trick whenever you make salsa or guacamole. This salsa is also used in an amazing Tomatillo-Green Guacamole, recipe to come in the future!


Recipe courtesy of Rick Bayless
Ingredients:
1 pound (10-12 medium) tomatillos, husked and rinsed
1 to 3 fresh serrano chiles to taste
2 large garlic cloves, unpeeled
1 small white onion, finely chopped
1/4 cup roughly chopped cilantro
Salt, about 1 teaspoon
Sugar, about 1 scant teaspoon (if tomatillos are too acidic)
Instructions:
  1. Turn broiler to high. Place tomatillos on a baking sheet and place 4 inches below a very hot broiler. When the tomatillos blister, blacken and soften on one side, about 5 minutes, turn them over and roast the other side. Cool completely. Roast the chiles and garlic in a ungreased skillet over medium heat, turning occasionally, until blackened in spots and soft, 5 to 10 minutes for the chiles, about 15 minutes for the garlic. Cool, then pull the stems from the chiles and peel the garlic
  2. In a food processor or blender, add the roasted tomatillos, garlic and chiles (I used one and a half), pulsing until everything is reduced to a coarse puree. Scrape the salsa into a serving bowl, adding a 1/4 cup of water if it is too thick. You can complete all of these steps up to 2 days ahead of time.
  3. Right before you are ready to serve, scoop the onion into a strainer, rinse under cold water and shake off any excess water. Add the onion and cilantro to the salsa, seasoning to taste with salt and sugar.

Skinny Mini Buttermilk Scones with Dark Chocolate Chips


My second attempt at making scones was another success! My first time baking scones I made pumpkin chocolate chip scones and they were delicious. I wanted to make scones again but I wanted a healthier version, as it is a new year and who doesn't have some type of healthy-eating resolution?
Although, these scones are still a baked good and will never be as good as eating, say, fruit or yogurt for breakfast, they are made with whole wheat and less sugar than normal scones. Also, I made them mini so the portion size feels a little more guilt-free. With one mini scone, you get a sweet but small snack that can satisfy your craving without feeling like you have to jump back on the treadmill.


I have to say, I was a little nervous to make these scones. After all, people say scones are pretty hard to make. Plus, this was the first time I used whole wheat in a recipe. I was afraid they would not bake the same way or taste good, but I was wrong about both! It was still easy and they taste great! 

Skinny Buttermilk Scones
adapted from skinnytaste

Ingredients
3/4 c. cold buttermilk
1/4 c. sugar
2 tsp. vanilla extract
1 large egg
1 c. all purpose flour
1 c. whole wheat flour
1 Tbsp. baking powder
1/2 tsp. salt
3 Tbsp. frozen butter
3/4 c. dark chocolate chips*
1 large egg white
decorating sugar
*dark chocolate chips could be replaced with blueberries, cinnamon chips, etc.  

Instructions
1. Combine first four ingredients in medium bowl and stir with a whisk
2. Combine flours, baking powder, and salt in large bowl. Stir with whisk or fork
3. Add small pieces of frozen butter by cutting with a knife or (my favorite) by grating with a cheese grater. Gently toss
4. Add chocolate chips and gently mix
5. Add milk mixture and stir only until all is moist
6. Place dough on floured cookie sheet. Knead lightly four times with floured hands
7. Form dough into three circles, each 3/4 inch thick
8. Place in freezer for approximately 30 minutes
9. Remove from freezer. Preheat oven to 375 degrees. Using a knife, cut the circles like you would a pizza or pie to create 6 to 8 pieces
10. Place egg white (discarding yolk) in a small container. Brush egg white onto scones. Sprinkle on decorating sugar
11. Bake at 375 degrees for about 18-20 minutes or until tops are golden
12. Once cooled for about 10 to 15 minutes, they should pull apart easily
13. Enjoy!


Friday, January 20, 2012

Bartolotta Pasta


Yes, it has taken me considerably longer than my fellow Badger bloggers to complete my first post, but I have finally got around to it! I decided to start off with one of my favorite pastas: it's cheesy, fresh, and has a nice little spicy kick. Coming from an Italian family, pasta is a staple at my house, and is eaten at least once a week. If you are from the Milwaukee area, you probably have heard of the Bartollota name that is in the title of the pasta. This is because they own a line of Italian restaurants in Southeastern Wisconsin. And yes, my mom got the recipe from one of the Bartollota's in person! It is really easy to modify this one by using vegetables that are in season or just change ingredients to your own taste. I have to admit, I did not have all the necessary ingredients to make it this time, but the recipe has yet to fail me on always turning out delicious, no matter what is missing or what I add to it. The picture really doesn't do the recipe justice, but I promise you will love it.

Ingredients:

Extra virgin olive oil
3-4 cloves of garlic finely chopped
1-2 tsp. crushed red pepper flakes (depending on how spicy you like it)
16 oz. can of Italian seasoned diced tomatoes
3/4 cup water
Handful of fresh basil leaves: they can be whole or coarsely chopped (I didn't have this when I made it, so I used about a teaspoon of dried basil)
1 pound penne or rigitoni (I just used up the half-full boxes of pasta I already had sitting on my shelf...hey I'm a college student on a budget)
8 oz. block of mozzarella cheese cut into small cubes


Optional Ingredients (no need to add all of them! Choose your favorites. Today I used Italian sausage, yellow zucchini squash, half a green pepper, and a few mushrooms):


Your favorite Italian sausage (I have also used spinach chicken sausage or spicy Italian seasoned chicken sausage which were really yummy)
Zucchini
Yellow Zucchini Squash
Eggplant
Green, yellow, and/or red peppers
Mushrooms
Spinach
Be creative! Add whatever you would like!


Start a large pot of water on high heat to boil the pasta before getting started on the sauce. (Don't forget to season the water with salt!) I also always make sure all of my veggies are chopped and ready to go before I start cooking. Way less stressful that way. Coat the bottom of a large saucepan with olive oil and put on medium heat. If you are using sausage, brown before adding the garlic and red pepper flakes. Saute the garlic and red pepper flakes only for about 1 minute. Add your vegetables and let them saute with the garlic for a a minute or two. Add the can of diced tomatoes and water. I usually just fill the empty tomato can 3/4 full of water to get the tomato remnants out of the can instead of measuring out the water. Put your fresh (or dried) basil in the sauce and let it simmer uncovered until your pasta is ready.


I would recommend under-cooking your pasta just a little bit for this recipe, just because adding a hot liquidy sauce continues to cook the pasta after the dish is complete. In a large mixing bowl or serving dish, pour your pasta and the contents of the saucepan and mix.  I discovered from experience to not add your cubed mozzarella to the large mixing bowl, because it tends to melt and dissolve to almost a soupy consistency. I like to add a few cubes of cheese to each serving. Let the cheese melt, sprinkle with some fresh Parmigiano-Reggiano, garnish with fresh basil, and indulge!


I forgot to mention: the leftovers are AMAZING! I always make some extra to be sure I will have a plate left-over for the next day. I would almost choose the pasta a day old over fresh! Just mix the remaining cubes of mozzarella to the your leftovers dish and zap in the microwave for a minute and half and it is heaven! Hopefully it won't take me half a year to put up my next blog post.

Whole Wheat Beer Bread


I had the complete intention of baking a loaf of banana pecan bread today since I have a couple of spoiled bananas.  The problem is though, when I stopped at the grocery store yesterday I accidentally bought almonds instead of pecans.  What was I thinking?!  The banana pecan bread will have to wait a couple of days now, because instead I got my bread fix by making a loaf of whole wheat beer bread.

Ideally I would have been making a loaf of beer bread this weekend to enjoy while watching the Packers game, but since they lost last week that obviously will not be happening.  Since I had all of the ingredients anyways I figured I should make a loaf on this Wisconsin evening where the high temperature is in the single digits and wind chills are below zero!  I'll take any excuse to turn on the oven and add a little extra heat to our apartment.

The bread ended up being super easy to make and took less than 10 minutes to prepare.  It comes out to be rather dense and filling so I'd suggest thin slices with a little added butter.  I'm sure this bread would go great with soup or another dish but I just ate it as a snack.  Enjoy!

Ingredients
  • 1 1/2 cups all-purpose flour
  • 1 1/2 cups whole wheat flour
  • 4 1/2 teaspoons baking powder
  • 1 1/2 teaspoons salt
  • 1/3 cup brown sugar
  • 1 12 oz can of beer
  • 1/4 cup (or less if desired) melted butter

Directions
  1. Preheat oven to 350 degrees.  Lightly grease a 9x5 in bread pan.
  2. Combine all dry ingredients in a large mixing bowl and mix together.
  3. Add beer and stir until all dry ingredients are absorbed into dough.
  4. Pour dough into bread pan.
  5. Bake in oven for about 50 minutes or until a toothpick inserted into the center of the loaf comes out clean.
Recipe slightly adapted from AllRecipes


Hot Beef Sandwiches Au Jus


I know what you're thinking, where's the sandwich? When my boyfriend and I were planning this meal, we decided to minus the bun to be a bit healthier. Plus, then nothing could take away from the flavor and tenderness this meat got! It was perfect plain or dipped in the heart cup full of jus. 
[sidenote: yup, it is just jus. My cookbook taught me the yummy juice is just called jus. Au jus means "with the juice."]
This was the first time I made this. Also, this was the first recipe I made from my new slow cooker cookbook I got for Christmas from my roommate, Tonia. Thanks again! I'll definitely make this hot beef recipe again. But not for awhile because I froze two containers of it. This recipe makes a lot! 

Hot Beef Sandwiches Au Jus

Ingredients
4 lbs beef rump roast
2 envelopes (1 oz each) dried onion soup mix (I used Lipton)
2 tsp. sugar
1 tsp. dried oregano
1 Tbsp. minced garlic
2 cans  (101/5 oz. each) beef broth
1 can beer

Instructions
1. Trim fat from beef and discard. Place in slow cooker
2. Combine soup mix, sugar, oregano, garlic, broth, and beer in large mixing bowl
3. Pour mixture over beef
4. Cover and cook on high for 6 to 8 hours or until beef is tender
[Every once in awhile, I flipped the roast over but this is not needed - you can leave it alone for the whole cook time if you want]
5. Remove beef from slow cooker. Shred beef with two forks. Return to slow cooker and mix well
6. Serve on rolls or alone with extra jus on the side for dipping
7. Enjoy!
p.s click on RecipeLion Blog hop button and vote for my blog post!

Thursday, January 19, 2012

Sun-Dried Tomato and Goat Cheese Pasta


Earlier today I was looking through some old recipes that I had saved and I came across this recipe for rigatoni with sun-dried tomatoes and goat cheese.  Being a member of the Badger Cheese Club with my fellow blogger, April, goat cheese has definitely become one of my favorites so I decided to adapt the recipe I found and try to make it a little bit healthier.

I learned something from cooking this meal, and that is I do not really care for sun-dried tomatoes.  The pasta is still very good though.  The red pepper flakes give the pasta a nice little kick, while the sun-dried tomatoes balance it with sweetness.  The pasta is topped with homemade whole wheat bread crumbs that add some crunch to the creamy pasta.  If I make this recipe again, I will add a little more pasta as the sauce was a little too dense for my taste, but some people may like it that way.


Whole Wheat Bread Crumbs

Ingredients
  • 4 slices whole wheat bread
Directions
  1. Preheat oven to 350 degrees.
  2. Put bread slices into a food processor and run for about 25 seconds so that crumbs are fine.
  3. Spread crumbs onto a baking sheet evenly and cook for about 10 minutes.  Bread crumbs should be golden brown.
(Store unused bread crumbs for future use.)
Recipe from Comfort Food Fix by Ellie Krieger

Sun-Dried Tomato and Goat Cheese Pasta

Ingredients
  • 8 ounces whole wheat penne noodles
  • 1/3 cup whole wheat bread crumbs
  • 4 tablespoons olive oil
  • 1/8 teaspoon pepper
  • 1 clove garlic, minced
  • 1/4 teaspoon red pepper flakes
  • 1/4 cup sun-dried tomatoes, cut into strips
  • 1 cup skim milk
  • 4 teaspoons corn starch
  • 1/8 teaspoon nutmeg
  • 4 ounces goat cheese
  • Salt to taste
Directions
  1. Preheat oven to 400 degrees.
  2. Prepare whole wheat noodles according to package directions.
  3. In a small bowl, mix whole wheat bread crumbs, 2 tablespoons of olive oil, and pepper.  Set aside.
  4. In a separate small bowl, whisk together skim milk and corn starch.  Set aside.
  5. Heat 2 tablespoons olive oil over medium heat in a large saucepan.
  6. Add garlic, red pepper flakes, and sun-dried tomatoes.  Stir for 1 minute.
  7. Add milk mixture and nutmeg.  Let simmer for 2 minutes.
  8. Toss in cooked noodles and goat cheese.  Add salt to taste.
  9. Spread noodle mixture in a baking dish.  Sprinkle bread crumb mixture on top.
  10. Bake in the oven for 10 minutes.  Serve and enjoy!


Tuesday, January 17, 2012

Quick Sourdough Baguettes


Another recipe that was a staple in my house growing up. It is amazingly easy and quick. Unlike normal bread making, the measurements don't have to be perfect. My moms turns out wonderfully every time, and believe me she roughly measures everything.


I make this in a bread machine. Never bake your bread in one though, that is my philosophy anyways. The bread machine mixes it all up for you and provides the perfect conditions to rise in. Make sure you select the dough setting. I have found out why it wasn't rising the hard way, no fun. In its first few minutes of mixing, if it looks to dry or wet add more water or flour.


I have never tried it, but I am sure it would work just as well in a stand mixer with a dough hook. You would let it rise, covered with a damp towel, in a warm place. I find that a good place is in the oven, when it is off, with the oven light on. Let it rise for about an hour to an hour and a half. During baking, a pan with water in the oven during baking creates steam. The steam keeps the outside of the bread moist, allowing it to rise more in the first few minutes of baking. It makes a world of difference.

Ingredients:
1 1/4 cups warm water (microwave for 75 seconds)
1 tablespoon yeast
1 teaspoon sugar
1 tablespoon olive oil
3 overflowing/mounded cups of bread flour
1 teaspoon salt

Instructions:
  1. Combine ingredients in the order listed in a bread machine. Using your bread machines "dough" setting, mix and let the bread rise.
  2. Preheat oven to 500F, with a small pan or ramekin with water on the bottom shelf. Remove dough from bread machine, onto a floured surface. Divide the dough into half and shape into two long cylinders. Place on a greased baking sheet or baguette pan, letting them rise until oven is heated. Bake for 15 minutes or golden. Let rest for 10 minutes before cutting.