Pages

Tuesday, February 28, 2012

Tuna Noodle Casserole


Tuna noodle casserole was one of those meals that was in the regular rotation growing up.  It came up quite frequently during the Lenten season.  The only fish our family ever ate was canned tuna, so Fridays usually alternated between cheese pizza and tuna noodle casserole. (I'm doing my best now to try different kinds of fish and seafood!)

I decided to make this on Ash Wednesday so that I would have leftovers to enjoy on Friday as well.    Mom never really used exact measurements when making this dish, so those I've listed are estimates, feel free to use more or less.  Personally, my favorite part is when you get a piece of green olive in a bite, so I like to add lots of those!


Ingredients

  • 1 (12 oz) package whole wheat egg noodles
  • 2 (5 oz) cans tuna (or 1 large can)
  • 1 can cream of mushroom soup
  • 1/4 cup milk
  • 3/4 cup frozen peas
  • 1/4 cup green olives, quartered
  • 1/2 cup mozzarella cheese
  • 1/4 teaspoon salt
  • 1/4 teaspoon pepper
  • Whole wheat bread crumbs
Directions
  1. Prepare noodles according to directions on package.
  2. Preheat oven to 350 degrees.
  3. In a casserole dish (or 9x13 inch Pyrex dish like I use since I don't have a casserole dish) mix together all ingredients except for whole wheat bread crumbs.
  4. Sprinkle bread crumbs over top of dish.
  5. Cook for about 30 minutes, or until dish is warm throughout.

Tuesday, February 21, 2012

Classic White Cupcakes


There was no special occasion for these cupcakes. Everyone thought I was crazy when I told them my only reason for making them was so I could test out my piping set that I got for Christmas (thank you again, parents!). This was the first time I ever piped frosting. It was an adventure. It was fun but also frustrating. I'm sure it will only get easier as I continue to practice.


This was also (surprisingly) the first time I have made cupcakes and frosting from scratch. I enjoyed it so much more than buying a boxed mix and a tub of frosting. I recommend everyone should try it sometime!

White Cupcakes
recipe from Betty Crocker's The Big Book of Cupcakes

Ingredients
2 3/4 c. flour
3 tsp. baking powder
1/2 tsp/ salt
1 2/3 c. sugar
5 egg whites
2 1/2 tsp. vanilla extract
1 1/4 c. milk
3/4 c. shortening or butter (I did 1:1 shortening and butter to total 3/4c.)

Instructions
1. Preheat oven to 350 degrees. Place 24 paper baking cups in a regular-sized muffin pan(s). This recipe yields 24 cupcakes.
2. In a medium bowl, mix flour, baking powder and salt. Set aside.
3. In a large bowl, beat shortening/butter on medium speed for 30 seconds. Gradually add sugar, beating well after each addition.
4. Add egg whites, one at a time and beat well.
5. Beat in vanilla extract.
6. On a low speed, alternately beat in the flour mixture and milk (adding increments of approximately 1/3c. each time).
7. Divide batter evenly between muffin cups, filling about 2/3 full (I found I had more batter left over if I filled them 2/3 full so I filled them closer to the top).
Note: If you only have one 12-cup muffin pan, allow the pan to cool before filling with the batter and cooking the second round.
8. Bake 18 to 20 minutes. Let cool in the pan for 5 minutes and then transfer to a cooling rack.
9. Enjoy now or frost with the buttercream recipe below when completely cooled.


Chocolate Buttercream Frosting
adapted from Savory Sweet Life

Ingredients
1 c. butter (2 sticks), softened
3 1/2 c. powdered sugar (I used 1/2 c. in addition to thicken)
1/2 c. cocoa powder
1/2 tsp. salt
2 tsp. vanilla extract
4 Tbs. milk
If piping, 1 small spoonful shortening (this will help the frosting maintain shape)

Instructions
1. Cream butter for a few minutes with a hand mixer.
2. Slowly add cocoa powder and powdered sugar until well blended.
3. Add vanilla extract and salt and mix.
4. Slowly add milk and beat for another 3 minutes.
Notes: if the frosting is too thin, add more sugar; if it is too thick, add more milk. The frosting can be refrigerated for a couple of days but allow it to get to room temperature before frosting cakes, cupcakes, etc. 


Sunday, February 19, 2012

Salted Caramels


The first theme for Cheese Club this semester was cheese and chocolate pairings. I saw this as the perfect opportunity to share some of my kitchen creations with a big group of people. They were a huge hit and paired wonderfully with the cheeses. The consensus was that these paired best with the Spanish Mahon compared to the other two cheeses we had.


Caramels are surprisingly easy to make and if you mess up it is not a big deal, just start over. The ingredients are inexpensive and the process isn't complicated or overly time consuming. The most important thing is to not cook them beyond 248F. I would suggest removing the caramel for the heat right before it hits the 248F mark, to be safe.


An alternative method is the cold water test. Prepare a small glass of ice water and as the caramel is about ready, drip a small amount into the cold water. You do not need to let it sit in the cold water for long, reach in and give it a taste for texture.


The caramels are wonderful without chocolate too. I dipped them into chocolate for Cheese Club, but it is tedious work. I got bored and started to dip just the tops or half of the caramels. You could always drizzle chocolate over them too. Have fun with it and get creative!


Ingredients:
1 cup heavy cream
5 tablespoons unsalted butter
3/4 teaspoon french grey sea salt or fleur de sel
1 1/2 cups granulated white sugar
1/4 cup light corn syrup
1/4 cup water
1 bag chocolate morsels (optional)
Instructions:

  1. Spray a 8-inch baking pan with cooking spray and then line with parchment paper. 
  2. Combine the cream, butter and salt in a small saucepan over medium heat. Bring the mixture to a low boil and then remove from the heat, setting aside.
  3. In a 3-quart saucepan, boil the sugar, corn syrup and water, over medium heat, stirring until the sugar is dissolved. Continue to boil, without stirring but gently swirling the pan, until the mixture is a light golden to amber color.
  4. Attach a candy thermometer to the pan. Carefully add the cream mixture (it will bubble up) and simmer, over medium-low heat, until the temperature just reaches 248F. DO NOT let it go beyond that or you will get very hard caramels. It will take 10-15 minutes. Pour into prepared pan and cool for 2 hours. If you want to add salt to the tops, wait for them to cool slightly or the salt will dissolve.
  5. Once cooled, cut them into the desired size, wrapping them in parchment or wax paper. If keeping them for yourself, its not worth the fuss, just store them in an airtight container. 

Covering them in chocolate:
  1. Using the double boiler method, place a glass or metal bowl with your chocolate, over a pan 1/4 to 1/2 full with simmering water. Allow the chocolate to melt, stirring occasionally. I chose this over the microwave because I can keep the chocolate warm. While the chocolate melts, prepare a baking sheet with parchment paper for the finished chocolate covered caramels.
  2. Once the chocolate is melted, dip them one by one into the chocolate, using a fork. Make sure to tap the fork on the edge of the bowl to remove excess chocolate. If you want to add salt to the tops, let them cool slightly first. Let the chocolate set up completely and then store in an airtight container.

Thursday, February 16, 2012

Butterscotch Pudding

There is a restaurant in Madison, that makes the best budino di caramello or butterscotch pudding. Go figure my favorite desert in Madison, is from a Italian restaurant, Osteria Papavero. I am seriously obsessed with it. I am constantly talking about and decided I should learn to make it on my own.  I came across this recipe from a friend, who also loves their pudding. She told me this was the closest one she had found to Osteria's pudding. Wow, was she right!


If you do not think you like butterscotch, try this. I claim to dislike butterscotch, but I guess this is an exception. My roommate had the same feelings. She loved it. It is rich and creamy, with no overwhelming butterscotch flavor.


I added  extra scotch to the pudding, it was by accident but turned out with the right flavor. Other recipes I looked at used straight whiskey, if you don't have scotch. The next time I make it, I am going to try adding less sugar. I also wanted to use vanilla beans in place of the vanilla extract. Turns out I didn't have any vanilla beans. The vanilla extract does the same job, but I think the flecks of vanilla make it look pretty. None the less, I am very happy with how this turned out.


Don't be daunted by making homemade pudding, it is easy. If you won't take my word for it, you have plenty of liquid courage on hand. You have to make sure the scotch is good too, right? Enjoy!

Adapted from Emeril Lagasse
Ingredients:
2 cups heavy cream
1 cup whole milk
1 cup dark brown sugar
1/2 teaspoon salt
3 large egg yolks
3 tablespoons cornstarch
3 tablespoons unsalted butter
1 tablespoon scotch whiskey
1 teaspoon vanilla extract

Instructions:
  1. In a medium sauce pan, combine the cream, milk, dark brown sugar and salt, and bring to a gentle boil over medium heat (just until it starts to bubble in the center of the pan), whisking to dissolve the sugar.
  2. In a medium bowl combine the egg yolks and cornstarch, whisking until well combined and pale yellow.
  3. Slowly add 1/2 cup of the hot cream mixture to the eggs, whisking constantly (try pouring it down the side of the bowl instead of into the middle, if you are concerned the eggs will become chunky). Gradually add the egg mixture into the remaining hot cream, whisking to combine.
  4. Return the sauce pan to medium heat. Bring the mixture to a simmer, stirring constantly with a wooden spoon, for 4 to 5 minutes (the consistency of the pudding, after being removed from the heat is the same as after being chilled). Remove from the heat, adding the butter, scotch and vanilla, stirring until the butter is melted.
  5. Pour the pudding through a fine mesh strainer, into a clean bowl. Spoon into 4 decorative bowls or glasses and cover each with plastic wrap, pressing into the pudding to prevent a skin from forming. Refrigerate for 3 hours, if you can't wait that long it is just as good still warm!

Tuesday, February 14, 2012

Lasagna Soup


I was meandering around on Pinterest the other day and came across this recipe for lasagna soup.  I'm a little bit intimidated by the idea of making a soup because I don't really love soup so I've never wanted to spend the time to make it if I'm not going to really enjoy it.  This appeared to be more of a mix between a soup and a casserole though so I was sold.


It ended up being very easy to make as well as very delicious.  I used an extra half a cup of noodles than what the original recipe called for, but if you do prefer it to be more soupy, then use the original 2 and a half cups or less.  The great thing about this recipe is that you cook everything from start to finish in the same pot so it's a pretty easy clean up!


Ingredients
  • 1 lb lean ground beef (90% lean)
  • 1 large green pepper, chopped
  • 1 medium onion, chopped
  • 2 garlic cloves, minced
  • 2 cans (14.5 ounces each) reduced-sodium beef broth
  • 2 cans (14.5 ounces each) diced tomatoes
  • 1 can (8 ounces) tomato sauce
  • 1 cup frozen corn
  • 1/4 cup tomato paste
  • 2 teaspoons Italian seasoning
  • 1/4 teaspoon pepper
  • 3 cups whole wheat uncooked spiral pasta
  • Shredded Parmesan cheese
Directions
  1. In a large saucepan, cook the beef, green pepper and onion over medium heat until meat is no longer pink.
  2. Add garlic and cook for another minute.  Drain.
  3. Stir in beef brother, diced tomatoes, tomato sauce, corn, tomato paste, Italian seasoning and pepper.  Bring to a boil.
  4. Stir in pasta.  Return to a boil.
  5. Reduce heat, cover and simmer for 10-12 minutes, or until pasta is tender.
  6. Sprinkle Parmesan cheese on top as desired.
Recipe adapted from  Taste of Home


Shrimp Curry with Potatoes and Cauliflower


I struggled making this dish, none the less it turned out splendidly. I had nothing prepped resulting in some timing issues. None the less, it got Ladders, my roommate, seal of approval even with all my cursing at the food! I take it as a huge compliment when she tries something, she thinks she may not like and I prove her wrong. I have the affect in the kitchen. I had made curry once before and I didn't like it, but curry always sounds so scrumptious. This turned out to be a keeper, for both Ladders and I.


This dish should take you about 30 minutes, 40 minutes, if you are slow like me to make. I used Penzey's sweet curry powder and decided to give it a little heat with red pepper flakes. I like this curry too because it does not use coconut milk, something I don't use often unlike yogurt. You can substitute the shrimp with tofu or chicken. This was an insanely easy weeknight meal served with brown rice. There is a lot of flexibility with the recipe too, enjoy!


Ingredients:
1/2 pound extra-large shrimp
Salt and ground black pepper
2 tablespoons olive oil
1 onion, diced
1 tablespoon freshly grated ginger
4 garlic cloves, minced or grated
1/4 teaspoon red pepper flakes (depending on the curry you use)
1 1/2 cups low sodium chicken broth
1 tablespoon cornstarch
1/2 pound red potatoes, cut into 1/2-inch chunks
1/2 a head of cauliflower florets (2 cups)
1/2 cup frozen peas
1/2 cup non-fat plain Greek yogurt
1/4 cup minced fresh cilantro (optional)

Instructions:

  1. Season the shrimp with salt and pepper. Heat 1 tablespoon of oil in a medium pot or 12-inch non-stick skillet, with a lid, over medium heat. Add the shrimp and cook on each side for 2 minutes. Transfer the shrimp to a clean bowl and set aside.
  2. Add the remaining tablespoon of oil to the pot, heating over medium heat. Add the onion, curry powder, and 1/2 teaspoon salt and cook until softened, about 5 minutes. Stir in garlic and ginger and cook, 30 seconds.
  3. In a small bowl or measuring cup, whisk the chicken broth and cornstarch together to dissolve the cornstarch. Add the mixture to the pot. Add potatoes and cauliflower. Reduce heat to medium-low, cover, and cook until the vegetables are tender, 7 to 10 minutes. 
  4. Add the shrimp and peas to the pot, returning it to a brief simmer. Remove from the heat and stir in yogurt and cilantro. Season with slat and pepper to taste. Enjoy!


Sunday, February 12, 2012

Overnight Cinnamon Rolls


This year for Valentine's day, my boyfriend and I decided we weren't going to exchange gifts. However, I didn't want to do absolutely nothing. So, I made him heart shaped cinnamon rolls. This was the first time I made them and they turned out delicious! My boyfriend approved (so did my roommates!). The recipe is a bit time consuming but worth every minute of the prep time. 


So, if you still need an idea for that special someone, try making these! They are perfect for a Valentine's day breakfast. Plus, your sweetie will know they were made with love.


Overnight Cinnamon Rolls
adapted from Alton Brown's recipe

Ingredients
dough:
4 large egg yolks, room temperature
1 large whole egg, room temperature
1/4 c. sugar
6 Tbs. butter, melted
6 oz. buttermilk, room temperature
4 c. flour
1 package instant dry yeast (approximately 2 1/4 tsp.)
1 1/4 tsp. salt
filling:
1 c. brown sugar
1 1/2 Tbs. ground cinnamon
pinch of salt
1 1/2 Tbs. butter, melted
icing:
2 1/2 oz. softened cream cheese
3 Tbs. milk
1 1/2 c. powdered sugar
1 tsp. vanilla extract

Instructions
Day 1
1. In a bowl, whisk the egg yolks, whole egg, sugar, butter, and buttermilk. Make sure all these ingredients are at room temperature.
2. Add about 2 cups of the flour and the yeast packet. Whisk until moistened. Let it rest for a few minutes and then add the salt.
3. Add 1 1/4 cups flour and knead with a dough hook or hands. Continuously add the rest of the flour and knead until the dough is not sticky but moist and soft. If the kneading is done by hand, knead the dough for about 5 to 10 minutes more.
4. Lightly oil a large bowl and place the dough in it. Cover and let it double in volume. This should take about 2 hours.
5. Prepare the filling by combining the brown sugar, cinnamon, and salt in a medium bowl. Mix well.
6. After the dough has doubled in volume, turn the dough out on a lightly floured work surface or cookie sheet.
7. Shape the dough into a 18 x 12 inch rectangle with the longest side to you.
8. Brush the dough with the melted butter and sprinkle the cinnamon mixture over it. Gently press into the dough.
9. Roll each long end into each other and pinch the seam to seal the roll.
10. Gently squeeze the cylinder to an even thickness.
11. Using a serrated knife, slice the cylinder into 1 1/2 inch rolls, yielding 12 rolls.
12. Shape each roll into a heart and place into a buttered 9 x 13 inch glass baking dish.
13. Cover the dish tightly with plastic wrap and store in the refrigerator overnight, for up to 16 hours.
Day 2
1. Remove the rolls from the refrigerator and place in an oven that is turned off.
2. Fill a pan 2/3 full of boiling water and place just beneath the rolls. Close the oven door and let the rolls rise until they become slightly puffy (this will take about 20 to 30 minutes).
3. Take the rolls and water out of the oven and preheat it to 350 degrees.
4. Cook the rolls on the middle rack for about 20 minutes.
5. As the rolls are baking, make the icing by whisking the softened cream cheese in a bowl until creamy.
6. Mix in the milk and vanilla extract.
7. Add the powdered sugar slowly and mix well.
8. Drizzle the icing over the warm rolls
9. Enjoy!

Saturday, February 11, 2012

Drunken Pinto Beans


I made this for the family during the Super Bowl along with tacos. They were a huge hit; everyone was fighting over them! The first time I made them I used fresh serrano chiles instead of jarred jalapenos, but both ways tasted wonderful. Using the jarred jalapenos, makes this an even faster and easy side dish. You can really control the heat in this too by adding as many jalapenos as you like or not taking the seeds out of the serrano.


This is just a simply delicious and flavorful side. It takes about 20 minutes in total. The addition of water adds body to the over all texture of the dish. The water also helps to get all the yummy caramelized bits from the bottom of the pan. If you don't like tequila, no fears the end product is not like drinking or smelling tequila. I love tequila in any form, so it is not a problem for me!

Serves 4
Adapted from Ricky Bayless
Ingredients:
8 slices of bacon, cut into 1/4 inch pieces
1 small white onion, chopped
1/4 cup canned jalapeno slices chopped or 1-2 serrano chiles sliced
1/2 teaspoon oregano
2 garlic cloves, minced
2x 16 ounce cans pinto beans
1/2 cup water
1-2 tablespoons tequila
Instructions:

  1. In a medium sized skillet, fry the bacon, until crisp, about 10 minutes.With a slotted spoon, remove the bacon, leaving 2 tablespoons of the drippings. Over medium heat, fry the onion, jalapenos and oregano until deep golden brown, about 10 minutes. In the last 2 minutes of frying, add the minced garlic. 
  2. Add the beans into the skillet and 1/2 cup water. Simmer over low heat until most all the liquid is evaporated and the beans are heated through. Remove from heat and season with salt and stir in the tequila. Serve in bowls topped with the crumbled bacon.


Wednesday, February 8, 2012

Pasta e Fagioli


Want Olive Garden at home? This recipe does the trick! One day, I was really craving Olive Garden's pasta e fagioli. It is a soup that is similar to chili, but without the chili powder. It is my favorite soup that they serve and it is quite filling. I only need to order this soup and salad (of course I eat the bread sticks, too) and I am stuffed! However, being on a college budget and schedule, I didn't want to spend the money or time going to Olive Garden. So, to satisfy my craving, I went to the internet to scoop out the best mimic Olive Garden pasta e fagioli. After reading reviews of a bunch of recipes, I finally found one that people said tastes like the soup I was so desperately wanting. After that, and running to the grocery store for a few items, I was on my way transforming my apartment into Olive Garden. My boyfriend was pretty excited, as he was invited to share the meal (and we still had a bunch of leftovers).

Few notes about this recipe, if there is something you don't care for, leave it out! There are so many flavors and spices that if you take one or two things out, it will still be flavorful and delicious! As a matter of fact, I accidentally forgot to add celery (even though I had it out and ready to cut up), but it didn't taste like anything was missing. Also, as you can see in the pictures, it is best with a sprinkle of cheese. I only had mild cheddar but parmesan would be great, too. Finally, I suggest making bread sticks so it feels even more like Olive Garden at home. Plus, they taste great dipped in the soup!

Pasta e Fagioli 
recipe found on top secret recipes

Ingredients
1 lb. ground beef
1 small onion, diced (about 1 c.)
1 large carrot, julienned aka long, thin slivers (about 1 c.)
3 stalks celery, chopped (about 1 c.)
2 cloves garlic, minced
1 14.5 oz can diced tomatoes (the true recipe calls for 2, I accidentally only grabbed 1)
1 15 oz can red kidney beans (with liquid)
1 15 oz can great northern beans (with liquid)
1 15 oz can tomato sauce
1 12 oz can V-8 juice
*I used a little more than 24 oz of V-8 juice since the recipe did not call to simmer the soup with a lid so I added more V-8 juice because I wanted there to be more liquid. Also, this helped the leftovers to stay soupy
1 Tbsp. white vinegar
1 1/2 tsp. salt
1 tsp. oregano
1 tsp. basil
1/2 tsp. pepper
1/2 tsp. thyme
1/2 lb. ditali pasta (about half a package)
*I was not able to find ditali pasta anywhere. These noodles are the signature mark for this soup at Olive Garden. I was very disappointed when I had to use elbow. However, it still tasted great!

Instructions
1. Brown the ground beef in a skillet and drain grease.
2. Add diced onion, julienned carrots, chopped celery, and minced garlic to the beef and saute for about 10 minutes.
3. Place beef mixture into a large saucepan or pot, along with the remaining ingredients, except pasta. Simmer for about 1 hour. I would recommend putting a lid on and setting the burner at a little less than medium heat (however, all stovetops vary).
4. Once the soup has been simmering for 50 minutes, cook the pasta in boiling water for about 10 minutes or until pasta is al dente. Drain water.
5. Add the pasta to the pot and simmer for another 5 to 10 minutes.
6. Enjoy!

Tuesday, February 7, 2012

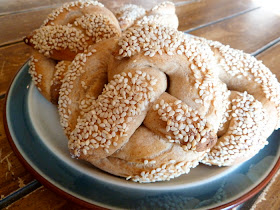
Sesame Whole Wheat Soft Pretzels


I am trying to be a more adventurous baker and cook and try making new things.  I came across this recipe for sesame whole wheat soft pretzels in my healthy cookbook Comfort Food Fix by Ellie Krieger.  It didn't seem overly difficult, and since I've been a little intimidated by yeast I figured this would fall under the adventurous category.  All I had to do was wait for a weekend when I went to my parent's house to do laundry (and visit them of course, the perks of going to college 20 minutes from home) so that I could use my Mom's stand mixer as the recipe calls for the use of the dough hook.  I'm sure you could easily make these without the stand mixer too, just by kneading the dough a bunch.

They turned out quite delicious if I do say so myself.  They're especially good warm, so if they aren't fresh I suggest heating them up in the microwave for a few seconds before eating.  My choice of dip was spicy mustard, so yummy!


Yield: 18 pretzels

Ingredients

  • Nonstick cooking spray
  • 1 packet (2 1/4 teaspoons) instant yeast
  • 3 tablespoons honey
  • 1 1/2 cups warm water
  • 2 1/4 cups whole wheat flour
  • 2 1/2 cups all purpose flour
  • 2 teaspoons salt
  • 2 tablespoons canola oil
  • 1 tablespoon unsalted butter, melted
  • 1 large egg
  • 1 teaspoon water
  • 3 tablespoons sesame seeds
  • 1 1/2 teaspoons coarse salt


Directions
  1. Preheat oven to 425 degrees and prepare two baking sheets with cooking spray.
  2. Using the bowl of the stand mixer, use a spoon and stir together yeast, warm water, and honey.  Once all the yeast is dissolved let sit for about 5 to 6 minutes, once the mixture begins to foam.
  3. While the yeast mixture is setting, take a different large bowl and mix together the all purpose flour, whole wheat flour, and salt.
  4. When the yeast mixture is ready, add flour mixture, oil, and butter and mix on low speed in the stand mixer with the paddle attachment.  After about 10 to 15 seconds the dough will begin to form.  Switch to the dough hook.
  5. On a low to medium speed, continue to mix dough for 2 to 3 minutes.  Dough should be smooth but still pliable.
  6. Will the dough is mixing, beat together egg and water in a small bowl.  Also mix sesame seeds and coarse salt on a small plate.  Set aside.
  7. Remove dough from bowl and divide into 6 equal parts (each will be about 6 ounces).
  8. Divide each of those parts into 3 equal sections (each will be about 2 ounces) and form into balls.
  9. Roll out each ball so it is about 14 inches long and twist into a pretzel shape.  (I found it easiest when rolling the dough out to start with both hands in the middle and move outward in opposite directions are the same time so dough was about the same thickness throughout.)
  10. Generously brush egg mixture onto pretzel and dip in sesame seeds and salt.  Place on baking sheet.
  11. Bake for 18 to 20 minutes, or until a golden crust is formed.  Enjoy with your favorite dipping sauce!
Recipe courtesy of Comfort Food Fix by Ellie Krieger


Monday, February 6, 2012

Cinnamon Rum Raisin Bread

My grandma is coming to town this weekend and I am taking her to an orchid show. I came across this recipe in my Fine Cooking Magazine and was inspired by grandma to add rum to the raisins. She, like me, enjoys her drunk fruit. She always saves the fruit in her old fashioned until the end, when it has had some time to drink up the alcohol. For awhile she kept raisins soaked in gin in her kitchen too, they are supposed to be good for arthritis.


The recipe looks really long, but in reality most of the time spent making this recipe is inactive. There is a lot of combining and waiting. I also wanted to be sure all the steps were clear. Do not be daunted by the length, it was fairly easy. If you do not want to soak the raisins in rum, just use water instead and soak them for less time. After they are removed from the oven, you are supposed to brush them with butter. Brushing the tops with butter, keeps the crust soft and adds flavor.


The final product is moist and a bit dense. It got rave reviews. My roommate asked for seconds and grandma loved it too! The rum does make a difference in flavor, it gives it richness. The rum will be that secret ingredient everyone will be asking about.

Total rising time: approximately 1 1/2 hours to 2 hours

Ingredients:
Raisins:
2 cups dark raisins
1 cup rum
1 cup warm tap water
Dough:
Vegetable or Canola oil, for the bowl
2 cups whole wheat flour
2 cups unbleached all-purpose flour; plus more for dusting
2 tablespoons granulated sugar
2 tablespoons ground cinnamon
1 packet (1/4 oz. or 2 1/4 teaspoons) instant yeast
2 teaspoons salt
1/2 cup whole milk, room temperature
1/4 cup liquid from the raisins, plus 3/4 cup warm water
1 large egg
3 tablespoons butter, softened
Filling:
4 tablespoons cinnamon
2 tablespoons sugar
2 tablespoons brown sugar
4 tablespoons butter, melted

Instructions:
  1. Combine the raisins, rum and warm water in a bowl. Let the raisins sit for 30 minutes or the time it takes to make the dough. Drain, reserving 1/4 cup of liquid.
  2. In a stand mixer fitted with a dough hook, combine the flour, sugar, cinnamon, yeast and salt. Mix on low speed, about 1 minute. Add the milk, egg, butter and 1/4 cup reserved rum raisin liquid plus 3/4 warm water. Mix on medium speed until the dough comes together, about 1 minute. Increase the speed to medium high and continue to mix until the dough is smooth, slightly sticky and clings to the hook, about 5 minutes. 
  3. Remove the dough from the hook and bowl to a floured surface. By hand, gently knead in the raisins, forming the dough into a ball. Lightly oil a large bowl, placing the ball of dough into the bowl. Cover the bowl loosely with plastic wrap and let rise for 30 minutes, until the dough looks puffy.
  4. On a well-floured surface, use your hands to flatten the dough to 3/4 inch thick. Fold the dough in half from top to bottom, then in half again from left to right. Put the dough back into the bowl, cover, and let sit until it has risen slightly, about 30-50 minutes.
  5. Grease two 8 1/2x4 1/2-inch loaf pans with butter. In a small bowl combine the sugars and cinnamon; set aside. Melt 2 tablespoons butter.
  6. On a lightly floured surface, divide the dough in half. Using a rolling pin, roll each half into 8 x 16 rectangles that are 1/4 inch thick.Use your hand or pastry brush to spread half the melted butter onto each rectangle. Sprinkle each rectangle equally with the cinnamon-sugar mixture. Starting at the short end of the rectangle, roll each rectangle into a 8 1/2 inch long cylinder. Place the cylinders in the prepared pans, seam side down and cover with plastic wrap. Let the loafs rest at room temperature until the dough has risen slightly and springs back when lightly pressed, about 1 to 1 1/2 hours. 
  7. Position a rack in the middle of the oven and heat the oven to 375F. Bake the loaves 30 to 35 minutes, until they are dark brown and hollow-sounding when thumped on top. Leaving the loaves in their pans, transfer to a rack to cool. Meanwhile, melt the remaining two tablespoons of butter. Brush the top of each loaf with the butter. Once cool enough to handle, remove from pans and serve right away or continue to cool.

Sunday, February 5, 2012

Sugar Cookies


These cookies were supposed to be "I-wish-the-Packers-were-in-the-Super-Bowl" sugar cookies, but I guess now they can be "Aaron-Rodgers-MVP" cookies!  I was pretty excited to use the piping kit that I got for Christmas to make the laces on the footballs, it was my first time using it though so they aren't exactly perfect.

This is the sugar cookie and frosting recipe that my Mom always uses when our family makes Christmas cookies.  It's also the same recipe that my Gramma Zach has always used as well.


Sugar Cookies

Ingredients
  • 1 cup butter (may use half shortening and half butter)
  • 1 1/2 cups sugar
  • 3 eggs
  • 1 teaspoon vanilla extract
  • 3 1/2 cups flour
  • 2 teaspoon cream of tartar
  • 1 teaspoon baking soda
  • 1/2 teaspoon salt
Directions
  1. Cream butter and shortening if using half and half of each.
  2. Add sugar gradually until light and fluffy.
  3. Add eggs one at a time, beating after each addition.
  4. Stir in vanilla.
  5. Add dry ingredients gradually to creamed mixture.
  6. Chill thoroughly at least 3 to 4 hours.  (I usually make it the night before I want to bake.)
  7. Preheat oven to 375 degrees.
  8. Roll out on well floured surface.
  9. Cut into shapes.
  10. Bake for 6 to 8 minutes.


Frosting

Ingredients
  • 3 cups powdered sugar
  • 1/3 cup butter or shortening
  • 1 1/2 teaspoons vanilla extract
  • 2 tablespoons milk (may need more)
Directions
  1. Make sure cookies are cooled before frosting.
  2. Mix all ingredients together.


Thursday, February 2, 2012

Michigan Chicken


If I had to pick my least favorite kind of cheese it would be blue cheese.  After that though, it would be Swiss.  I remember making a big deal the first time my mom said she was going to make this recipe that she found in our church cookbook because I did not want Swiss cheese anywhere near my piece of chicken.  My piece did not have any Swiss on it, but I soon learned that it is even more delicious with!  This recipe easily became a favorite of the entire family.


Recipe serves 8.  (I usually just buy one package of chicken that has 3 breasts in it and just half the recipe.  Sometimes I don't even half it if I'm really in the mood for the stuffing topping!)

Ingredients
  • 8 (1/2) boneless, skinless chicken breasts (raw)
  • 8 slices Swiss cheese
  • 1 can cream of chicken soup
  • 1 (8 3/8 oz.) chicken-flavored Stove Top stuffing
  • 1/4 cup water
  • 1/4 cup butter
Directions
  1. Preheat oven to 350 degrees.
  2. Place chicken breasts in a single layer in a 9x13 inch pan.
  3. Place one piece of Swiss cheese on top of each piece of chicken.
  4. Mix together water and soup in a small bowl.
  5. Spoon water and soup mixture over chicken pieces.
  6. Sprinkle stuffing over chicken pieces as well.
  7. Melt butter.  Drizzle over stuffing.
  8. Cook for about 55 minutes (covered for the first 40 minutes, uncovered for the last 15 minutes.)
Recipe Courtesy of Lil Haegele from the St. Andrews Parish Cookbook


As a side note, I have no idea what the significance of the name Michigan Chicken is.  I assumed it is a family recipe of some sort from the lady who submitted it to the church cookbook but I did some research using google and it looks like there's some more similar recipes out there!