Pages

Monday, November 12, 2012

Compost Cookies


I'm going to be in a wedding! A bridesmaid to be precise! I don't know much about weddings. The last wedding and reception I attended was when I was like 5. We are lucky I remember that (I don't remember my childhood, much less what I did 3 days ago). Now I am in the wedding! We call it a wedding, but really its a statement of vows, or both. There never was a wedding or exchange of vows, whoops. So it is pretty much a wedding, I guess. How could this be, you ask?!

Did you know in Colorado you can have someone stand in for the other half? That is what my brother and now sister-in-law did. The best part was, the stand in for my sister-in-law was a dude. To be precise my parents best man. How cute?


It is probably important to know why they did this. She was at boot camp. He had already finished and was an officer, in the military. It isn't the best to sleep with your boss, ya know? Especially in the military. They just failed to think of this before she was confined to boot camp. Now the wedding is in February. They aren't much for the planning ahead. Excited none the less. Do you know anyone who has gotten married in this way? Or any good wedding laughs? I'd love to hear them!

Believe it or not, the above story is slightly related to these cookies. I'm mailing them to my sister-in-law, in Texas. Another twist to their little love story: they've spent a lot of time apart. BUT she comes home in 2 1/2 weeks, for good!


These cookies are from the Momofuku Milk Bar cookbook. This is a pretty great book. A lot of it is pretty involved  but oh so very interesting. Beet-lime white chocolate ganache? Intrigued. Plus I don't live in New York. AKA New York is being brought to me instead.

I've been wanting to make these for a while and a friend recently was nagging me for the recipe. Perfect reason to make them. Plus, I have been all about the sweet, salty and unexpected. Chips and pretzels in your cookie? YUM!


These come out as giant sized cookies. In case you like 'em smaller, take note of that.  You only use 1/4 of the graham crust, but I took their suggestion and froze it for later use. I plan to make these for the holidays anyways. Screw traditional cookies, someone else will make them. Another great tip, freeze them for later. The finished product is rich and sweet, with whole pretzel crunch surprises.

Ingredients:
Graham Crust:
1 1/2 cups graham cracker crumbs
1/4 cup milk powder
2 tablespoons sugar
3/4 teaspoon salt
4 tablespoons (1/2 stick) butter, melted
1/4 cup heavy cream

Cookie batter:
2 sticks butter, at room temperature
1 cup granulated sugar
2/3 cup brown sugar, tightly packed
1 tablespoon corn syrup

1 large egg
1/2 teaspoon vanilla extract

1 1/3 cups flour
1/2 teaspoon baking powder
1/4 teaspoon baking soda
1 teaspoon kosher salt

3/4 cup mini chocolate chips
1/2 cup butterscotch chips
1/2 cup graham crust
1/3 cup old fashioned oats
2 teaspoons ground coffee

50g (2 cups) chips
50g mini (1 cup) pretzels

Instructions:
  1. Combine the butter, sugars, and corn syrup in the bowl of a stand mixer fitted with the paddle attachment and cream together on medium-high for 2 to 3 minutes. Scrape down the sides of the bowl, add the egg and vanilla, and beat for 7-8 minutes, until pale and fluffy (almost doubled).
  2. In a medium bowl combine the flour, baking powder, baking soda and salt. With the mixer on low, add the flour mixture. Mix just until the dough comes together, no longer than 1 minute (you don't want to over mix the batter!).
  3. Still on low speed, add the chocolate chips, butterscotch chips, graham crust, oats, and coffee and mix just until incorporated, about 30 seconds. Add the potato chips and pretzels and paddle, still on low speed, until just incorporated. Don't overmix or risk breaking too many of the pretzels or potato chips!
  4. Using a 2 3/4-ounce ice cream scoop (or a 1/3-cup measuring cup), portion out the dough onto a parchment-lined sheet pan. Pat the tops of the cookie dough domes flat. Wrap the sheet pan tightly in plastic wrap and refrigerate for at least 1 hour, or up to 1 week. Do not bake your cookies from room temperature--they will not bake properly (did you see all that butter you put in there!?). 
  5. Heat the oven to 375F.
  6. Arrange the chilled dough a minimum of 4 inches apart on parchment- or silpat-lined sheet pans (these cookies do spread like crazy, give 'em space. I put 5 per pan). Bake for 18 minutes (I'd check them at about 16 minutes, depending on your oven). The cookies will puff, crackle, and spread. After 18 minutes, they should be very faintly browned on the edges yet still bright yellow in the center. Give them an extra minute or so if that's not the case.
  7. Cool the cookies completely on the sheet pans before transferring to a plate or an airtight container for storage. At room temp, cookies will keep fresh for 5 days; in the freezer, they will keep for 1 month.

Sunday, November 4, 2012

Sweet & Salty Sugar Cookies

What is your favorite kind of cookie? I asked my sister-in-law that same question and the response was one I wasn't really expecting. Or maybe I should have because she is a bit of a selective eater. Her response was sugar cookies and chocolate chip cookies without the chocolate chips. What do you even call that, when the major ingredient is missing? Sometimes the odd stuff is the best stuff, so she might be onto something?


My favorite cookie has to be chocolate chip though or white chocolate macadamia nut. It is probably a childhood thing. My grandmother would always make billions of chocolate chip cookies and we would eat them all winter long. The macadamia nut is probably picked up from my dad, pretty sure those are his favorite. I also like them because they seem to have this sweet and slightly salty thing going on.


Sweet and salty has to be the ultimate flavor combination. Chocolate covered pretzels. Salted caramel. These almonds .You name it, if it is sweet and salty it will be awesome. That is how these cookies came to be. Plain old sugar cookies seemed boring. They tend to be overly sweet and run of the mill.


These may be sweet too, but in the best way. You can't just eat one, the salt gets you coming back for more.  It might be just the cookie for the person who doesn't like sweets. These are also super easy to make. Everything should be in your pantry or fridge already.


You take a vanilla bean and scrap out its cute little seeds and combine it with sugar. Beat the sugars and butter. Add an egg and some vanilla extract. The addition of vanilla extract combined with the vanilla bean, gives these a vanilla scented quality. It cuts the sweetness a bit and balances the saltiness. Then you add your flour, mix it all up. Scoop, roll, flatten and bake your cookies. Slam, bam and done! The resulting cookie is chewy and soft on the inside, witch crisp edges.


Try them with a cup of coffee, its delicious. These will make the perfect cookie for the upcoming holiday cookie season. Not to mention an unexpected surprise from the traditional sugar cookie. Take them to a holiday party or to work, for a surprise break from the standard sugary sweet holiday cookies. You'll impress people, promise. I want to know what your favorite cookie is, leave a comment!

xo
April

Ingredients:
Yields 24 cookies
Cookies:
2 cups unbleached all-purpose flour
1/2 teaspoons baking powder
1/2 teaspoon sea salt
16 tablespoons unsalted butter (2 sticks), softened
1 cup granulated sugar
1 vanilla bean, scraped
1 tablespoon light brown sugar
1 large egg
1/4 teaspoon vanilla extract

Salty/Sugar Coating:
1/2 cup granulated sugar
1 teaspoon sea salt

Instructions:
  1. Preheat the oven to 375F. Position a rack in the middle of oven.
  2. In a food processor, combine 1 cup sugar and the vanilla bean, pulsing until vanilla is well distributed (If you don't have a food processor, use your hands to break up the vanilla seeds into the sugar, until evenly distributed.)
  3. Combine the flour, baking powder and salt in a medium bowl. 
  4. In a stand mixer or bowl, beat the sugars and butter together for 2-3 minutes, until light and fluffy. Then add the egg and vanilla, beating until well combined. Add the flour mixture, mixing until just combined. 
  5. Line 2 baking sheets with parchment. In a small shallow pan or plate, mix the sugar and salt. Scoop the dough by the tablespoons, a generous one, rolling the dough into a ball. Next, roll the dough into the sugar/salt mixture. Place the cookies, evenly spaced, on the prepared baking sheets. Next, slighlty press each cookie, using a flat bottomed glass, flattening the tops. 
  6. Bake the cookies for about 12 minutes, until their edges are just starting to brown.
  7. Remove the cookies from the oven, and cool on the pan for several minutes before transferring to a rack to cool completely.
  8. Once the cookies are cool, store them in an airtight container and enjoy.
Recipe adapted from Baking Illustrated

Thursday, October 25, 2012

Spiral Sugar Cookies


So a few weeks ago, I got a very exciting email. I found out that I had won Heather Baird's cookbook, Sprinklebakes! I couldn't believe it! I have entered a couple giveaways on blogs before but I have never won. I was never too disappointed because before this email, I had never won any raffle. Ever. One time in elementary school, we had bingo night and I won there, but that is beside the point. Otherwise, I've been going through my whole life without my ticket ever being called off or name being drawn. I guess I should take into account that I don't enter myself into these things often. But lets get back on track, I was checking my email at work and winning this book made my day! I was so excited and nervous I would miss the cut off time to reply, so I immediately replied to the email. Some short days later the book came in the mail! Thank you again Dawn from Vanilla Sugar Blog!


The cookbook not only has great pictures and recipes to go with them, but there are great technique tips to sift through, too. But the best part about the book is that it is all about making your desserts art. And if you know me well, you know there's a little artist trying to peak through the science nerd that I am.

When I was looking through Sprinklebakes, I pick this recipe as my first target. These would be a yummy but neat looking sugar cookie that would be perfect for a Wisconsin Badgers game day! The game against Purdue was away so I figured these cookies would be the perfect munchie while watching the game on TV. Although they can be a bit time consuming, a helper (aka my boyfriend) in the kitchen makes a big difference. The effort and time is definitely worth it! These cookies are the perfect sweetness that are not too soft but not quite crunchy either. All in all, it's hard to only eat one! 


Normally I would post the recipe but I attached the link to when Heather posted the recipe on her Sprinklebakes blog here. I think the pictures that go along with the steps are useful. Also, I'm not going to lie, it has been a busy week of class, exams, work and preparing for my boyfriend's birthday dinner (yay!) so my tired body doesn't even want to type anymore. Hope you check out the recipe!

Saturday, October 13, 2012

Pumpkin French Toast Bread Pudding


Food and I have not been getting along lately. There has been a lot of cooking and eating, but will sub par success. Failed attempts at the perfect pumpkin Bourbon bread pudding (determination pays off people). Restaurant meals not meeting my highly anticipated expectations. Burning cookies.

Buying the same smoked butterkase, on two separate occasions, for a Badger Cheese Club Meeting, and I call myself president. Don't worry, I caught the mistake in time to dash to the store and by smoked mozzarella, but really I had already been to three stores for cheese that same day. Where was my head at?!


I made biscuits that were over mixed and poorly risen. The whole reasoning for making them was because they are the perfect fail safe. Biscuits are supposed to be my friend. It seemed like there wasn't anything to lose by giving the pumpkin bread pudding a fourth try at perfection.


A lot of lessons were learned on the road to this fabulous baked french toast bread pudding. Brioche bread makes better bread pudding than french bread. If you do chose to use french or country bread, try to use drier day old bread.

More bourbon for me and less for the bread pudding. Too much for the pudding and it gets a sick texture and taste. Same goes for too much bourbon for me, but that's a whole other story. Be sure to really let all the bread get well coated with the pumpkin custard mixture. Keep stirring it in a large bowl, until it is mostly all absorbed. Its important.


If you find the texture of bread pudding unpleasant, this may be for you. Its more like french toast, hence the name. It's super delicious and not too sweet. Double it to feed a crowd french toast, minus the hour standing in front of the griddle, for breakfast, on Thanksgiving morning. Give it a try with ice cream and caramel sauce, for dessert.

xo
April

Serves: 6
Ingredients:
5 cups brioche bread (11 ounces), cut into 1-inch cubes
1 cup heavy cream
1/4 cup whole milk
2 whole large eggs, 1 large egg yolk
1 tablespoon and 1 teaspoon bourbon
1/2 cup sugar
2/3 cup pumpkin
1/4 teaspoon salt
1 teaspoon cinnamon
1/4 teaspoon ginger
1/8 teaspoon allspice
1/4 teaspoon nutmeg
pinch ground cloves

Instructions:
  1. Preheat oven to 350F, with rack in middle.
  2. Whisk together the cream, milk, eggs, sugar, pumpkin, spices and bourbon in a medium bowl.
  3. In another large bowl, pour the custard mixture over the bread cubes. Toss the bread cubes until well coated and mostly absorbed. Transfer to a 8x8 inch ungreased baking dish and bake until custard is set, 25-30 minutes.
Adapted from Gourmet

Friday, September 28, 2012

Grandma Spencer's Strawberry Spinach Salad


Yesterday was my dad, the "Big Man's", birthday.  In our family we don't go all out or anything for birthdays, but we did all head over to Mom and Dad's house to have a nice family dinner.  Mom had to work late yesterday and my offer of making dinner was turned down because it would've apparently taken too much time so we ended up ordering pizza for dinner.  As a nice little side to go along with our pizza I decided to make this strawberry spinach salad.


This salad is a family favorite.  When we were kids (well maybe not my brother who also wouldn't eat ketchup) we would always gobble it up even though it was full of spinach!  My Grandma Spencer used to always make it and it was a recipe that we made sure to get from our grandpa once she had passed away.  Now we make it for special dinners every once in a while or it's also great to take to pot lucks as well. 


And in case you were wondering, there was no cake for dessert, Dad is not a big cake person.  Instead we had brownies, his all time favorite.  My sister Avery made the brownies and added pecans to half of them because that's the way dad likes them.  (Well Dad would prefer the whole pan have nuts but some other people in the family are picky.)  

Ingredients
  • 12 oz fresh baby spinach
  • 2 tablespoons sesame seeds
  • 1/4 cup vegetable oil
  • 2 tablespoons cider or raspberry vinegar
  • 1-2 tablespoons sugar
  • 2 tablespoons minced green onion
  • 1 teaspoon salt
  • dash of pepper
  • 1 pint strawberries, sliced

Directions
  1. Combine oil, vinegar, sugar, green onion, salt, and pepper in a small bowl.  Refrigerate for a couple of hours (or longer.)
  2. Toast sesame seeds at 350 degrees for about ten minutes (150 for about 5 minutes in a toaster oven.)
  3. Toss spinach, sesame seeds, dressing, and strawberries in a large bowl.  Enjoy!

Wednesday, September 26, 2012

Cheesy Jalapeño Stuffed Chicken

I'm back!  That's right, my last post was in May, can you even believe it!  I spent 8 weeks this summer in Europe studying abroad in Toledo, Spain and then doing a little backpacking as well with my fellow blogger Emily.  When I got back in mid-August who knows what happened because I had been wanting to cook and bake the entire time I was in gone.  For some reason it took until now to get things rolling again.  But here I am, finally back at it again and with this cheesy jalapeño stuffed chicken to get things started again.


Bear with me as I have downgraded my camera since my last post.  (My mom wanted hers back apparently.)  I'm thinking a new camera is going to be the main item on my Christmas list this year!  Not to mention I haven't really gotten this whole lighting and editing thing down yet.  My photography skills are a work in progress to say the least.


I hope you enjoy!  I served my chicken with roasted red potatoes, a simple vinaigrette salad, and a tall glass of milk to balance out the hotness from those jalapeños (I left the seeds in.)

Recipe adapted from Skinnytaste.

Ingredients

  • 2 slices center cut bacon, cooked and crumbled
  • 2 jalapeños (remove seeds if prefer more mild)
  • 3 oz 1/3 less fat cream cheese (about 1/3 cup)
  • 2 oz reduced fat shredded cheddar cheese (about 1/4 cup)
  • 2 oz shredded pepperjack cheese (about 1/4 cup)
  • 2 tablespoons green onion, chopped
  • 6 skinless chicken breast cutlets, about 3 oz each
  • 1/2 cup panko breadcrumbs with italian seasoning
  • 2 limes, juice of
  • 1 tablespoon olive oil
  • salt and fresh pepper
  • olive oil non-stick spray
Directions
  1. Wash and dry chicken cutlets and season with salt and pepper.
  2. Preheat oven to 450 degrees.  Lightly spray baking dish with non-stick spray.
  3. In a medium bowl, combine cream cheese, cheeses, green onion, jalapeños and bacon crumbles.
  4. Lay out chicken cutlets and spread an equal amount of cheese mixture on each.  Roll each cutlet and secure ends with toothpicks.
  5. Combine olive oil and lime juice in a small bowl.  Place bread crumbs in another.
  6. Dip chicken in liquid mixture and then in bread crumbs.  Set seam-down in baking dish.
  7. Lightly spray top of chicken with olive oil spray.
  8. Cook for about 25 minutes and serve.

Red Tomato Hash

People have been asking me a lot lately how school is going. My response is usually its been going for three weeks too many. That is right people, can't a girl just be ready to be done with school? We have all been there, right?


The best part of my semester, maybe the second best class ever taken at UW-Madison, is my 50 minutes of relaxation twice a week. It is pretty awesome. We stretch, relax, clear our minds, focus on breathing, all that cool stuff. I'm going to be a zen relaxation machine come December.


You may wonder to yourself, what could be a more awesome class than that? A literature class dedicated to J.R.R Tolkien. What I have to read The Hobbit tonight? Well, I am not going to argue with that, ever. Speaking of being a total LOTR nerd, who is way excited for The Hobbit movie to come out December 14th? I don't even care that it is right before finals week, I will be there at midnight.


Enough LOTR nerd talk and on to this hash. It is pretty delicious and fairly easy. You roast some tomatoes, garlic and jalapenos. Don't be afraid to let the tomatoes get really blackened, it makes the salsa more thick and delicious. Add it all to a food processor, making it a chunky salsa consistency. Finally toss in some finely chopped onion and cilantro and done.


You can also double the tomato salsa and get salsa one day and hash the next. I do suggest, depending on how hot your peppers are, one jalapeno for salsa and two for hash. The peppers I used, where like crazy stupid hot. Locally grown for the win. Grocery store jalapenos, weak.


After you make the salsa you cook up some onion and other vegetables you have on hand, in a non-stick skillet, with a little oil. Then add some salsa to the skillet, letting it reduce and thicken. Finally add some roughly mashed potatoes, stirring occasionally letting everything get all golden delicious before shoveling into your mouth.

xo
April

Ingredients:
Salsa:
1 pound (3 medium) tomatoes
1-2 fresh jalapeno chiles
3 garlic cloves, unpeeled
1/2 teaspoon salt
1/2 small onion, finely chopped
1/3 cup chopped cilantro
1 1/2 teaspoons cider vinegar

Hash:
1/2 small onion, chopped
1 medium red bell pepper, chopped
1 ear corn, kernels removed
3 cups roughly mashed red potatoes (from about 2 pounds boiled potatoes)
3 tablespoons vegetable oil

Instructions:
  1. Lay the tomatoes on a rimmed baking sheet and place about 4 inches under a hot broiler. Roast until blistered and blackened on one side, about 6 minutes. Remove the baking sheet from the oven, flipping the tomatoes over and adding the jalapenos. Return the baking sheet to the oven and continue to broil for 6 minutes, at 3 minutes, add the unpeeled garlic cloves to the baking sheet.
  2. Cool, then peel the skins off the tomatoes and garlic and stem and seed the jalapenos. In a food processor, grind the jalapenos, garlic and 1/2 teaspoon salt to a paste. Add the tomatoes to the paste, pulsing several times to achieve a coarse puree.
  3. In a strainer, rinse the onion under running water, shake off any excess and add to the salsa, along with the cilantro and vinegar. (At this point you could use this as a salsa or continue on to make the hash).
  4. In a large non-stick skillet over medium heat, fry the onion, pepper and corn in the vegetable oil for 5-8 minutes. Add 1 1/2 cups of the salsa and cook until thick and reduced, about 5 minutes. Finally stir in the 3 cups of coarsely mashed potatoes, continuing to fry and turn everything together until the potatoes brown and the mixtures holds together, about 5-10 minutes.
  5. Serve the hash with a fried or poached egg.
Adapted from Ricky Bayless


Thursday, September 20, 2012

Apple Crisp Pie


My mouth has been watering for fall food flavors since August! I've been waiting patiently to make apple pie for weeks! I finally decided it was a good time to buy some apples for this tasty treat. My boyfriend and I made sure to buy the best of the best apples for this recipe. The only place to go for those, is the Madison Farmers' Market! The absolute best stand for apples has to be Ten Eyck Orchard. That is where these honeycrisp apples are from. We decided on honeycrisp instead of a more traditional baking apple because we wanted extras to snack on. 


This was the first time I ever made pie, and I have to say I coming into it I was nervous but quickly found out making this was as easy as, well, pie. I was extremely nervous to make homemade crust. You have to do everything just right otherwise it is not flaky enough. Most people just skip it entirely and by store bought crust. I'm glad I didn't! The recipe I have for the pie crust was very simple and it was very delicious! It went perfectly with the apple crisp center. As for the meat of the pie, it is very simple. Besides the labor put into peeling and cutting 10 apples, it is a cinch!


This apple crisp pie is sweet and savory. Don't be nervous when the first piece taken out of the dish reveals a lot of juice. My honeycrisp apples were very juicy and left a pool. This is yummy to drizzle on top of your helping! Apart from the delicious apples and cinnamon, the crust and topping add a crunch! It is the perfect combination of apples and crisp that can be enjoyed warm or chilled.

Apple Crisp Pie with Homemade Pie Crust

Pie Crust
from Williams-Sonoma

Ingredients
1 1/4 c. flour
1 Tbsp. sugar
1/4 tsp. salt
1 stick cold to frozen butter
3 Tbs. very cold water (I measured my water out into a small cup, then I placed it into a bowl of ice)

Instructions
1. Mix flour, sugar and salt in a large bowl.
2. Cut the butter into small chunks and place into bowl. With a pastry cutter, get the butter incorporated into the dry ingredients. Use knives or a fork if you do not have a pastry cutter.
3. Add the cold water and mix with a fork until the dough pulls together. I actually needed about a tablespoon more of water to get all the ingredients to stay together.
4. Place dough ball onto a floured surface and roll out using a rolling pin. Sprinkle flour on the rolling pin or dough if it sticks. Roll out until it fits into a 9-in pie pan.

Mrs. Mohoney's Apple Crisp 

Ingredients
10 apples
3/4 c. white sugar
3 tsp. cinnamon

For the Topping:
1 1/2 c. white sugar
1 c. flour
1 stick butter, softened

Instructions
1. Peel and cut apples into tiny pieces
2. Mix apple pieces, sugar and cinnamon into a large bowl, making sure the apples are evenly coated.
3. Place mixture into a pie shell or for simply apple crisp, place in a buttered 8x8 baking dish.
4. Mix the topping ingredients together until it forms little pea sized balls.
5. Sprinkle on top of the apple mixture.
6. Bake at 375 for about 35-40 minutes.
7. Enjoy!


Sunday, September 16, 2012

Green Olive Red Noodles

I know, I have been MIA for way way too long. I'm sorry. You all really have no idea how anxious it makes me when I fall behind on posting. It feels like I'm letting you all down. I also like to believe I have loads of faithful followers.


My excuse? The end of summer, birthdays, my birthday, work and too much fun. It was all squeezed in last mintue. Then school came and at the exact same time, my computer decided to have a overheating problem. What a huge inconvinence for both my blogging and school, but mostly blogging. Can you say last semester senioritis?

Two weeks later, I'm back in business. In the process, I learned how computer dumb I am, when it was returned with a new harddrive. It only took me forever to reconfigure my computer. Thanks for taking out my harddrive, not. That isn't important though, there are way more important things to share with you all. Like this pasta being perfect for carbo loading before an epic open water race. That is what I was doing the other weekend, in Chicago.


Open water swimming, the best thing ever. Totally hooked on it or maybe hooked on the competition. I also totally dominated. Beinging totally honest, I wasn't in the best shape to swim a 2.5k, in wavy Lake Michigan. The waves were 2-3 feet, peaking at 4. Its nothing like an ocean, obviously, but don't laugh at my excitiment. The 4 practice swims in Lake Monana don't prepare a person for waves, only algae and gross fish and the occasional muskrat.

Besides all the awesomeness of the waves and algae free water, I placed 30th out of 321 (thats men and women). No big deal, top 10%. The 11th women, with a time of 40:06. Not bad, not bad at all for most of the training happening in the three weeks leading up to it.


Enough bragging and ramblings about swimming and onto the noodles. Our family loves making "red noodles" (recipe to come one day) and this is my version of it. I love olives and that is how this came to be. Feel free to add as much cayenne as you like and as many olives. This is just simple olive, tomato paste and carb goodness, in less than 20 minutes. The perfect fail safe or when you are in a rush or both.

xo
April

Ingredients:
1 pound cavatapi or bowtie noodles
1/4 cup olive oil
5 ounces tomato paste
1/3 cup chopped green olives with pimento
1/4 teaspoon granulated garlic
Cayenne pepper

Instructions:
  1. Bring a pot of water to a boil and cook noodles according to package instructions.
  2. In a medium pot, combine olive oil, tomato paste, olives, splash of olive juice, granulated garlic and cayenne pepper (to taste), over medium-low heat for 5 minutes.
  3. Drain the noodles (don't worry about draining them perfectly, a little water won't hurt) and add them to the tomato and olive mixture, stirring to combine well.


Thursday, August 30, 2012

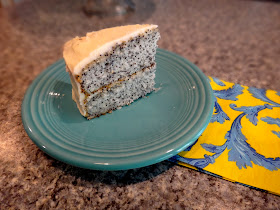
Poppy Seed Cake with Lemon Buttercream

Awhile back my boyfriend's mom found a recipe in a Penzey's spices magazine she wanted to try. Knowing how much I like to be in the kitchen, she photocopied this recipe for a poppy seed cake and gave it to me. So, when my boyfriend and I decided to visit his parents this past weekend, I had to make this cake for them!


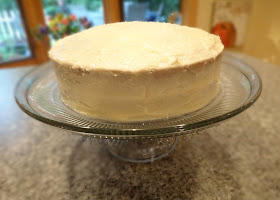
 I always get nervous baking for anyone. There is so much pressure I put on myself to make it perfect! But I didn't just have the cake to make right. I had an hour and a half drive that the cake had to outlast. First obstacle was the 90 degree weather with humidity on Friday. I made the cake Thursday night and then I was going to frost it Friday right before we left town. We didn't have our air conditioning on at the apartment so I was super nervous the frosting was just going to melt off. Luckily, it lasted. I packed ice to go over my new glass cake set (I found it at Target!) for the car ride. This seemed to work well. However, there was one more obstacle, being in a bumpy car. I actually had the cake at my feet (where the air conditioning could blow at it). My feet straddled it and they cramped up a few times to say the least...

Unfortunately, the cake still ended up bumping around and frosting seemed to be everywhere! Fortunately, my boyfriend's parents are forgiving and were still pleasantly surprised! Well, and I fixed it up quickly when no one was in the kitchen. 


Everyone enjoyed the cake! It was moist and light. The poppy seed flavor was perfect and of course the famous complement of lemon was not hidden nor too overpowering. This is a perfect spring or summer treat, especially in hot weather. I think it would be perfect for a brunch dessert but it would make a great ending to any meal of course. 

Poppy Seed Cake
adapted from Penzeys

Ingredients
1/2 c. whole poppy seeds
1 c. milk
3/4 c. butter, room temperature
1 1/2 c. sugar
1 tsp. vanilla extract
2 c. cake flour
2 tsp. baking powder
4 egg whites

Instructions
1. Soak the poppy seeds in the milk for at least 2 hours.
2. Preheat the oven to 375.
3. Cream the butter until fluffy. Add the sugar and vanilla and mix.
4. Add the poppy seeds/milk mixture.
5. Gradually add the dry ingredients (cake flour, baking powder).
6. Beat in a separate bowl the egg whites and add to the other ingredients once frothy.
7. Pour batter into 2 greased 9-inch cake pans, trying to add the same amount to each. Bake in preheated oven for about 25 minutes.
8. Let the pans cool for at least 5 minutes before transferring the cakes to wire racks to finish cooling.
9. Completely cool before frosting. Try the lemon buttercream recipe below or use a filling and frosting of your own!
10. Enjoy!

Lemon Buttercream Frosting

Ingredients
1 c. butter, room temperature
3 3/4 c. powdered sugar
1 medium lemon, zest and juice
1 tsp. vanilla extract
pinch of salt
*milk may be needed

Instructions
1. Cream butter, vanilla extract and salt.
2. Add the lemon zest and juice (don't let the seeds fall in).
3. Gradually add the powdered sugar to create a consistency that allows peaks to form when a spatula or fork leaves the frosting. You may not need to add all the powdered sugar. If the frosting becomes too firm, add a small amount of milk (a tablespoon or two) to thin it out.
4. Frost on the poppy seed cake from above (or this frosting would taste great on lemon or vanilla cakes).

Friday, August 24, 2012

Tomato Avocado Feta Salad


My excessive eating and fine wine drinking didn't stop when I got back from California. Why you ask? The sister-in-law came back a few days after us. She only got to stay for a few days before heading back to California and then to Texas. Then she finally gets to come home forever and ever or at least until she goes off to grad school. Probably somewhere cool like Harvard or Oxford. Smarty pants.


This salad was the perfect healthy cleansing meal I needed after over indulging for more consecutive days than I'm willing to admit. I exercised, a few times, in there. That counted for something. Anyways, my dad and my mom gave this rave reviews. They took part in the overindulging binge as well and thought it was only fair they had a bowl of this too.


I tested out two different dressings for this on my dad. One made with bacon fat and balsamic vinegar, a little BLT inspiration situation. Bacon grease and everything else associated with bacon, usually makes everything better. Surprisingly not the case here and not just because this was supposed to be a healthy meal.


The vinaigrette listed below, made for a much brighter salad. Made the tomatoes a little more sweet and paired with the avocado better. It was just all around better. The tomatoes became the star, which is the point. Save the bacon for your next BLT or don't. Sprinkling bacon pieces over the top of the salad was a nice option, giving it a bit more richness without having a greasy heavy bacon vinaigrette.


The best part of this salad has to be that you can make it as big or as little as you want. Make it fit your needs. Love avocado? Use two instead of one. Love feta? Use more of it. Crumble it instead of cube it, getting little bits in every bite. You get the idea. Its a awesome summer salad perfect for showing off summers tomatoes.

xo
April

Serves 2-4
Ingredients: 
Vinaigrette:

1 medium shallot, minced
1 garlic clove, minced

2 tablespoons white wine vinegar
1 1/2 tablespoons dijon mustard
1 1/2 tablespoons honey
1/2 cup plus 1 1/2 tablespoons extra virgin olive oil
Salt and pepper to taste
Salad:
3 large heirloom tomatoes, cubed
1 avocado, cubed
4 ounces feta cheese, cubed
2 slices bacon, cut 1/4-inch pieces, cooked crispy (optional)

Instructions:
  1. For vinaigrette: combine all the ingredients for the in a bowl, whisking until the mixture emulsifies.
  2. In a large bowl, combine the tomatoes, avocado and feta. Pour some vinaigrette over the salad, gently tossing. Serve, dressing with more vinaigrette to taste.

Monday, August 20, 2012

Peach Almond Galette

It has been a long while since I have wrote a post or cooked anything at all. Like the peach gallette, made it over a week ago. I have good reasons though. I wasn't cooking; instead, I was eating my way through San Francisco. Fair reason? I think so. Eating amazing food. Drinking delicious Californian wine. Yum! It was pretty amazing, which helps me forget what a giant cow I feel like, after overeating and drinking for a week.


Did I mention visiting my sister-in-law was the whole reason for going to California? She graduated from the Defensive Language Institute, in Monterey. Seeing her was probably the highlight of the trip, along with Tortas Frontera (the only place to get a good bite to eat in O'hare airport) making amazing margaritas, to go. That is right carry on margaritas. Never slept so well on a flight, ever.


I made this peach galette for my brother before going to Cali, so he didn't miss us too much. More like so he didn't feel so bad about not being able to go see his little lady graduate, after a year of intensive Farsi learning. It was a problem for me to take one for the team and go instead.


I really like this "pie" because it is rustic. There is no pie pan necessary. You of course could make this as a traditional pie, as the recipe is the same one I use for pie pans. This is much easier though, no perfect circles needed. This is perfect for your peach lover. It is mostly fruit, with  just a little sugar, making it all peachy perfect.


The almond mixture on the bottom of the pie just adds a nice flair to the pie, a little extra something. The same goes for the little bit of ground ginger. All barely noticeable, but without them the pie may not be nearly as tasty. I wouldn't know, never tried. You could always try using chopped/ground walnuts or crystallized ginger, neither of which I had on at the time.

xo
April


Ingredients:
Crust
1 1/2 cups all purpose flour
2 teaspoons sugar
1/2 teaspoon salt
1/2 cup (1 stick) unsalted butter, cut into 1/4-inch cubes
3-5 tablespoons ice water

Peaches
4-5 peaches, cored and sliced 1/4-inch thick
1/3 cup blanched almonds, coarsely ground
1/4 cup sugar
1/2 teaspoon ground ginger
1 tablespoon butter, melted

Instructions:

  1. In a food processor, combine the flour, sugar and salt, pulsing several times to combine. Scatter the butter evenly over the flour, pulsing until the mixture resembles coarse meal. Add 3 tablespoons of water, pulsing several times. If the mixture looks too dry, add more water by the tablespoon, until the dough is evenly moistened and just starts to come together. This can all be done using a fork/fingers, if you don't have a food processor. 
  2. Remove the dough from the food processor, onto a clean counter. Being careful not to overwork the dough, shape the dough into a disk. Wrap it in plastic wrap and chill for at least 1 hour.
  3. Preheat the oven to 400F. Remove the dough from the fridge. Working on a lightly floured surface, roll the dough into a 14-inch circle. Place the dough onto a parchment lined baking sheet. 
  4. In a small bowl, combine the almonds, sugar and ginger. Sprinkle 3/4 of the mixture into the center of the dough, leaving a 1 1/2-inch border. Arrange the peaches in a roughly concentric circle, overlapping them as needed. Sprinkle the remaining almond mixture over the peaches. 
  5. Fold the border of dough, at an angle, into the peaches, pinching the edges to make sure they are sealed. Brush the border with the melted butter.
  6. Bake for 45-50 minutes, until the crust is well browned and its edges are slightly caramelized. Remove from oven and allow to cool for 20 minutes before serving.

Wednesday, August 8, 2012

Open Faced Eggplant Sandwich

This is completely unrelated to this sandwich, but who else loves grapes as much as I do? When I ran to the store to buy some bread for this sandwich, I bought two bags of grapes. Only one of them made it home with me. I ate the rest as I drove. That is probably not natural, huh? I just love grapes so much, like candy.


In other life news I rode my first century bike ride, that is a 100 miles. It actually came out to be about 107 miles. I'm an overachiever, I know. The weekend actually came out to be 187 miles. Why you ask? The 2012 Wisconsin Bike MS was this weekend. That was totally unrelated to grapes or this sandwich, but I am just so proud to say I rode and raised more than ever for the event this year.


We finally turn to the sandwich, which most of you are more interested in than my above ramblings. All that you need to know about this sandwich is its super easy and delicious. Double the recipe to serve more people. Lose the bread if you don't have any on hand or bread isn't your thing. Who doesn't love bread though, really? It is surprisingly filling but still light. Its the perfect, quick, made to order open faced sammie. The leftover tomato relish is awesome on toast with some goat cheese after you run out of eggplant (or get sick of it after 3 days).

xo
April

Serves 2
Ingredients:
Tomato relish:
2 medium tomatoes, finely chopped, 1 1/2 cups
1/4 cup, scant, finely chopped parsley
1 tablespoon olive oil
2 teaspoons red wine vinegar
Salt
Pepper

Sandwich:
2 small or 1 large eggplant
2 slices, 3/4 inch thick, sourdough or country bread, from a round loaf
Olive oil
Salt
Pepper
4 ounces goat cheese

Instructions:
  1. Combine the tomato, parsely, olive oil, and vinegar in a medium bowl. Season to taste with salt and pepper, set aside for later.
  2. Trim off the top and the bottom of each eggplant, then cut 2 (1-inch thick) slices lengthwise from the center, discarding the remainder (the rounded, skinned outside portions are discarded). Brush the cut sides with olive oil and sprinkle with 1/4 teaspoon salt. Heat a heavy bottom skillet over medium heat, cooking on each side for about 6-7 minutes or until nicely browned. 
  3. For the bread, lightly brush both sides with oil. Toast them in the same pan as the eggplant or under a hot broiler, until lightly golden. 
  4. To assemble the sandwich, spread goat cheese on each piece of bread and place the eggplant on top of that. Finish each off with half of the tomato relish.