Friday, October 28, 2011

Birthday Oreo Cheesecake

For my boyfriend's birthday, I decided to make his favorite dessert: cheesecake! Although he loves any type of cheesecake, I decided on oreo after being inspired by foodgawker.

I've made a few cheesecakes before so I wasn't too nervous to make another one. But I did want to add something different so I added chocolate chips to the edge of the cake. This was a difficult task but it ended up being the best part - crunchy and chocolaty, who wouldn't like that!
I also wanted to change up the recipe I found so I made only part of the batter chocolate so it wouldn't be too rich. Plus, the two colored layers looked pretty cool! 
Oreo Cheesecake
adapted from kraft kitchen

Ingredients
2 rows or so of oreos (around 25 cookies), crushed
4 pkg. (8 oz. each) cream cheese, softened 
1 c. and 1 tbsp. sugar
1 tsp. vanilla 
6 squares Baker's semi-sweet chocolate squares
4 eggs (room temperature)
2 c. crushed graham crackers
1 stick butter
3/4 bag of mini chocolate chips (estimated) 

Directions
1. Heat oven to 325 degrees 
2. Melt butter and add to crushed graham crackers and 1 tsp. of sugar. Mix well
3. Press firmly to the bottom of a 9 in. springform pan. Make it is even throughout. (Since I added chocolate chips to the edge, I pressed the crust flat to the bottom. However, if you don't want chocolate chips, you can press the crust mixture up the side of the pan.)
4. Bake crust for 10 minutes. Don't forget to take it out!
5. Beat cream cheese, sugar, and vanilla with mixer until well blended. Add eggs, 1 at a time. 
6. Separate batter equally into to different mixing bowls.
7. Melt 4 chocolate squares and add to one of the batters. 
8. Add crushed oreos to both batters.
9. Pour each batters into the pan, one at a time to form layers (I pour the chocolate layer last). 
10. Bake on the center rack for 50 minutes to an hour (It took about 1 hour and 15 minutes for me).

For the chocolate chip edge :)
1. Melt the other 2 chocolate squares and spread on the edge of cake. Wait until cake is completely cooled.
2. With your hands and lots of patience, place chocolate chips on the edge, using the melted chocolate as "glue."  
3. Set cake in refrigerator so the chocolate sets. 
Enjoy cheesecake chilled!  

Wednesday, October 26, 2011

Outrageous Brownies

The only thing you need to know about these brownies is that they are an "orgasm in your mouth". The first time I made these that is all my roommate could say about them after trying the batter. It is a good start to get a compliment like that on the batter, the finished product has to be amazing too. She loved the finished brownies just as much. She doesn't have much of a sweet tooth but I found her sneaking more of these than me. The person who isn't big on sweets, the batter lover and the brownie lover will all be in love with these brownies!


They are super moist and chocolaty. The addition of the instant coffee brings out the chocolate. The recipe has you mix the nuts and chips with flour, which helps them to not sink to the bottom of the pan. You are instructed to refrigerate them, which I recommend. Refrigerating them makes them easier to cut and holds their shape better once cut.  Give them a try, they are sure to please everyone!


Recipe Courtesy of Ina Garten
Ingredients:

  • 1 pound unsalted butter
  • 1 pound plus 12 ounces semisweet chocolate chips (do not melt the 12oz)
  • 6 ounces unsweetened chocolate
  • 6 extra-large eggs
  • 3 tablespoons instant coffee granules
  • 2 tablespoons pure vanilla extract
  • 2 1/4 cups sugar
  • 1 1/4 cups all-purpose flour
  • 1 tablespoon baking powder
  • 1 teaspoon salt
  • 3 cups chopped walnuts (toasted)
Directions:

Preheat oven to 350 degrees F.

Butter a 9 x 12 and 8 x 8 brownie pans (there is LOTS of batter)

Melt together the butter, 1 pound of chocolate chips (reserve 12 oz for later on), and the unsweetened chocolate in a medium bowl on low in microwave. Allow to cool slightly. In a large bowl, stir (do not beat) together the eggs, coffee granules, vanilla, and sugar. Stir the warm chocolate mixture into the egg mixture and allow to cool slightly.
In a medium bowl, mix together 1 cup of flour, the baking powder, and salt. Add to the chocolate mixture. Toss the walnuts and 12 ounces of chocolate chips in a medium bowl with 1/4 cup of flour, then add them to the chocolate batter. Pour into the prepared baking pans, evenly.
Bake for 40-50 minutes (the smaller pan will take less time), until a toothpick comes out clean. Do not overbake! Allow to cool thoroughly, refrigerate, cut and enjoy!


Sunday, October 23, 2011

Grampa Zach's Pumpkin Bread


One year ago today was an extremely emotional day for my family.  It was early Saturday morning and I was in the car with my two older sisters on our way to the salon to get our hair done for our big brother's wedding that afternoon.  We received a phone call from our mom as we were driving, informing us that our Grampa Zach had passed away over the night.  He's the father of nine children, so quite a few people experienced these double sided emotions throughout the day.  It is unfortunate that these two events overlapped with each other, but it was comforting to be surrounded by friends and family the entire day and we were all still able to properly celebrate the joyous occasion!

Growing up one of the foods that my mom always baked on a somewhat regular occasion was pumpkin bread.  The majority of the time when she made pumpkin bread, a loaf would go to Grampa Zach because it was one of his favorite foods.  While I love my Grampa, as a kid I always thought this was a little unfair because it cut back sometimes by half the amount of pumpkin bread left for for the six of us left in our immediate family (although I will admit, more often than not Grampa only got a little loaf).


I decided that it would only be appropriate to use my mom's pumpkin bread recipe and bake some  in honor of Grampa Zach.  I would gladly give Grampa both loaves if I could today.


Ingredients
  • 2/3 cup shortening
  • 2 2/3 cups sugar
  • 4 eggs
  • 2 cups (1 15-16 oz can) mashed pumpkin
  • 3 1/3 cups flour
  • 2 tsp baking soda
  • 1/2 tsp baking powder
  • 1 1/2 tsp salt
  • 1 tsp cinnamon
  • 1 tsp nutmeg
  • 2/3 cup water
  • 1 tsp vanilla
  • Powdered sugar (optional)
Directions
  1. Preheat over to 350 degrees.
  2. Cream together shortening and sugar.
  3. Add eggs one at a time, beating well after each addition.
  4. Sit in pumpkin.
  5. Combine dry ingredients and add alternately with water.
  6. Stir in vanilla.
  7. Turn batter into greased loaf pans (2 large or 3 medium).
  8. Bake for 45-60 minutes (depending on size of loaves).
  9. Sprinkle with powdered sugar if desired after removing loaves from pans.


Happy Anniversary Zach and Kaci!


Tuesday, October 18, 2011

Crockpot Barbecue Beer Pulled Pork

One of my favorite things about going to graduation parties when I was in high school was always the food.  Besides the cake (shout out to Craig's Cake Shop in Verona, WI!), you could almost always count on there to be some sort of hot sandwich served, and most likely that sandwich was going to be pulled pork.  I usually got my fair share of pulled pork to last until the next graduation party season, but now that I'm in college, my pulled pork needs are just not being met!

So, I decided I needed to take matters into my own hands.  I've always heard that it was pretty easy to make, and seeing as it was a Badger football Saturday and roommate Tonia wanted everyone to get up early to tailgate before the 11am game, I thought it would be a pretty good occasion to try out my luck.


Ingredients
  • 3 lbs pork roast (mine was actually 3.3 lbs)
  • 1 tablespoon onion powder
  • 1 tablespoon paprika
  • 1 teaspoon garlic powder
  • 1/2 teaspoon salt
  • 1/2 teaspoon pepper
  • 8 ounces beer
  • 32 ounces barbecue sauce

Season both sides of the pork roast with the onion powder, paprika, garlic powder, salt, and pepper.  I did not measure them out exactly but instead approximated.


Add the pork roast, beer, and most of the barbecue sauce to the crockpot.  I used Bud Light but would maybe suggest using a darker beer to add a little more flavor.  


Set the crockpot to cook on low.  It will need to cook for about 8 hours.  When I got back from the Badger game (victory over Indiana!) the pork had been cooking for about 6 hours and I found that it had floated to the top of the sauce, so I flipped it over to make sure both sides got thoroughly cooked.


A couple hours later I came back to get ready to shred the pork.  Mine actually ended up cooking for closer to 9 hours.


Pull the pork out of the crockpot and set it on a cutting board or pan.  Then take two forks and start pulling the pork apart and shredding it.


After the pork is shredded, put it back in the crockpot and stir in with the sauce.  Add more barbecue sauce as desired to taste.


Serve on a bun and enjoy!  


I shared my pulled pork with three of my roommates and my boyfriend, ate some leftovers the next day for lunch, and still had probably four sandwiches worth that I put in the freezer.

Recipe adapted from this crockpot barbecue beer chicken recipe.


Monday, October 17, 2011

Pumpkin Oatmeal Raisin Cookies

My brother recently graduated from basic training for the National Guard and moved on to officer training school in Georgia. Before he graduated the only way to communicate with him was via snail mail. He has a bit more freedom now and since he has been gone for nearly 5 months he could really go for a little taste of home and I am more than happy to oblige. I have been instructed to not send too many goodies at a time because they are expected to eat it all the same day they receive it. Strange if you ask me, but I have every intention to send large amounts so that he has to share with his army friends. We all know how happy it makes me when other people can enjoy my food! I just mailed these today and can barely wait to hear how they like them!


These cookies are chewy, crispy and a bit cake like all at the same, just the way I like them.They are also simple and versatile. You could add cranberries, cherries, almonds, chocolate or anything you like. I suggest taking the extra little effort to toast any nut you choose to put in these because it really brings out their flavor. Enjoy these and be sure to share them with a friend!


Adapted from My Baking Addiction blog
Yield 30 cookies


Ingredients:
1 1/2 cups all purpose flour
3/4 cups whole wheat flour
1/2 cups old fashioned oats
1 tsp baking soda
1 1/2 tsp cinnamon
1 tsp pumpkin pie spice
1/2 tsp kosher salt
1 cup butter (2 sticks); softened
1 cup packed light brown sugar
1 cup granulated sugar
1 cup canned pumpkin puree
1 large egg
1 tsp pure vanilla extract
1 cup chopped walnuts
1 cup raisins


Instructions:
  1. Preheat oven to 350F.
  2. Heat a medium skillet over medium heat and toast walnuts until fragrant.
  3. Combine flour, oats, baking soda, cinnamon, pumpkin pie spice and salt in a medium bowl and mix to combine.
  4. Beat butter, brown sugar and granulated sugar until light and fluffy (about 5mins).
  5. Add pumpkin, egg and vanilla to the butter and mix to combine. Add the dry ingredients, raisins and nuts and mix until just combined. 
  6. Drop onto a cookie sheet by the rounded tablespoon an inch apart. 
  7. Bake for 12-14 minutes and let cool slightly and then move to a rack to cool.

Sunday, October 16, 2011

Pumpkin Chocolate Chip Bars


As you can see, this little blog of ours is doing its fair share of helping out with the pumpkin shortage.  I found this recipe and just couldn't resist making it, the perfect way to celebrate the end of the first round of midterms for the semester!

I was expecting these bars to be more cookie like, fitting more appropriately in the dessert category.  After consulting with my taste testers though, we've decided that they are more cakey and would probably fit better as a coffee cake.  They remind me of a cinnamon chip coffee cake that my mom makes.  Essentially, I'd consider these bars "all purpose" as they can appropriately be eaten at any time of day (not to say that I've never eaten a cookie for breakfast before).


Ingredients
  • 2 cups flour
  • 1 tablespoon pumpkin pie spice
  • 1 teaspoon baking soda
  • 3/4 teaspoon salt
  • 1 cup unsalted butter
  • 1 1/4 cups sugar
  • 1 large egg
  • 2 teaspoons vanilla extract
  • 1 cup pumpkin puree
  • 1 package (12 ounces) semisweet chocolate chips
Directions
  1. Preheat oven to 350 degrees.  Grease a 9x13 pan.
  2. Add butter and sugar to a mixing bowl and cream together.
  3. Beat in vanilla and egg.
  4. Add pumpkin puree and mix.
  5. Mix in dry ingredients (flour, pumpkin pie spice, baking soda, and salt).
  6. Add chocolate chips.
  7. Spread batter evenly into 9x13 pan and bake for approximately 35 minutes.
Recipe courtesy of Martha Stewart.


Friday, October 14, 2011

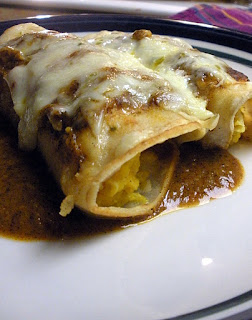
Chicken-pumpkin Enchiladas

There has been a plethora of sweet pumpkin recipes lately and I wanted to try using pumpkin in a savory way. I thought about pumpkin raviolis (next weekend?), but I decided that this was a much more original idea and slightly less work. I have been very excited all week to make these and was a bit panicked that I wouldn't be able to find anyone to make them for. My favorite part of cooking is sharing it with other people. I was thrilled when my roommate said she would love for me to make her enchiladas despite hating Mexican food and that her co-worker was going to join us too and we would watch the Brewer game. They both loved them despite being skeptical. If you have ever had sweet potato enchiladas they are very similar--a little sweet and spicy. The flavor of these and ingredients can really be tailored to your tastes, which is great. I threw a butternut squash in because it needed to be used. I decided to flash fry the corn tortillas to add a bit of flavor to them and make them more malleable. It is not necessary but I think it adds a nice touch. Hope you enjoy!

Ingredients:

Corn tortillas
3/4 cup grated pepper jack cheese

Enchilada Sauce:
1/4 cup vegetable oil
1/4 cup (scant) New Mexico chili powder
2 tbs flour
1 3/4 cup chicken broth
1 (80z) can tomato sauce
1/4 tsp (rounded) cumin
1/4 tsp onion salt
1/4 tsp cinnamon
2 garlic cloves grated or minced
salt to taste

Filling:
1 rotisserie chicken
1 small pumpkin (any works, I used a sugar pie)
1 small butternut squash
Vegetable oil
8oz goat cheese
3/4 tsp cumin
3/4 tsp chili powder
1/4 tsp cayenne pepper
1/4 tsp cinnamon
1/4 tsp salt

Instructions:
  1. Preheat oven to 350F. Cut the pumpkin/squash in half and remove seeds. Drizzle the insides with vegetable oil and sprinkle with a generous pinch of cumin and salt. Place them cut side up on a rimmed baking sheet and place on the middle rack on the oven for 30-40mins or until tender.
  2. For the sauce place the vegetable oil, chili powder and flour in a medium sauce pan over medium-high heat. Stir constantly, so it does not burn, until it starts to thicken and turn darker (about 1-3mins). Turn the heat down to medium and pour in the chicken broth, tomato sauce, cumin, onion salt, garlic and cinnamon. Stir to combine and thicken and remove from heat. Season to taste with salt.
  3. Shred the chicken using a fork and place in a medium bowl.
  4. When the pumpkin is cool enough to handle, spoon the flesh into a food processor along with the goat cheese, cumin, chili powder, cayenne pepper, cinnamon and salt. Pulse until combined to a somewhat smooth consistency.
  5. Put 3/4 cup of the pumpkin mixture into the enchilada sauce and stir to combine. Place the remaining pumpkin mixture in the bowl with the chicken and stir to combine.
  6. Preheat oven to 350F. In a 9x13 baking dish, spread 3/4 cup of the sauce evenly over the bottom of the dish. Heat a small skillet with 1/2 tsp vegetable oil over medium to medium- high heat. Place the corn tortillas in the pan one at a time and fry on each side for 15secs or until browned in spots, add more oil as needed. Fill each tortilla with 1/2 a cup of the pumpkin-chicken mixture and wrap closed, placing them seam side down in a the baking dish. Cover with 3/4 cup of sauce and sprinkle cheese over the top. Place in the oven and bake for 20mins or until cheese is melted and slightly golden.


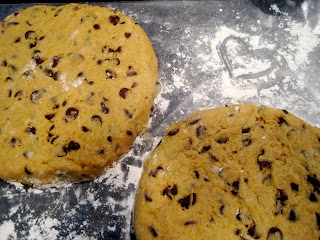
Pumpkin Chocolate Chip Scones (for breakfast or dessert!)

I have been planning on making scones since summer but luckily I have been putting if off so I could make them in my favorite fall flavor - pumpkin!

But before I could make them, I needed to pick up all the ingredients. This started a huge adventure because I really wanted to find the sugar that bakeries put on their baked goods. The first (and pretty important) problem I had was that I didn't even know what that sugar was called! After some research on the internet, I found out it has quite a few names: sanding sugar, decorating sugar, coarse sugar, pearl sugar...but even though I knew the names of this large-grain sugar, I didn't know where to find it. After going to grocery store after grocery store, and even target, I finally found it at Whole Foods. The long search came to an end and I could finally make my scones, well, after I went out again to get the eggs I forgot. 
This was the first time I made scones and they turned out great! Everyone loved them! I can't wait to try this recipe again but maybe with blueberries instead of pumpkin and chocolate chips.

Pumpkin Chocolate Chip Scones 

Ingredients 
2 3/4 c. flour
1/3 c. sugar
1 Tbsp baking powder
3/4 tsp salt
3/4 tsp ground cinnamon
1/4 tsp ground ginger
1/4 tsp ground nutmeg
1/4 tsp ground allspice 
1/2 c. frozen butter (I took it out of the freezer probably 10 minutes before I used it)
1 package (about 2 cups) chocolate chips 
2/3 c. canned pumpkin
2 eggs
3 Tbsp (& a small amount for brushing) half and half
Decorating Sugar for topping (if you can find it) 

Directions 
1. Add all dry ingredients into a large bowl and mix (flour to allspice)
2. Add the frozen butter by using a large-hole cheese grater (I got this tip from Allrecipes!) and lightly mix. Otherwise, other recipes show to cut the butter into small pieces and then use a fork to integrate it into the dry ingredients. 
3. In a different bowl, add all the wet ingredients (pumpkin, eggs, and half and half) and mix. 
4. Pour the mixed wet ingredients and chocolate chips into the bowl with the dry ingredients and mix (don't over mix though). 
5. Lightly flour hands and parchment paper (I only had tin foil) that is on a cookie sheet. Shape dough into two discs of the same size and thickness (about 3/4 inch).
6. Brush a little half and half on top of the discs and sprinkle on the decorating sugar. (skip this step if you don't want the sugar on top or are substituting the sugar for a glaze).
7. Cut the discs like you would a pie or pizza for a total of 12 triangular pieces, or 6 pieces per disc. 
8. Now, not like normal baking, skip the oven and go for the freezer. Let the dough set in the freezer for about 30 minutes. 
9. While chilling in the freezer, preheat oven to 425 degrees. 
10. Place cookie sheet full of scones in the center of the oven for about 20-25 minutes or until golden brown and a fork comes clean after poking a scone. 
11. Cool for 5 minutes before enjoying! 

Friday, October 7, 2011

Fall Pumpkin Olive Oil Bread

I have been in a bit of a rut lately and decided it was time to get out of it and take a bike ride this morning. I make it a goal for myself sometimes when I ride my bike to smile at everyone I pass. It is awesome to think that I made someone’s day a bit better by smiling at them and even if I didn't I made mine a bit better. I couldn't help to think to myself the whole ride, corny as it is that as I was giving out warm fuzzies to people passing by, at the same time the bike path was covered with fuzzy wuzzy caterpillars that I was constantly swerving to miss the whole ride. Who doesn't love seeing all the little fuzzy caterpillars this time of year? By the end of the bike ride it had done exactly what I needed it too and I just had to keep the fall atmosphere going in my apartment with some pumpkin bread!
Enough rambling about my day but it was my inspiration to make the bread today! I have had pumpkin puree in the cupboard and have been waiting to make this for awhile now. It was super simple and is supposed to be “healthy”. I followed the recipe exactly except for adding more pumpkin than was called for. I have had breads and cakes with olive oil before and they are always super moist and simply delicious. My day got a bit hectic and I had to wait to try a piece until this afternoon but it was worth the wait. It is super moist. The only thing I would do differently is put pumpkin seeds on top for some crunch as was suggested, but I didn't have any.
Olive Oil Pumpkin Bread:
Ingredients:
3/4 cup whole wheat flour
2/3 cup unbleached all-purpose flour
1 tsp. ground cinnamon
1 tsp. baking soda
1/2 tsp. baking powder
1/2 tsp. ground nutmeg
1/4 tsp. salt
2 large eggs
1 cup canned pumpkin puree
1/2 cup packed light brown sugar
1/3 cup olive oil
1/3 cup honey
Instructions:
Preheat oven to 350F. Mix the dry ingredients together in a medium bowl and then combine the wet ingredients (eggs, pumpkin, sugar, olive oil, honey) in a large bowl to combine. Add the dry ingredients to the wet ingredients and stir with a spoon until just combined and then poor into a 9x5 loaf pan. Spread the batter evenly and tap on the counter a few times and cook for 40-45 minutes or until a toothpick comes out clean. Let the bread cool for 15 minutes before taking it out of the pan.
Enjoy!


Recipe courtesy of Ellie Krieger

Thursday, October 6, 2011

Chicken Pesto Pasta


I decided when I got back from class today that I wanted to cook something for dinner, so I started to think about what I had to work with.  I have a plethora of noodles because I like to buy them in all different shapes and sizes.  My noodles take up too much space in my cupboard, so I figured I should clear out some room in there since I only have a limited amount of cupboard space in an apartment of six.

I still consider myself to be a beginner cook and am still learning how to use spices, so I just used a jar of store bought pesto.  


First I put a medium size pot of water with a touch of salt in it on the stove to boil.  At the same time I started warming a large saucer with a large drizzle of extra virgin olive oil (regular olive oil works too).  

While that is going on, I took a large chicken breast and cut it up into strips.  I seasoned the strips with Morton Nature's Seasoning (any similar all seasoning would work) for a little extra flavor.


Once the water is boiling I poured about half a pound of rigatori noodles (any other shaped noodle with grooves in it for the pesto to sit in will work too) into the pot.  


Place the seasoned chicken in a single layer in the frying pan.


As the chicken cooks I cut it into smaller pieces because I like having chicken in as many bites of my pasta as I can!


Once the noodles and chicken are done cooking, strain the noodles and pour them into the frying pan.  Mix them in with the chicken.  Add spoonfuls of pesto and stir in to taste.  (I used about four spoonfuls or so.)


Serve as you wish!  I sprinkled a parmesan/asiago cheese mixture on top of my pasta.  The amount I made left lots of leftovers, which makes a quick and easy lunch when I get back from class and am starving.


Enjoy!

Monday, October 3, 2011

Pumpkin Brownies


I was making these really awesome pumpkin snickerdoodle cookies the other day and I had some leftover pumpkin that I couldn't decide what to do with. I was thinking something along the lines of pumpkin pancakes but then I came across this pumpkin brownie recipe and just couldn't resist trying out the combination of chocolate and pumpkin together, two of my favorite flavors!

So after class and work on Friday I came home and baked these guys as a nice transition from the school week to a fun filled weekend of Badger and Packer football domination! Two of my roommates kept my company while I baked and made a music playlist for our corn-husking tailgate.

After a couple of near tragic measurement mix ups (1/4 cups baking powder instead of 1/4 teaspoons. How does that even happen?!) the brownies came out of the oven scotch free. My taste testers and I decided that they are best eaten with a cold glass of milk, otherwise they may be a little too rich. I meant to put a dusting of powdered sugar on top of the brownies when I took them out of the oven but forgot, oh well. Enjoy!

Ingredients
10 oz. of dark chocolate
1/2 stick of butter
1/2 cup of pumpkin
2 eggs
1 1/2 teaspoons vanilla extract
1 cup flour
1/4 cup unsweetened cocoa powder
1/2 cup sugar
1 teaspoon pumpkin pie spice
1/4 teaspoon baking powder

Directions
  1. Preheat oven to 350 degrees.
  2. Grease a square 8x8 pan (line if you'd like first).
  3. Melt butter and chocolate squares together. Stir together.
  4. Add pumpkin, eggs, and vanilla extract. Mix together.
  5. Add flour, cocoa powder, sugar, pumpkin pie spice, and baking powder. Mix together with wet ingredients.
  6. Pour batter into pan and level out (batter will be thick and won't fill in all the nooks and crannies of the pan on its own).
  7. Bake for 30 minutes.
Recipe courtesy of Running to the Kitchen

LinkWithin

Related Posts Plugin for WordPress, Blogger...