Pages

Tuesday, November 29, 2011

Crispy Black Bean-Bacon Tacos

These are basically homemade taquitos. The recipe suggested serving it on a bed of lettuce and tomatoes, Mexican BLT anyone? We live in Wisconsin and in my opinion tomatoes are not worth it this time of year. I decided to go with a rice and beans route instead. Normally both of which are side dishes but with the beans in a taco they make a perfect main. This recipe is from Rick Bayless' Mexican Kitchen cookbook. No big deal, but it is a signed copy. It is no big secret that I love him, his food and restaurants. Anyways, I decided to make this recipe because it calls specifically for store bought corn tortillas and I am expecting a tortilla press from Santa this year (homemade are thinner). 


The process may seem difficult, but in reality it is very straightforward and quick. It is a perfect meal to cook with a friend. After the bean mixture is finished, one person can flash fry the tortillas, and the other can fill and roll them. I used to hate using corn tortillas until I tried the flash frying method--no tearing or breaking. Make sure that the oil is hot enough before you start the rolled and filled tacos. I did not use a thermometer. Instead I dropped a stray bean into the hot oil, if it sinks, bubbles and rises to the top quickly the oil should be hot enough. If you are going to make this for more than four people I suggest doubling the beans, there were no leftovers when I made this for my parents as a Thanksgiving Eve meal (although my Dad and I can really put it away). Try serving it with Red Chile Rice and enjoy!

Ingredients:
8 slices bacon
1 medium white onion, chopped
15 ounce can black beans, drained and rinsed
2-3 pickled jalapenos (seeded, stemmed and chopped) or 1/4 cup jalapenos slices chopped
Vegetable oil
12 corn tortillas
2/3 cup crumbled Mexican queso fresco

Instructions:
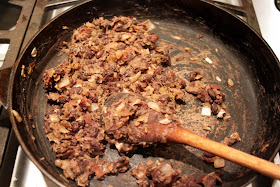
  1. In a 10- to 12-inch skillet, cook the bacon until crispy over medium heat. Remove the bacon to paper towel. Pour off all but a thin coating of the drippings. Add the onion and cook until deep golden brown, about 10 minutes. Stir in the beans, then coarsely mash the beans with the back of a wooden spoon. Crumble in the bacon along with the jalapenos. Season with salt and set aside in a bowl. This could be made several days ahead if you wanted.
  2. Clean the skillet, pour in a splash of oil and heat over medium-high. One by one, quick fry the tortillas for several seconds to soften and pat dry on paper towels. Add more oil as needed. Remove the oil from the heat. Fill each tortilla with 2 tablespoons of the bean mixture, sprinkle with 1 tablespoon cheese, and roll up. 
  3. Add 1/2 inch of oil to the pan and heat over medium to medium-high heat (about 375F). Fry the taquitos 4 at a time, placing them flap-side down in the oil. Fry on each side for about 2 minutes. Remove with a slotted spoon or tongs, drain on paper towels and tip them to be sure no oil is inside. Serve with rice.

Monday, November 28, 2011

Easy Peasy Cheesy Potatoes

One of my favorite sides to make with dinner (or it's happened a couple times as a meal itself when I'm feeling like having a very unbalanced meal) is cheesy potatoes!  It's super easy to make and tastes delicious every time.  The roommates always love when I make this because I always share with them.  I will admit though that this batch did not turn out quite as good as it usually does, I think it might be because I used a mixture pack of cheese instead of just cheddar.


Ingredients
  • 1 16 oz package of frozen hashbrowns, thawed
  • 1 can cream of chicken soup
  • 1 8 oz package of shredded cheddar cheese
  • 16 oz light sour cream
  • Corn flakes (or similar cereal, or crushed saltine crackers or other similar cracker)
  • 2 tablespoons butter
Directions
  1. Preheat oven to 350 degrees.
  2. Mix thawed hashbrowns, soup, sour cream, and cheese in a 9x13 pan. (Grease pan to make it easier to clean.)
  3. Sprinkle corn flakes in a layer on top.
  4. Drizzle melted butter over corn flakes.
  5. Cook for 40 minutes or so.

Nate's Angel Food Birthday Cake

My boyfriend's birthday was this past weekend so I told him I would bake him a cake and he could pick whatever kind he wanted.  I was secretly a little disappointed when he chose angel food cake because it's one of the few cakes that I would say I don't really like, but I stuck to my word and made it since it's one of his favorites.

Having never made an angel food cake before I did not really know what to expect and it ended up being a little more complicated than I was expecting.  (I guess I should've read the recipe more thoroughly before waiting until late morning of a home Badger football game to bake a cake!)  The cake turned out just fine though. Topped with homemade whipped cream and strawberry bits it received raving reviews, especially from my roommate Tonia. (The birthday boy liked it too!)


Recipe adapted from the Better Homes and Gardens New Cook Book

Ingredients
  • 1 1/2 cups egg whites (I used 11 large eggs.  It is very important that no yolk gets into the cake!)
  • 1 1/2 cups powdered sugar
  • 1 cup flour
  • 1 1/2 teaspoons cream of tartar
  • 1 teaspoon vanilla
  • 1 cup granulated sugar
Directions

Stiff peaks
  1. In a very large mixing bowl, allow egg whites to stand at room temperature for 30 minutes.
  2. Set flour and powdered sugar together in a separate bowl and set aside.
  3. Preheat oven to 350 degrees with baking rack at the lowest position in the oven.
  4. Add cream of tartar and vanilla to the egg whites and beat at a medium speed with an electric mixer until soft peaks form. (Soft peaks are when you pull the beaters out of the batter and the batter that pulls up into a peak curls over.)
  5. Gradually add granulated sugar and beat until stiff peaks form. (Stiff peaks are when the batter stands strait up when you pull the beaters out of the batter.)
  6. Sift flour mixture onto batter in fourths, folding into batter along the way. (To fold the batter, cut down through the batter with a spatula and bring up and around.)
  7. Pour batter into an ungreased 10-inch tube pan. (I greased mine which made the cake come out very easily, but I think it may have stayed a little fluffier if I hadn't.)
  8. Cut through batter with a skinny metal knife to release any hidden air bubbles.
  9. Bake on lowest rack of oven for 40 minutes or when top spring back when lightly touched.
  10. Turn cake pan upside down immediately and let cake cool while still in the pan.
  11. Loosen sides of cake from pan and enjoy!

Pumpkin Cheesecake

My family celebrates Thanksgiving by having a big dinner feast with just the immediate family.  My mom usually makes pumpkin tort for dessert, but this year she decided she wasn't going to so I volunteered to make a pumpkin cheesecake instead.  I was a little nervous though because I had never made a cheesecake before!

I found a recipe online of Paula Deen's online that I decided to use.  After reading a bunch of the reviews I decided to add a pan of water in the oven when I cooked the cheesecake to help so it didn't dry out.  I also adjusted the baking time and added about 20 minutes to what Paula's recipe called for.  The cheesecake ended up cracking a bit, but I'm sure that is something that will be fixed with experience.  One side also ended up being a little darker than the rest of the cheesecake but I think that is because I placed the pan of water on the rack under the cheesecake unevenly.  The cheesecake turned out quite delicious anyways and got raving reviews, especially when topped with homemade whipped cream!


Crust
  • 1 3/4 cups graham cracker crumbs
  • 3 tablespoons brown sugar
  • 1/2 teaspoon ground cinnamon
  • 1 stick melted butter
Filling
  • 3 8oz packages of cream cheese at room temperature (I used low fat cream cheese)
  • 1 15oz can pumpkin puree
  • 3 eggs plus 1 egg yolk
  • 1/4 cup sour cream (I used light sour cream)
  • 1 1/2 cups sugar
  • 1/2 teaspoon ground cinnamon
  • 1/8 teaspoon ground nutmeg
  • 1/8 teaspoon ground cloves
  • 2 tablespoons flour
  • 1 teaspoon vanilla extract
Directions
  1. Preheat oven to 350 degrees.
  2. For crust, combine graham cracker crumbs, brown sugar, and cinnamon.
  3. Add melted butter.
  4. Press down flat into a 9-inch springform pan.
  5. For filling, beat cream cheese until smooth.
  6. Add pumpkin puree, eggs, egg yolk, sour cream, sugar, and spices.
  7. Add flour and vanilla.  Beat together until well combined.
  8. Pour filling into crust and spread out evenly.
  9. Bake in oven containing a separate pan of water for 1 hour and 20 minutes, or until cheesecake only lightly jiggles.
  10. Remove from oven and let sit for about 15 minutes.
  11. Cover in plastic wrap and refrigerate for at least 4 hours.

Friday, November 25, 2011

Red Chile Rice

I made this the other night to go along with Crispy Black Bean-bacon Tacos. Everything about this was amazing, especially the rice being cooked perfectly. You will have leftover seasoning paste, which you could use as a rub on chicken or fish. I used the leftover paste to make more rice and the rice was cooked perfectly again. I added a can of beans and a cup of corn after the rice was cooked to make it into a meal for myself, delicious.


The seasoning paste was not as spicy as I was expecting it to be. If you want it to be spicier add a few dashes of cayenne pepper or use dried guajillos instead of the anchos. You will need a food processor or blender to make the paste. It is a lot easier to make than it may seem and well worth it. 


Recipe courtesy of Rick Bayless
Ingredients:
Essential Sweet and Spicy Ancho Seasoning Paste:
8 garlic cloves, unpeeled
8 medium (4 ounces) dried ancho chiles, stemmed and seeded
1 1/2 teaspoons dried oregano
1/2 teaspoon freshly ground black pepper
1/8 teaspoon ground cumin
1/4 teaspoon ground cloves
1 teaspoon salt
2/3 cup chicken broth or water
Rice:
1 tablespoon vegetable oil
1 cup white rice
1 medium white onion, diced
1 2/3 cups chicken broth or water
Instructions:
Ancho Seasoning Paste:

  1. Heat a heavy skillet over medium heat. Place the garlic in the pan and roast for 15 minutes until softened (they will blacken in spots); cool and peel. While the garlic roasts, open the chilies and lay them flat in the pan one at a time pressing down with a spatula for a few seconds on each side until you hear it crackle or send up a wisp of smoke.  Put the chilies in a small bowl with hot water and let re-hydrate for 30 minutes.
  2. In a food processor or blender, combine the oregano, black pepper, cumin, cloves, salt, peeled garlic, chilies and 2/3 cup broth or water. Process to a smooth puree.
The Rice:
  1. In a large measuring cup, heat the broth and 5 tablespoons of ancho seasoning paste in the microwave on high for 3 minutes. 
  2. In a medium saucepan heat the oil over medium heat. Add the onion and rice, stirring regularly, until the rice looks chalky, about 5 minutes. Pour in the broth and ancho seasoning paste with the rice, stirring a few times and scraping down any stray kernels from the side. Turn the heat to low, cover and cook for 15 minutes. Uncover and check a few grains of rice; it should be nearly cooked through. If it is just about ready, turn off the heat and let it it sit covered for 10 minutes. If it is far from done, replace the lid and cook for another 5 minutes. Enjoy!

Root beer Pulled Pork

I love this recipe! It is super delicious but super easy! The first time I ate root beer pulled pork, my boyfriend made it for me on my birthday. He had never had it before but was confident it would taste great. Since then, it has been one of our favorite dinners to have together. 

I made this one week day when we were both craving it. It is super easy to put together in the morning and let it cook all day as you're in class or working (or in my case, spending the whole day writing and perfecting a paper). Plus, it always leaves us left overs to enjoy later in the week. 

Root beer Pulled Pork

Ingredients
1 pork tenderloin (approximately 2 pounds)
2 cans of root beer (or enough to submerge the tenderloin)
1 bottle of Sweet Baby Ray's Barbecue sauce

Directions
1. Pour root beer over the pork tenderloin in a slow cooker (make sure the tenderloin is not frozen)
2. Cook on low for approximately 7 to 8 hours
3. Drain the root beer and shred the pork with two forks
4. Add the Sweet Baby Ray's barbecue sauce and cook on low until warm (about 15 minutes)
5. Enjoy!

Cranberry Upside Down Cake

My family unfortunately did not have the opportunity to host Thanksgiving this year, which just means Christmas dinner is going to be all the more epic. Even though I could not cook the whole feast, I had to bring something. Thanksgiving is also my Grandma's birthday, and I know she loves chocolate and cranberries. I chose cranberries because I have been looking for something to make with all the frozen cranberries in my freezer, and I have a lot (there was a deal at the last farmer's market).


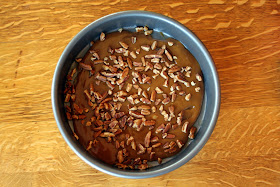
I searched through several different upside down cakes and came up with this one. The cake has an almost coffee cake like texture, with the addition of sour cream. I am usually not a fan of orange zest in things, but there is just enough here that it adds a nice flavor without being overwhelming. It is super moist and a little bit sweet and tart, a real Thanksgiving winner. 


Adapted from Joy of Baking
Ingredients:
Topping:
1/2 stick unsalted butter (1/4 cup)
3/4 cup light brown sugar
3/4 cup chopped pecans, toasted
2 cups fresh/frozen cranberries (about 8 ounces, do not thaw)
Cake:
1 1/2 cups all purpose flour
2 teaspoons baking powder
1/4 teaspoon salt
1/2 teaspoon cinnamon
1 stick unsalted butter, softened
1 cup granulated sugar
2 large eggs
1 teaspoon vanilla
1 teaspoon orange zest
8 ounces sour cream


Instructions
  1. Preheat the oven to 350F. Grease a 9-inch round cake pan.
  2. In a small saucepan heat the butter and brown sugar over medium heat, until the sugar has dissolved. It will bubble up some and eventually stop and begin to look smooth, about 4 minutes. Pour into the prepared cake pan and and evenly sprinkle the pecans and cranberries over the top.
  3. In a medium bowl combine the flour, baking powder, salt and cinnamon. In a stand mixer with a paddle attachment beat the butter and sugar on medium until light and fluffy (about 5 minutes). 
  4. Scrap down the sides and add the eggs one at a time. Add the vanilla, orange zest and sour cream. Beat to combine and scrap down the sides. Add the dry ingredients on low speed, mixing just to combine.
  5. Pour the mixture into the cake pan and gently spread it evenly over the top of the cranberries. Transfer it to the oven and bake for 30-40 minutes, until the top is golden and a toothpick comes out clean. 
  6. Cool the cake in its pan for 5 minutes and then invert it onto a serving plate. Allow the cake to cool for another hour and serve it warm or at room temperature. 

Monday, November 14, 2011

Four Cheese Squash Macaroni

I have been coming across a lot of mac and cheese recipes that incorporate squash. I happened to have some squash and cheese that needed to be used up. The cheese maybe didn't need to be used up but being a true Wisconsin girl there is never a shortage of cheese on hand and I love mac and cheese!


I hate it when mac and cheese is too soupy or too dry. For my first time making mac and cheese with out a recipe, this turned out splendidly. It was just the right creamy consistency of cheese to noodle ratio. The squash and onions add a bit of sweetness and is contrasted excellently by the sharpness of the Gorgonzola and goat cheese. If you don't think you are a Gorgonzola fan, I would strongly recommend trying it here. The Gorgonzola just adds a much needed bite and saltiness. I am very pleased with how this turned out and hope you enjoy it as much as I did!


Ingredients:
1 pound pasta (penne, rigatoni, spirals, fusilli etc.)
1 medium onion
1 medium squash
2 tablespoon olive oil
Salt
Pepper
6 tablespoons unsalted butter
4 tablespoons flour
2 1/2 cups 2% milk
1 cup heavy cream
10 oz goat cheese
1 1/4 cups (5oz) grated  fontina cheese
1 1/4 cups (5oz) grated Havarti cheese
1/2 cup (2oz)  Gorgonzola cheese
2 cups fresh bread crumbs


Instructions:

  1. Preheat oven to 400F. Peel and cut squash into 1-inch cubes. Toss with a tablespoon of olive oil and sprinkle with salt and pepper. Place on a baking sheet and cook for 30mins or until fork tender. Maintain oven temperature.
  2. Meanwhile, slice the onion and place in a small skillet with a tablespoon of butter and a tablespoon of olive oil over medium-low heat. Sprinkle with a pinch of salt and pepper. Cook for 15-20 minutes until golden and softened. They may start to stick or the pan may turn brown, that is okay. If they start to look dry add a splash of water.
  3. Bring a pot of water to a boil and cook the pasta to al dente (under cooked, about 2 minutes less than normal).
  4. Combine the bread crumbs with 2 tablespoons of butter and a 1/4 cup of Havarti and fontina. 
  5. In a medium pot heat 3 tablespoons of butter over medium heat and add 4 tablespoons of flour, whisking constantly until thickened and golden. Add both milks and increase heat to medium-high. Whisk until combined and small bubbles form around the edge, reducing heat to medium until thickened.
  6. Add the remining fontina, Havarti,Gorgonzola and goat cheese. Stirring until melted. Add the onions, squash and noodles stirring to combine. Pour the mixture into a baking dish and top with the bread crumb and cheese mixture. Place in the oven and cook until the top is melted and golden (about 10 minutes). Enjoy!


Tuesday, November 8, 2011

Three Sisters Soup

I am taking a Native American Indian class this semester for an ethnic studies graduation requirement. When the professor announced the second assignment was going to be about food, she had my full attention. It was a tough choice deciding if I should research the history of corn cultivation or get into the kitchen and cook, not! The goal of the assignment was to use indigenous ingredients that would have been available and used by the Native Americans of Wisconsin. I decide to go with soup because I have never made soup before and have always wanted too.


The story behind this soup is that squash, beans and corn grow cooperatively. Corn uses nitrogen from the soil and beans replenish nitrogen to the soil. The squash keeps down weeds and prevents erosion. It was a very sustainable method, allowing for replanting of the same plot year after year. I added wild rice to the soup to add texture and flavor, but wild rice was widely available in Wisconsin at the time.


I did not have high expectations for flavor, but I was totally shocked by how delicious it was. Part of the assignment was to cook the food for friends.  I made it for my dad during the Packer game and he loved it and it is not just because I am his daughter. He is not afraid to be critical (can you say overly critical?), and for not being a big soup person he loved this. There were only a few ingredients added that would not have been available at the time, but something similar was probably used to enhance the flavor the way contemporary ingredients do. It was very easy and quick, and it was even better the next day. This would make for a great meal at the beginning of the week, making leftovers for later in the week. 


Ingredients:
3/4 cup wild rice (the real deal, not Uncle Ben's)
1 medium squash
1- 19oz can red kidney beans
1 cup frozen corn
4 cups water
4 teaspoons vegetable bullion
1 bay leaf
¼ teaspoon black pepper
2 tablespoons flour
2 tablespoons butter

Instructions:

  1. Cook rice according to package instructions.
  2. Peel and cut the squash into 1 inch cubes. Drain and rinse beans.
  3. Add the squash, beans, corn and bay leaf into a heavy bottomed medium pot. Cover with water and add the vegetable bullion. Turn heat onto high and bring to a boil. Add the flour, butter and pepper. Boil for 5 minutes and reduce to a simmer for 5-10 minutes or until the squash is fork tender. 
  4. Add the cooked wild rice, stir to combine and serve.

Monday, November 7, 2011

Peanut Butter Cup Cheesecake

I was at my parents house the other day and whenever I am home I like to look through my moms cooking magazines. I found a really delicious looking caramel pie recipe and was bound and determined to make it this past weekend. My head was apparently in the clouds while I made the pie because I burnt the heck out of the caramel. It had been a frustrating day and that was the last straw. I decided not to try the caramel again but was left with an empty graham cracker crust. What better to put in a graham cracker crust than cheesecake?! I looked at some plain cheesecake recipes and came up with this. It is not too sweet which I like a lot and it was very simple. The Reese's cups on top of the pie add a really nice touch. Enjoy!


Ingredients
1 1/2 packages graham crackers
5 tablespoons butter (melted)
2 teaspoons sugar
3 x 8oz packages cream cheese (room temperature)
2 tablespoons flour
Pinch salt
3/4 cup sugar
14 peanut butter cups
1 tablespoon vanilla
3 large eggs


Instructions:
  1. Preheat oven to 375F
  2. In a food processor pulse graham crackers to a fine crumb. Add melted butter and sugar and pulse to combine. Place in a pie dish and press down in the middle and up the sides to form the crust. Bake the crust for 5-7 minutes until golden.
  3. Reduce oven to 300F. Place 8 peanut butter cups in a food processor and pulse to medium/small pieces.
  4. In a stand mixer with a paddle attachment, beat the cream cheese, flour, and pinch of salt on medium speed for about 5 minutes. Scrape down the sides and add add sugar and mix to combine. Scrape down the sides and add the peanut butter cup pieces and vanilla. Mix until just combined. Add the eggs and mix until just combined (don't over mix or it will puff up too much and is more likely to crack).
  5. Pour the mixture into the graham cracker crust. Place 6 whole peanut butter cups in a circle on the top of the cream cheese mixture.
  6. Put it in the middle of the oven and bake for 45-50 minutes or until slightly jiggly like jello.
  7. Let cool at room temperature and enjoy!


Friday, November 4, 2011

mini mini Chocolate Chip (Chocolate) Cookies

Yeah, I'm just as confused as you are. I didn't know how else to title this post because I made mini cookies that have mini chocolate chips in them and half of the cookies are double chocolate (the dough is chocolate and they have chocolate chips). Hope that clears any confusion! If not, just see the picture.
I wasn't very creative for these cookies, I basically followed the Nestle Tollhouse recipe on the back of the chocolate chip bag. I did a few different things, one was making half the batch double chocolate chip cookies. Don't worry, I'll show you how! They were quite a hit over the weekend. I made them on Friday and they didn't last much longer past Sunday. 

Mini mini Chocolate Chip (Chocolate) Cookies
as seen on the back of your chocolate chip bag or here

Ingredients
2 1/4 c. flour (I always use more so the cookies are fluffier - I probably added 3/4 c. more)
1 tsp. baking soda
1 tsp. salt
1 c. (2 sticks) butter, softened (I actually used 1/2 c. butter, 1/2 c. shortening - I got this tip from Kelsey!)
3/4 c. packed brown sugar
1 tsp. vanilla extract
2 eggs
1 package mini chocolate chips
1/3 c. cocoa
1 tbsp. vegetable oil

Directions
1. Preheat oven to 375 degrees
2. Combine all dry ingredients (flour, baking soda, and salt) and mix
3. Combine in a different bowl butter (and shortening), both sugars, and vanilla extract. Mix until creamy. I'd recommend using a hand mixer
4. Add eggs, one at a time, beating well after each addition
5. Gradually beat in flour

Small side note - I had this conversation with a couple people about whether they follow the directions about mixing the dry ingredients and liquids separately. I personally do it separately, but I don't really know if it makes a difference. Leave a comment on what you do or what you think is better :)

6. Divide dough equally and place in different bowls. 
7. To one bowl, add 1/3 c. cocoa and 1 tbsp. vegetable oil. Mix well
8. Add chocolate chips to each bowl, (make sure half of the bag goes into each). Mix

9. Drop cookies onto a cookie sheet. My mini cookies were about a tablespoon amount for each. 
*I would recommend starting with a cookie sheet full of all regular dough cookies (not double chocolate) so you can see when they are golden brown. 
10. Bake cookies for about 9-11 minutes. Even though the cookies were smaller, it took the same amount of time that was recommended (10 minutes) for me. 
11. Enjoy with a glass of milk :)