Monday, June 25, 2012

Beet, Blue Cheese & Arugula Pizza


Has anyone else been watching the Olympic trials? I caught synchronized diving the other night when it was a bit slow at work. It is some crazy cool stuff. I'm especially excited to watch the swimming Olympic trials. I even know someone who will be swimming, crazy! It was also just brought to my attention that the Tour de France starts Saturday. 

That is right, I like to watch the kind of sports where people just truck along, alone. Wind through the hills of France. Swim back and forth, back and forth, in a pool. It is thrilling stuff, seriously. 


If the Olympic trials and Tour de France don't thrill you, pizza will. Pizzas are such a great treat in the summer time. There are so many fresh veggies and even fruits available to top you pizzas with. That is right, savory fruit pizza. Its going to happen this summer, just wait for it. 


Homemade pizza is a great way to get outside the box in the kitchen. Like this beet pizza. The ingredients are a classic flavor combination. Think beet salad, on a pizza. My new unofficial mission is to get people to like beets. At least to give them a chance. Good thing these beets are on a pizza, because everyone likes pizza.


The beets add a little sweetness, contrasted by the tangy, creamy and sweat blue cheese. I used a Hook's Danish Blue. Using a variety of colored beets, makes this pizza very pretty too. The only difference in red and orange beets is their sweetness.

Walnuts add a unexpected crunch to the pizza. Lets be real, who expects nuts on a pizza? Probably no one. The addition of arugula adds a peppery spiciness to offset the sweetness of the beets. I added some before I cooked the pizza and then more after it came out of the oven. Either or both ways work.


Just have fun with this pizza. It is super easy to throw together, using your favorite pizza dough. I used this one from Smitten Kitchen. You can always do store bought dough. Try adding goat cheese, if blue cheese isn't your thing. Enjoy!

xo
April

Ingredients:
10 ounces pizza dough (homemade or store-bought)
4 small to medium beets, thinly sliced
4 ounces of blue cheese, such as Hook's Danish Blue, crumbled
1/2 cup chopped walnuts
2 cups arugula
Olive oil
Salt

Instructions:
  1. Preheat the oven to 500F. Gently roll your pizza dough out to a 10 to 12 inch diameter (don't worry if it isn't perfect, that is what we call rustic!). Place the pizza on a sheet pan, or heat a pizza stone in the oven. Cover the surface of the pizza with the beet slices, overlapping them slightly. Sprinkle with salt and olive oil, to keep the beets moist. Sprinkle the blue cheese, walnuts and half of the arugula evenly over the beets.
  2. Bake until the dough is golden and crisp, about 10-15 minutes, popping any bubbles with a fork that might form. Remove from the oven, topping it with the remaining arugula, allowing it to wilt slightly. Serve and enjoy!

Thursday, June 21, 2012

Maple Bacon Biscuits with Maple Glaze


Swim lessons just started up and I've been a bit busy and trying to get into a new routine. You know how that goes, right? It is only a small change and doesn't really take up much time, but it seems to throw off your whole game. Maybe I am just in a bit of a slump. Work has at least forced me into a working out routine. Riding your bike to work plus some for the win! Now its time to kick the slump elsewhere, starting with maple bacon biscuits and a wonderful message from fellow blogger Frances!


Frances (aka Emily) and Kelsey are in Spain right now. Totally jealous. In case you didn't know, they also contribute to the blog along with Brittany and I. The only difference is Britt and I are here, in good old Wisconsin. We make our own fun that  competes with their European adventures. It is fun to pretend we do anyways.


I got the best message from Frances this morning. A real fixer for the slump I am in. Her host mom wanted to check out the blog, mostly the pictures. Then Frances writes down the recipe in Spanish for her, if the picture looks yummy. No big deal, she thought my hummus looked tasty enough to write down. It pretty much made my day. Remember that people, little things (especially food orientated things) make my day. Now onto more important things, maple bacon biscuits.


These biscuits are like little nuggets of gold. Be sure to use a good quality real maple syrup, not Mrs. Butterworth. They are best enjoyed warm out of the oven. They are still good if made the night before or at room temperature, just not as good. Their sweet, salty, bacony goodness makes up for their lack of warmth, if you choose to make them ahead of time. Try sandwiching a fried egg between these biscuits. I bet it would be out of this world delicious. I made these in a food processor because I think it easier. They can be just as easily made without one and are equally good. If you like bacon, you will love these. Give them a try.

xo
April

Adapted from Baking Illustrated
Ingredients:
Biscuits
6-8 slices of bacon
2 cups unbleached all-purpose flour
2 teaspoons baking powder
1/2 teaspoon baking soda
1 teaspoon sugar
8 tablespoons unsalted butter, chilled, cut into 1/4 inch cubes
1/2 cup cold buttermilk
1/4 cup maple syrup
Maple Glaze
1/2 cup powdered sugar
1/4 cup pure maple syrup
1/2 teaspoon vanilla

Instructions:

  1. Preheat the oven to 450F
  2. The bacon can be fried or baked. I prefer the baking method for a more crispy bacon. Preheat the oven to 400F. Arrange the bacon on a parchment lined rimmed baking sheet side by side. Place the bacon in the oven for 10-20 minutes or until crispy. Drain the bacon on paper towels and roughly chop into 1/2 inch pieces.
  3. If you baked the bacon, increase the oven temperature to 450F. Combine the flour, baking powder, baking soda, sugar, and salt in a large bowl or food processor. Whisk together or pulse six times.
  4. If making by hand, add the cubed butter, working quickly to break it into bits, to resemble small peas. If using a food processor, evenly distribute the butter into the work bowl, pulsing 12 times, for 1 second.
  5. If making by hand, add the buttermilk, bacon and maple syrup, stirring until it just starts to form a ball. If using a food processor, add the buttermilk, bacon and maple syrup, pulsing 8 times or until the dough just comes together.
  6. Transfer the dough to a lightly floured surface and quickly form a rough ball. Be careful not to over mix. Using a knife, dived the dough into quarters and then cut each quarter into thirds. Quickly shape each piece into a rough ball and place on a parchment lined cookie sheet. 
  7. Bake until the biscuit tops are light brown, 10 to 12 minutes.
  8. For the glaze, mix all the ingredients together, whisking to combine. Serve the biscuits warm with glaze poured over the tops.


Saturday, June 16, 2012

Perfect White Cake


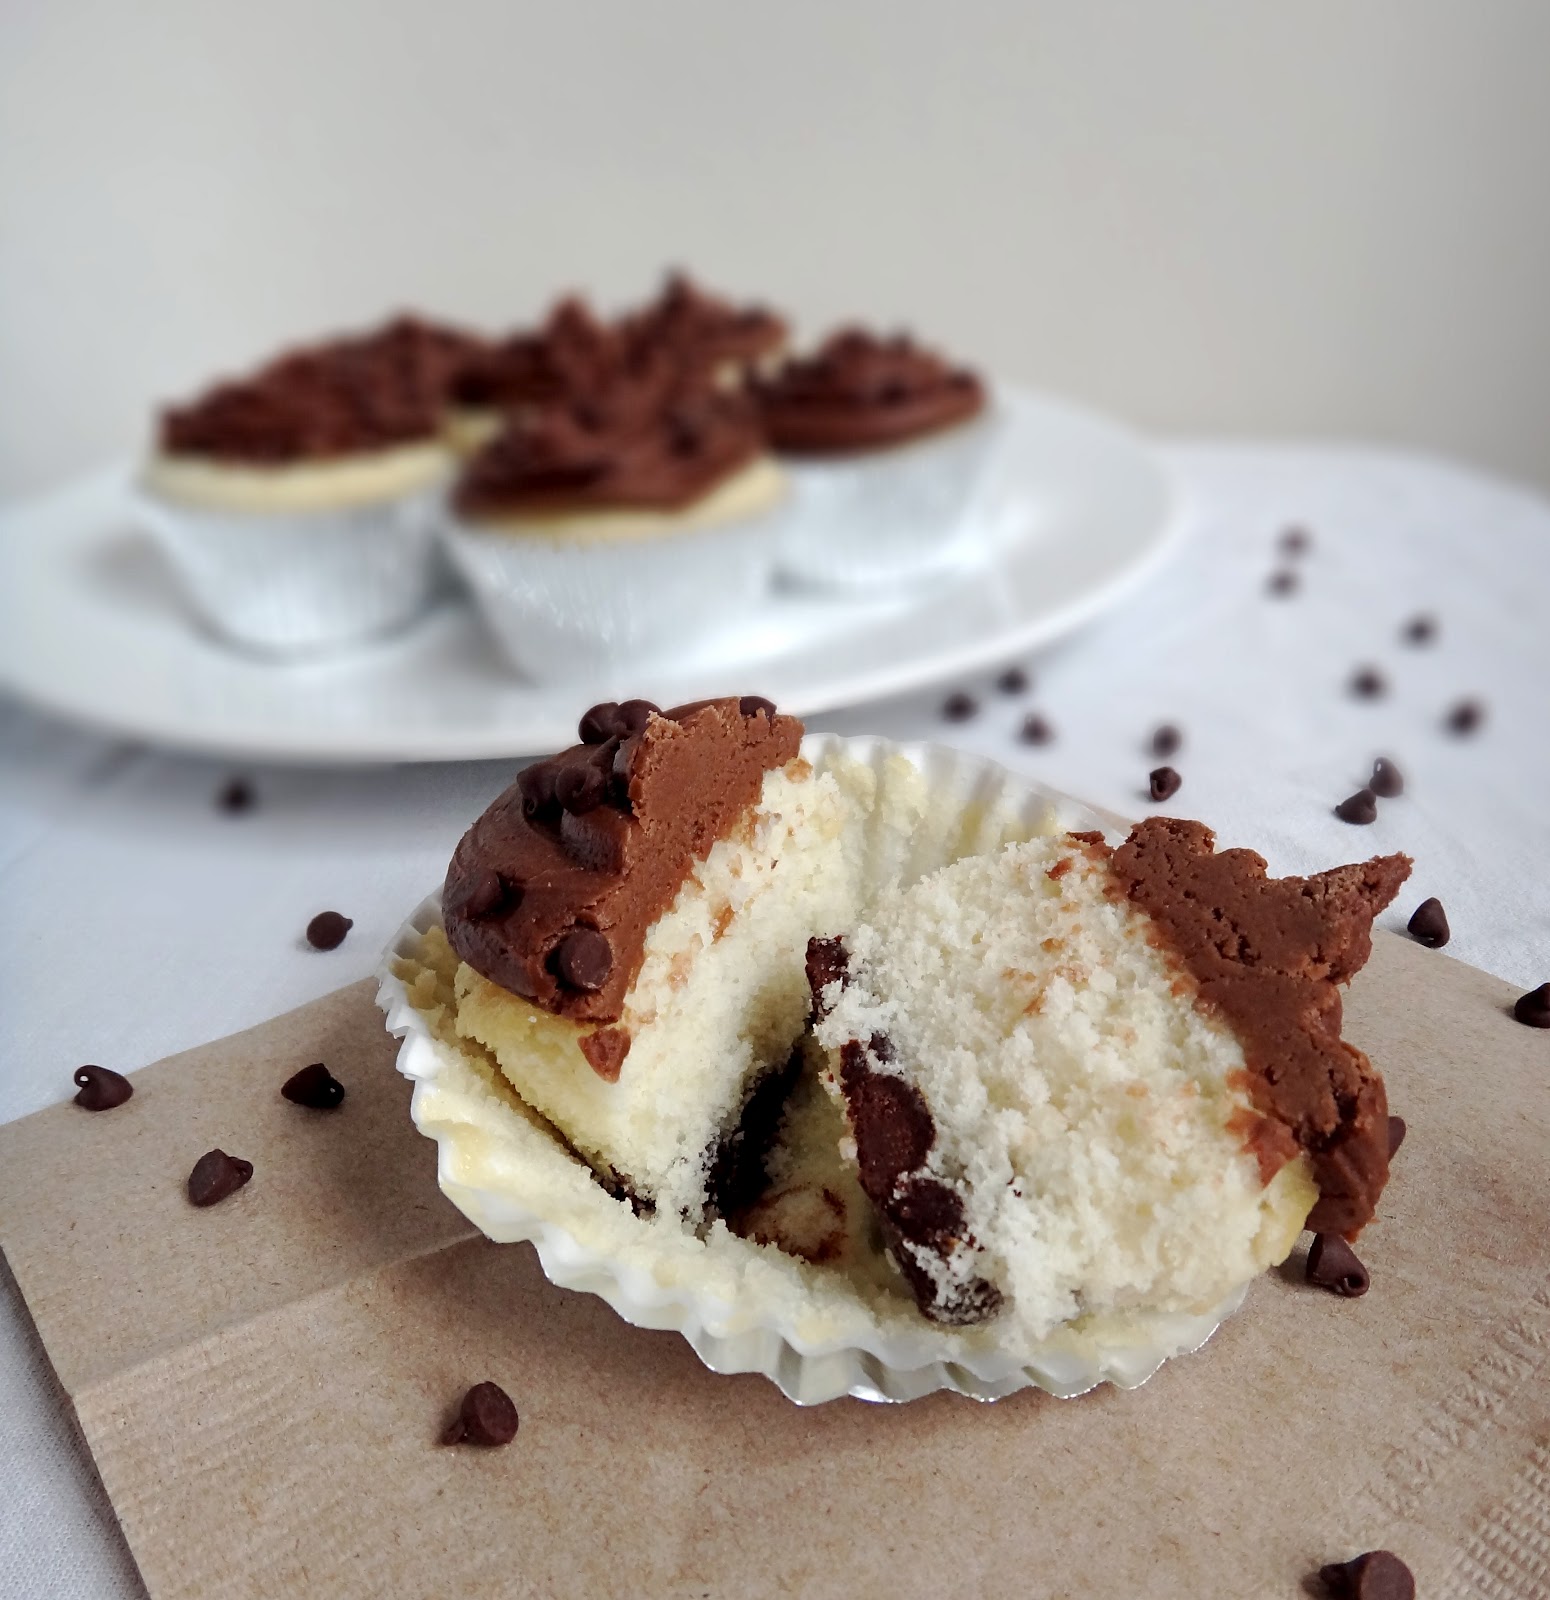
Earlier this week I found out great news from my boyfriend - he got a raise at work! He deserved it and I couldn't be prouder of him! I wanted to celebrate so I asked him to pick a dessert that I could make. With some deliberation, we decided on white cupcakes with chocolate chips and Ghirardelli chocolate frosting. The last time I made white cupcakes, found here, I thought they were a little too dense and tasted a bit like pancakes (yes, I just said pancakes). So I was determined to find a better recipe that would make a fluffy, light but still moist cake. This recipe does the job, hands down! It is light and has the perfect flavor to accent any type of frosting.


The recipe calls for cake flour, which I have never worked with before. I did some research and found that cake flour is better for fluffier results. I had to try it, especially because that was one of my complaints about the last cupcakes. I was very happy with the results! The only problem with these extra light and tasty cupcakes is that our chocolate chips sank to the bottom! However, it makes for a yummy surprise!

Perfect White Cake 
adapted from allrecipes

Ingredients
2 3/4 c. sifted cake flour
4 tsp. baking powder
3/4 tsp. salt
4 egg whites
1 1/2 c. white sugar
3/4 c. butter
1 c. milk
1 tsp. vanilla extract 
1 1/2 c. Ghirardelli chocolate chips

Instructions
1. Sift together cake flour, baking powder and salt. Set aside.
2. In a mixing bowl, beat egg whites until frothy. Add 1/2 cup of sugar gradually and beat until soft peaks form. Set aside. 
3. In another bowl, cream butter and the remaining cup of sugar. Alternating between sifted ingredients and milk, gradually add to bowl and mix. 
4. Add in vanilla extract and meringue (the egg whites/sugar mixture). Be careful not to over-mix. To help avoid over-mixing, I folded in the meringue instead of using a hand mixer. Fold in chocolate chips, if desired.
5. Spread batter in a large cake pan or scoop into a lined cupcake pan. The recipe makes a few more than 24 cupcakes.
6. Bake at 350 degrees for 30 to 35 minutes for a cake, 20 to 25 minutes for cupcakes. Cool in pan for 5 minutes and then transfer to a wired rack.
7. Frost with your favorite recipe or the one below once completely cooled. 


We made chocolate frosting found on the can of Ghirardelli's sweet ground chocolate and cocoa for these cupcakes. I struggled to get the perfect consistency. I actually made the frosting twice! The first time I added too much sugar so I scraped it off and tried again. The second round turned out great! It still had a bit more powdered sugar than the recipe called for so it was a good thickness. So don't be afriad to use a little more than the recipe calls for.

Ghirardelli Chocolate Frosting

Ingredients
1/4 c. butter
3 Tbsp. milk
1/2 c. Ghirardelli sweet ground chocolate and cocoa
2 1/2 c. powdered sugar
1/2 tsp. vanilla extract
dash of salt

Instructions
1. Melt butter in a saucepan on low heat. Add milk and ground chocolate and cocoa. Remove from heat
2. Add powdered sugar, salt, and vanilla.
3. Beat until smooth
4. Frost onto the cupcakes above or your favorite baking good

Wednesday, June 13, 2012

Beetroot Hummus

If you could be any animal, what animal would you be? I have never ever had a good answer to that question. Sure, I got the height, uncoordinated, awkwardness of a giraffe, but that always felt like a predictable default sort of answer. Not very unique, but it may be a close second.


The other day I was having dinner with the family and my mom blurts out that she would like to be reincarnated as a chicken. Why? Its a mystery to us, some things are better left not trying to be understood. The next day I decided I would be an orangutan. They are awesome furry gingers and I have a soft spot for gingers. I don't think think it is true that they don't have a soul.


In my primate class last year, I learned that they are generally solitary creatures. Being solitary isn't really my thing exactly. They are mostly loners because they don't like to share their food. Its fitting for me, I say I want to share my food. What I really mean is you can have a bite and I will hoard the rest for myself. I also expect that you share an even bigger bite of your food with me. That is why I would be an orangutan. Now onto the food: beets.


Beets are probably my favorite vegetable. I love the color of them. You eat with your eyes first after all.  I even love the earthy flavor they have going on. Yes, some may translate earthy to dirt. Maybe I like dirt, so what? What ever you want to translate earthy to mean, I love it. They are also delicious hot, cold or at room temperature. Diverse vegetable alert!


This hummus is perfect for those of you who may not be able to get past the earthy quality of beets. What you really pick up in the hummus is the sweetness of the beets and the nuttiness of traditional hummus. Make sure you salt this generously too, brings out the flavor double time! The bright pink color of this too makes it really fun and unexpected. Give beets a chance, with this hummus. If you already love beets, you are good to go.

xo
April

Ingredients:
5-6 small beets, tops trimmed and cleaned
1 (15 ounces) can of garbanzo beans
2 tablespoons tahini paste
2 garlic cloves
1 lemon, zest and juice
Salt
Olive oil

Instructions:
  1. Preheat the oven to 400F. Wrap the beets in tin foil and cook in the oven for an hour or until fork tender. Once cool enough to handle, peel and cube the beets, placing them into the food processor.
  2. Add the garbanzo beans, tahini paste, garlic, lemon juice and zest and salt to the beats, pulsing to combine. Taste and season with more salt if necessary. Add a splash of olive oil to thin the consistency, if desired. Transfer to a bowl, top with a drizzle of olive oil or feta. Serve with pita chips, crackers, veggies or whatever you like. 


Sunday, June 10, 2012

Chocolate Brownie Cookies


I was just having one of those weeks. The one's where you think there is no way Friday will come and the Universe seems to be laughing at you struggle. Yup, that sums up my week so to turn it around, I made these. I was just browsing recipes and once I feasted my eyes upon this recipe, I knew my week could only get better. C'mon, its a cookie...and a brownie. And it's made with chocolate, lots of it! I used up all my cocoa powder and semi-sweet chocolate chips. Oh, and I had to go to the store for some white chocolate chips. Universe, who is laughing now!


These cookie/brownies are a perfect mood-booster or a easy dessert to add to a cookout menu. I actually used this recipe for both purposes! They are chewy (as long as you are extra careful with baking time), chocolately, and are sure to go within a couple of days!


Chocolate Brownie Cookies
adapted from Yammie's Noshery

Ingredients
2 sticks butter
2 1/4 c. sugar
4 large eggs
1 Tbsp vanilla extract 
1 1/4 c. cocoa powder 
1/2 tsp. salt
1 tsp. baking powder 
1 1/2 c. all-purpose flour
1 c. semi-sweet chocolate chips
1 c. white chocolate chips

Instructions
1. Add butter and sugar into a saucepan. Place on stovetop at medium heat. Stir until the butter/sugar mixture is bubbly and smooth. Remove from heat. 
2. Add in eggs and vanilla and stir. 
3. In a separate bowl, mix together the cocoa, salt, baking powder, and flour. Add in the butter/sugar/egg mixture.
4. Fold in both types of chocolate chips once the dough is at room temperature. 
When I did this, the sugar/butter mixture was still a bit hot and melted the semi-sweet chocolate chips (oops!). So I added more and the white chocolate chips later
5. The dough will have a consistency (and smell) of brownies so chill the dough in the freezer or refrigerator until it becomes pretty solid. 
6. Preheat the oven to 375 degrees. Form the dough into balls and gently pat them down onto a cookie sheet. These cookies don't spread out too much during baking, so shape them/pat them down to your liking. 
7. Bake for about 9-13 minutes. Keep an eye on them to not over-bake them. I took them out just as the middle of the cookie was losing its dark brown color (as mine cooked, they turned into a slightly lighter brown color). 
8. Set cookies on a cooling rack.
9. Enjoy!

LinkWithin

Related Posts Plugin for WordPress, Blogger...