Showing posts with label summer. Show all posts

Friday, May 22, 2015

Roasted Strawberry-Rhubarb Buckwheat Biscuit Cake

Happy Memorial Day weekend, friends! I have this to die for strawberry-rhubarb biscuit cake. Ah-mazing.


Before we get to the food, I have to share how difficult it has been to get this post up. My cat has been a relentless snuggle bean. I can't sit down without her showing up and climbing into my lap.

I often complain how she doesn't give me enough loving, finding it very hard to kick her off my lap. When she was too slow to get on my lap before my computer, she still climbs on. Sprawled out, one leg on the keyboard, belly up. Cuteness.


As I write this she is sitting on my belly giving me the stink-eye. She has obviously claimed my lap as her own and has some computer jealousy.

It may be that she knows her mother, me, is about to leave her for two weeks and she wants all the snuggles she can get before that day arrives.

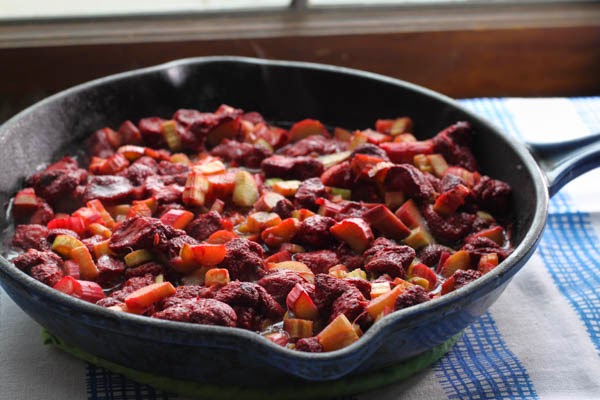
Now about this cake, cobbler, fruit and biscuit situation. It is maybe the most delicious thing I've ever made. I had frozen strawberries from last summer and rhubarb from the farmers market.

If you are using frozen berries, be sure to drain them. If you don't, you'll end up with way too much liquid. Which is bad. We don't want that. Set them in a strainer overnight on the counter or in the refrigerator.

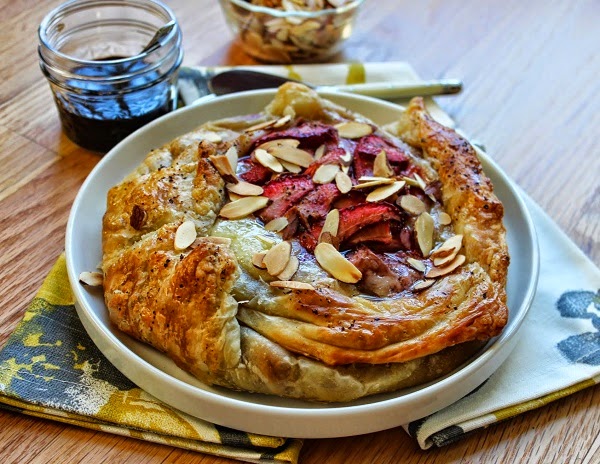
Did I mention how easy this is to make? It took like 45 minutes all together, including dishes. The cake was gone in about the same amount of time. Remember, this is a judge free zone.

The biscuits come together really quickly, they are fairly doughy and dense, not so light and fluffy, but it worked for me. Using all white flour is totally acceptable.

I sort of just used what I had on hand. You could substitute creme fraiche or sour cream for the yogurt.


Roasting the fruit results in a super jammy and buttery consistency. I would have slathered it all over myself, if I had more of it. That is right, it is that good.

It is so good you want to sit down all alone, dim the lights and turn on your favorite cooking show and savor the moment.
xo
April

Ingredients:
for the fruit:
2 cups rhubarb, cut into 1/4 inch pieces
2 cups strawberries, fresh or frozen, if frozen, defrost and drain first
2 tablespoons granulated sugar
1/2 teaspoon vanilla
1/2 vanilla bean, scraped
2 tablespoons cornstarch
3 tablespoons butter
for the biscuits:
1 cup all purpose flour
1/2 cup buckwheat flour
1 1/2 tablespoons sugar
1 1/2 teaspoons baking powder
1/2 teaspoon sea salt
8 tablespoons butter, cold, cut into quarter inch cubes
1/2 cup full fat greek yogurt or creme fraiche
1/2 vanilla bean, seeds removed and scraped
for the egg wash:
1 large egg
splash of water or milk
brown sugar

Instructions:
  1. Place a rack in the middle of the oven, preheat the oven to 375F. 
  2. In a medium bowl, combine the first six ingredients for the fruit, tossing to fully coat the fruit. Place the fruit mixture into an 8-inch oven proof skillet or metal baking dish, placing small pads of butter on top of the fruit. Place in the oven to roast for 12 to 15 minutes. While the fruit roasts, prepare the biscuit dough.
  3. To make the biscuits, in a medium bowl whisk together flour, sugar, baking powder and salt. Add the cold butter and vanilla bean seeds and use your fingers to quickly break the butter down into the flour and sugar mixture. Some of the butter pieces will be the size of oat flakes, others will be the size of small peas.
  4. Create a well in the center of the flour mixture and add the cold yogurt . Stir with a spoon. The mixture will be rather wet. Shape the dough into a rough disk, dividing the dough into 6 pieces. Brush the top of each biscuit with the egg wash (whisk together one egg with a splash of milk or water) and top with brown sugar.
  5. Remove the strawberries from the oven and carefully place the biscuits over the hot strawberries. Return the skillet to the oven and bake for another 15-20 minutes, or until the biscuits are cooked through and the biscuits are golden.
  6. Remove from the oven, allow to cool until the strawberries are no longer bubbling, and serve warm.

Thursday, April 9, 2015

Strawberry and Mixed Greens Salad


A couple of months ago I shared by go-to lunch salad, a sweet potato and mixed greens salad.  Honestly, after eating it almost daily for a month straight, my love for that salad faded (don't worry, I'm sure I will become obsessed again in the future because it's too tasty not too!)

Recently I decided to revamp it a bit to make it a little less wintery, and a little more springy.  While it's nowhere near strawberry season in Wisconsin, it must be it other places because they're all over at the grocery store in a rich red color and at such great prices!  Fresh, sweet strawberries replace the cinnamon honey roasted sweet potatoes while a salty, light feta steps in for the tangy goat cheese crumbles.  This salad is also topped with a sprinkling of craisins and a small handful of pecans.  If you're looking for a little more protein to round out this salad, go ahead and throw on some grilled chicken or some quinoa.  Feel free to customize with whatever you have on hand!


As you can see, after I photographed this beauty I threw it in a tupperware to take for my work lunch.  I suggest keeping the dressing separate if you're doing this as the balsamic vinaigrette can really eat away at the lettuce and by lunchtime it'll be really soggy.  If you don't have little dressing containers like I do, I'm intrigued with the mason jar salads as well.  If you're going to do that, I would suggest putting the dressing in first, then top with the pecans, craisins and feta, then throw in the strawberries and put the lettuce on top.  If you give it a try, let me know how it goes!


Ingredients:

  • 2-3 cups spring mix lettuce (or other choice of greens)
  • 1/4 cup strawberries, quartered
  • 2 tablespoons craisins
  • 2 tablespoons feta, crumbled
  • 1/8 cup pecans (or other choice of nut)
  • 2-3 tablespoons balsamic vinaigrette

Directions:

  1. Spread spring mix lettuce over large plate or bowl.
  2. Top with strawberries, craisins, feta and pecans.
  3. Drizzle with balsamic vinaigrette.
  4. Toss and enjoy!
If you like this salad, you may also like:

Wednesday, April 1, 2015

Champagne Mojitos


Mojitos are one of my favorites. So is champagne. Put them together and yum. This drink is perfectly bubbly with the great traditional mojito flavor. Make this the next time you host brunch, celebrate a bridal shower (yes, I have wedding brain...the countdown is finally into the double digits!), or just have extra limes hanging around. For me, here's the list of things I was celebrating when I made this spring-y cocktail:
  • It's feeling like spring! The birds are chirping and the windows are open (slightly)
  • Iced coffee season is here. Enough said.
  • The Madison farmer's market is only a few weekends alway
  • Honeymoon is all planned 
  • Oh and I got a new job!

This recipe is super easy but the champagne gives it a special feel. The original recipe from Food Network suggests using cava, which I used and liked. But, I don't think using a different kind would be a deal breaker. Go ahead, get creative!

Cheers!
Brittany

Ingredients
1/4 c. fresh mint leaves
2-3 Tbsp. sugar
1 lime, cut into wedges
1 c. rum
1 bottle chilled cava

Instructions
1. Put mint, sugar and lime wedges into a pitcher and muddle
2. Stir in rum
3. Strain into chilled glasses and top with cava
4. Enjoy!

Friday, August 29, 2014

Zucchini Chocolate Chip Muffins


I've been trying to make a conscious effort to eat healthier which is why lately I've been using zucchini to justify all things baked goods.  I also use baked goods on the regular to justify my chocolate addiction, so this recipe is really a win-win.  But fo cereal, aside from begging every single person I know to take six pound zucchinis off my hands I've grating them up and tossing them in zucchini bread, zucchini brownies and now these zucchini chocolate chip muffins because everything is better in single servings, plus don't forget they're "healthy" so you can really eat two or three.


But don't worry, I've been eating zucchini the real healthy way too, slicing these bad boys and either roasting or sauteing them as well.  I've got another 10 months until wedding bells ring but only a couple until the hunt for the perfect white dress takes place and I'm hoping to have a good start on being in wedding dress shape by then.

These muffins honestly aren't the healthiest thing I could be eating, but they're a smarter option for satisfy a sweet tooth and because they're already separated into servings, you can easily freeze them and pull one or two out to thaw every few days instead of chowing down for a week straight.


If you want to try lightening them up a little more, consider halving or skipping altogether the chocolate chips and/or streusel topping.  I ended up only using about two-thirds of the topping on mine.  I'm warning you now though, you will risk getting your chocolate fix from these muffins if you omit the chocolate chips and might find yourself eating them out of the bag instead anyways!

Happy Labor Day weekend everyone!
Kelsey

Yields 22 muffins.

Ingredients

Brown Sugar Oat Streusel
  • 1 1/3 cup oats (old fashioned or quick)
  • 1 cup brown sugar
  • 4 tablespoons all-purpose flour
  • 1 teaspoon ground cinnamon
  • 1/2 cup unsalted butter, cold
Zucchini Muffins
  • 2 large eggs, beaten
  • 1 cup brown sugar
  • 1 cup granulated sugar
  • 1/2 cup canola oil
  • 1/2 cup unsweetened applesauce
  • 2 cups grated zucchini
  • 4 teaspoons vanilla extract
  • 2 cups all-purpose flour
  • 1 cup whole-wheat flour
  • 1 teaspoon baking powder
  • 1 teaspoon baking soda
  • 1 teaspoon salt
  • 4 teaspoons ground cinnamon
  • 1/2 teaspoon ground nutmeg
  • 1 1/2 cups semi-sweet chocolate chips
Directions
  1. Preheat oven to 425 degrees.  Grease or line muffin tins.
  2. In a medium bowl, add oats, brown sugar, flour, cinnamon and butter for the brown sugar oat streusel.  Using your hands, combine ingredients until they are well mixed and crumbly.  Set aside for later.
  3. In a different medium sized bowl, whisk together eggs, brown sugar, granulated sugar, canola oil, applesauce, zucchini and vanilla extract.
  4. Using a large bowl and large rubber spatula, combine flours, baking powder, baking soda, salt, cinnamon, nutmeg and chocolate chips.
  5. Pour the wet ingredients into the large bowl with the dry ingredients and mix with the rubber spatula until just combined.
  6. Using a 1/4 cup measuring cup, transfer batter into prepared muffin tin.  Top each muffin fully with crumbled streusel mixture.
  7. Bake for 5 minutes at 425 degrees before lowering the temperature to 350 degrees for an additional 14 minutes, or until toothpick inserted in the center comes out clean.  Let cool for 5 minutes before removing from muffin tin.
Recipe adapted from Sally's Baking Addiction (also includes bread version).

Wednesday, August 13, 2014

Caprese Pasta

If you haven't heard from last Wednesday's post, August is tomato month at Badger Kitchen! Get excited gardeners, farmer's market goers, and tomato enthusiasts. This month we're featuring delicious recipes where the tomato has the starring role. This time of year, we find ourselves with tomatoes up to our ears! So look no further to find your next exciting recipe before you decided to cut that tomato up to just toss it into your side salad. C'mon now, your tastebuds are craving something new!


When I found this recipe at How Sweet It Is, I knew exactly how I was going to use it. I made it on a Sunday afternoon because it's a pasta dish. And pasta dishes warm up nicely as leftovers. So, it was going to be my go-to lunch for the coming work week. Yum, my lunch breaks were the highlight of the day. Oh and I had some gakwers this week as the aroma of basil filled the break room. 


Basil has to be one of my favorite fresh herbs. So delicious and it really is one of the main elements in this dish. Well, it is caprese pasta, after all. But surprisingly, my favorite part of this dish is biting into one of the juicy tomatoes. Just cooked enough, they add a refreshing burst of goodness amongst the mozzarella and noodles. 


Ingredients
1/2 box noodles
1 c. pasta sauce
1/3 c. half and half
1/3 c. parmesan cheese, grated
4 oz. mozzarella cheese, grated
1 pint grape tomatoes, halved or left whole (whatever your liking is!)
1 bunch fresh basil leaves, chopped
Extra cheese for garnish

Instructions
1. Preheat oven to 350 degrees.
2. Boil pasta, following directions on box.
3. Heat pasta sauce, half and half, and parmesan cheese in a saucepan over low heat. Stir occasionally.
4. Once pasta is done cooking, drain and place in a large bowl. Add mozzarella, sauce, tomatoes, and basil. Toss to combine. 
5. Place into a buttered 8X8 dish and garnish with more cheese, if desired. Cook in the oven for about 20 minutes. I love some extra crispy bites of cheese and noodles so I also broiled my dish for about 5 minutes at the end. 

Enjoy right away or as leftovers!
- Brittany

Wednesday, August 6, 2014

Warm Tomato, Arugula and Bacon Panzanella Salad

Its tomato season just about, before you know it tomatoes will be coming out of your ears. Don't worry though because this month on the blog its all about tomatoes!


This is a really simple recipe to throw together. You could even cut it down and make it for one person because the leftovers don't keep. Soggy bread problems, ya know? Speaking of bread problems, this is the perfect salad for day old bread. You want the bread to be a bit dried out so it takes its time absorbing the dressing.

This recipe can really be adjusted to your own tastes as well. Add as much or as little arugula or basil as you want. Play around with it a little bit. Trust your instincts! Add more tomatoes if you want. It is your salad after all. This is just a good foundation to build off of.


I love me some roasted tomatoes. They get all jammy and soft. Delicious. This recipe creates that feeling without having to turn the oven on. The tomatoes get fried up quickly in some bacon fat and they leave behind all their juices in the pan that will make up the bacon dressing eventually.

Surprisingly the bacon isn't over powering as you might expect. It gives just the right amount of salty bacon flavor and crunchy topping.The vinegar and mustard add nice balance to the dressing. You could easily use green onions or shallots in replace of the leeks. I just happened to have bought leeks the day before at the farmers market. 


Overall this is a really easy and beautiful salad to throw together for friends. The crispy bread with the juicy tomatoes and rich bacon and spicy arugula go so well together. Try adding some mint for a little extra freshness with the basil. More tomato recipes to come this month! Enjoy!

April


Ingredients:
1 french baguette or french round, cut into 1 inch cubes 
6 slices smoke bacon (3 ounces), cut into 1/4 inch pieces
1 1/2 pints tomatoes, halved
1 leek, sliced

1 tablespoon lemon juice
1 1/2 tablespoons balsamic vinegar
3 1/2 tablespoons olive oil
1 tablespoon Dijon mustard
Salt, to taste
Pepper, to taste

2 handfuls of arugula
Handful of basil

Buratta, mozzarella or goat cheese to serve

Instructions:
  1. Preheat the oven to 300 degrees F. Spread bread in one even layer on a rimmed baking sheet and toast bread in oven for 15 minutes or until the bread is crispy, but not browned. Meanwhile, fry bacon over medium heat, until crispy. Using a slotted spoon, remove bacon from pan, reserving 1 tablespoon of bacon grease. Add the halved tomatoes, cut side down to the pan, cooking over medium heat for 3-5 minutes or until softened and slightly caramelized. Remove the tomatoes, using a slotted spoon again, and set aside. 
  2. Over medium heat, add a tablespoon of oil to the pan and saute the leeks until softened and lightly golden, about 5-7 minutes. Turn off the heat and add the lemon juice, balsamic vinegar, remaining olive oil and dijon mustard. Whisk it all to combine (it will be thick and clumpy, that is okay). Season to taste with salt and pepper. 
  3. In a large bowl, add half the bread and top with half the tomatoes, arugula, basil and dressing. On top of that add the remaining bread and vegetables and dressing and toss to combine. Serve immediately and garnish with some bacon, buratta (or cheese of your choice) and a drizzle of balsamic vinegar.


Wednesday, July 23, 2014

Cookies n' Cream Frozen Pie


Frozen treats month continues here at Badger Kitchen and the timing couldn't have been more impeccable as we're wrapping up a little two day heat wave here in Madison.  We've had a generally mild summer weather wise here which has made for some really beautiful days to enjoy the outdoors.  I'm thinking Mother Nature might be trying to make up for what felt like the coldest winter ever by giving us lots of nice weather to enjoy.


For those days when the mercury rises and the humidity comes out to frizz up everyone's hair, this cookies n' cream frozen pie is a very refreshing treat to enjoy.  It's very easy to make as you're creating somewhat of a mock ice cream.  It's more like a frozen pudding actually, kind of like April's chocolate pudding pops.  No ice cream maker or anything fancy like that is required, just a little patience while it hardens in the freezer and a little self control so you don't dip all the extra Oreos in the pie filling while it's still soft.


Ingredients
  • 2 1/2 cups crushed Oreos, separated
  • 1/4 cup butter, melted
  • 1 1/2 cups cold half-and-half cream
  • 1 package (3.4 oz) instant vanilla pudding mix
  • 1 carton (8 oz) frozen whipped topping, thawed
Directions
  1. In a small bowl, combine 1 1/2 cups crushed Oreos with melted butter.  Press to the bottom of a 9 inch pie pan.  Place in fridge.
  2. In a medium mixing bowl, beat half-and-half and pudding on low speed for two minutes.  Let thicken for five more minutes.
  3. Fold in whipped topping and crushed cookies.
  4. Pour onto crust.  Chill in freezer for at least six hours.  Remove from freezer ten minutes before serving.
Recipe adapted from Best of Country Pies.

Thursday, July 10, 2014

Chocolate Pudding Pops


Frozen treat month continues! These came to be when I gave my boyfriend mono a few months ago. Oppsi. I tried to make it up to him by making him pudding, which failed. I was in a rush and not thinking. The pudding didn't get thick enough. It was pretty sad, until I thought put in the freezer! Soupy pudding was no more.

You could simply make pudding and skip the freezing, but it is summer and I think you probably should. This is super easy to make. It takes about 20 minutes in total and you probably have most of these ingredients in your kitchen already.


These are very chocolate-y. The addition of a little unsweetened chocolate really amps up the chocolate flavor. If you don't have any on hand, don't worry. They will still taste delicious with only semisweet or bittersweet chocolate.


I've made these with and without the addition of butter. I'm not sure that it makes a huge difference, but I like to add it. I think it gives it a little more texture and body, plus I like to think it helps the popsicles slide out of their molds easier. Who knows though.

These really are the perfect summer popsicles. They don't melt super fast and by melting I mean they turn to pudding. No dripping and sticky hands involved. Its like pudding meets ice cream on a stick, but with less melting.

If you don't have a popsicle mold, it would be totally worth trying to freeze a bowl of this pudding and eating it like ice cream. The ingredients are almost identical to those found in ice cream. The options are deliciously endless. Cool off and make these as soon as possible. You won't regret it.

xo,
April

Makes 6 popsicles
Ingredients:
1/4 cup cornstarch
1/2 cup sugar
1/4 teaspoon salt

3 cups whole milk

6 ounces bittersweet or semisweet chocolate, chopped
1 ounce unsweetened chocolate, chopped

1 teaspoon vanilla
1 tablespoon butter
6 wooden popsicle sticks

Instructions:
  1. Combine the cornstarch, sugar and salt in a medium saucepan, Slowly whisk in the milk, in a thin steam at first so that lumps don’t form, then more quickly once the cornstarch mixture is smoothly incorporated. 
  2.  Place over medium-low heat and stir occasionally, scraping the bottom and sides. Use a whisk as necessary should lumps begin to form. After 7 to 10 minutes (slower over lower heat is better, to give the cornstarch time to cook), before it starts to simmer, the mixture should begin to thicken, enough that it will coat the back of a spoon. 
  3. Add the chocolate, and continue stirring for another 2 to 4 minutes, until chocolate is fully incorporated and mixture is quite thick (like pudding). Remove from heat and stir in the vanilla and butter.
  4. Let cool slightly, then pour evenly among popsicle molds (there will be about one cup of pudding leftover. That is okay though because you get pudding right away). Freeze the molds for about 30 minutes and then place popsicle sticks in molds; continue to freeze for another 4 hours before serving.
Adapted from Smitten Kitchen

2 Years Ago: Homemade Marshmallows 

Monday, July 7, 2014

Farmer's Market Stir Fry with Peanut Sauce


I work on the Capitol Square which is also home to the Dane County Farmer's Market on Saturday mornings.  It's said to be the largest produce only farmer's markets in the country which means tons of selection, but also lots of crowds.  Since I'm no longer living in the downtown area, I rarely make the trek on Saturday mornings, but I have gotten in the habit of taking a break at work to head to the much smaller, Wednesday markets.

This past week at the market it seemed like there was a really good variety of vegetables at some great prices, so as I was walking around I decided to get ingredients to make a stir fry.  I had to take a couple laps around the stalls to get all my supplies and ended up with summer squash, green onion, broccoli, asparagus and sugar snap peas.  I also took home a head of lettuce and a couple khalorabi, all for only $13!  Usually when I make stir fry I go with a spicier szechuan sauce, but decided to go with a subtler peanut sauce this time.  It still put lots of flavor in the dish and didn't leave out a little spicy kick either.

Hope you enjoy!

Kelsey


Ingredients:
  • 2 cups brown rice (measured before cooking), cooked
  • 2 chicken breasts, cut into 1 inch pieces
  • Choice of seasonal vegetables (I used sugar snap peas, green onion, asparagus, summer squash and broccoli)
  • Desired amount of peanut sauce (I used about half, or a little over 1/4 cup)
  • Olive oil
For the peanut sauce:
  • 1/4 cup rice vinegar
  • 1/4 cup soy sauce
  • 2 teaspoons granulated sugar
  • 4 teaspoons peanut butter
  • 2 tablespoons water
  • 2 teaspoons Asian chili garlic paste
Adapted from Food and Family.

Directions:
  1. Prepare peanut sauce by mixing ingredients in a small bowl.  Heat in microwave in 20 second increments, stirring in between,  until peanut butter is no longer in large clumps. (It's okay if it's not completely melted into the mixture, the hot skillet will take care of that later.)
  2. Drizzle olive oil in skillet (or wok if you have one) and cook chicken.  Set aside.
  3. Pour desired amount of peanut sauce in skillet and sauté vegetables until they begin to soften.  Add chicken to mixture and stir until coated with sauce.
  4. Serve over rice.
Linking up with Time to Sparkle.

Wednesday, July 2, 2014

Boozy Roasted Strawberry Lemonade Popsicles

Summer is in full swing and we thought you could all use some recipes to help cool you off in the heat.


To kick off this months theme, Frozen Treats, I have some boozy roasted strawberry lemonade pops for us. I guess I just could not let go of last month's strawberry theme, but these popsicles really just make sense.

They bring together classic summer drinking. Everyone loves lemonade and why not add strawberries for some color and extra flavor. Then add some vodka and you have real easy summer living happening. Then freeze it all. Its a wonderful thing.


This recipe is actually perfect for this time in Wisconsin;s strawberry season. They won't be around much longer at Wisconsin farmers markets or you have more strawberries in your fridge than you know what to do with.


Like I have mentioned in a previous post, roasting strawberries is great for less than perfectly ripe strawberries (which is common with store bought berries) or too ripe strawberries. You know when they loose some of their firm juicy quality and become less pleasant to eat and will probably go bad within the next day. That is what I'm talking about when I say too ripe.

If you happen to be using local strawberries and they are on the smaller side, I would cut them in halves instead of quarters. When you roast the berries, I strongly recommend using parchment paper. I found that they stuck to tin foil.


While you roast the strawberries, start squeezing your lemons. I think squeezing your own lemons is really worth the effort. I got this amazing lemon squeezer. Amazing. It was so easy. You should get one. You won't regret it.

Heat up some water to add to your freshly squeeze lemon juice, just hot enough to dissolve some honey. Let is cool off before you add the vodka. We wouldn't wanted any of it to evaporate, duh. If you want to make these booze free for youngsters, just replace the vodka with water. No big deal.


You will fill up your popsicle molds, leaving about 1/2-inch at the top. Plop the strawberries on top of the lemonade. Some of them will sink. Some will not. The stawberries will bleed their juices into the lemonade, turning it a pretty red-pink.

Get them in the freezer. Let them chill out for a bit and then get some sticks in them. I opt to use wooden sticks, rather than the plastic things that came with my molds. I think it looks cuter and they are easy to devour.


I hope you give these a try! Maybe for Fourth of July weekend? Probably. I think it also wouldn't hurt to mix up a vodka lemonade and dip you popsicle into it, like a giant flavored ice cube. You know you want to.

Cheers,
April

Makes 6 popsicles
Ingredients:
1 1/2 pints strawberries, quartered
2 teaspoons honey
Zest of one lemon

1/2 cup freshly squeezed lemon juice (about 3 lemons)
1 3/4 cups warm water
1 tablespoon honey
4 1/2 tablespoons vodka

Popsicle mold (I use this one)
6 wooden popsicle sticks

Instructions:
  1. Preheat oven to 375 degrees F. Line a rimmed baking sheet with parchment paper. Toss strawberries, honey and lemon zest to coat. Spread strawberries evenly on prepared baking sheet and roast for 20 minutes. Allow to cool slightly.
  2. While the strawberries roast, combine warm water, lemon juice and honey, whisking to dissolve the honey. Let cool slightly. Transfer the cooled strawberries to a dish and transfer as much of their juices to the water and lemon juice mixture (I used a spatula to pool the juices together on the parchment paper and poured it into the mixture. It wasn't much). Finally, add the vodka (if you choose not to use vodka, replace it with 1/4 cup water). Prepare you popsicle mold.
  3. Fill each popsicle mold about 3/4 of the way, with the lemon mixture. Top off each popsicle mold with roasted strawberries. 
  4. Place the molds in the freezer for about an hour (or until firm enough to keep a popsicle stick upright) and then place a popsicle stick in each mold. Freeze for 12 hours before enjoying.
2 years ago: Grown Up Pink Lemonade

Friday, June 27, 2014

Lemon Chicken Kabobs


Oh boy! I found my new favorite grill recipe. The other weekend, I was visiting my future in-laws and we had chicken kabobs for dinner. The kabobs were store bought from the meat department. You know, the ones that are pre-prepared, quick and easy. They were delicious! Ever since then, I've been stuck on kabobs. I wanted to make them the next day, no joke. My fiancé advised we wait a bit. Although reluctantly agreeing, I finally got to test out a recipe. The flavor was worth the wait.  


Yum! These chicken kabobs were juicy and flavorful. With only adding lemon zest, you get this perfect but not overly powerful citrus flavor. It compliments the garlic and pepper very nicely. I chose to add bell peppers and onions, because they're my favorite and add some nice color. However, feel free to get creative with your vegetables (or even the meat). The choices are endless! 

Ingredients
1 pound chicken breast, cut into large cubes
2 bell peppers
1 onion

Marinade
3 tbsp. extra virgin olive oil
Zest of 1 lemon
3 garlic cloves, minced
1 tbsp. fresh parsley
1 tsp. kosher salt
1 tsp. ground pepper


Instructions
1. In a small bowl, combine marinade ingredients. Stir well
2. In a shallow dish, arrange chicken pieces into one or close to one layer
3. Pour marinade over chicken. Toss to coat pieces and cover.
4. Marinade chicken in refrigerator for at least 30 minutes but up to 8 hours.
5. Chop pepper and onion to similar size as the chicken, about 3/4-inch pieces.
6. Skew chicken, pepper and onion onto skewer sticks, alternating items.
7. Grill kabobs 45min, rotating often.
8. Enjoy!

Bon Appétit!
Brittany

Wednesday, June 18, 2014

Strawberry Jam

June is Strawberry month and what better way to celebrate than with jam! When we decided to feature strawberries for June, I had no idea what to make. I wanted to think outside the box, but not too far from it that I would end up short of a delicious recipe. So, I went to a super handy source for my recipe, Pinterest! Although I found a few strawberry recipes worth trying, today I have for you the easiest strawberry jam on the planet. It has to be the easiest because I was able to make it.


I know nothing about making jam or canning. But this recipe is so easy and you most likely have the whole 3 ingredients needed on hand. Although a quick and fool-proof recipe, it does not fall short on flavor. It's strawberry goodness would go great on top of any toast or english muffin. Yum!


recipe found on scattered thoughts of a crafty mom

Ingredients
16 oz. strawberries (or one normal size container found at grocery stores)
3/4 c. granulated sugar
2 tbsp. fresh lemon juice

yup, thats it!

Instructions
1. Remove stems of strawberries and coarsely chop
2. Place strawberries, sugar and lemon juice in blender and puree until blended to your liking
3. Pour mixture into sauce pan over medium heat. Allow sugar to dissolve
4. Heat at medium to high heat, stir often. Allow mixture to boil rigorously, about 10 minutes or until candy thermometer reaches about 200 degrees Fahrenheit. The mixture should reduce and become thickened and darker in color.
5. Fill mixture into a half pint jar. Let cool before sealing or cover and use within 10 days. Keep in refrigerator.
6. Enjoy over your favorite toast or other food!

Bon Appétit!
Brittany


Wednesday, June 11, 2014

Baked Brie with Strawberries, Almonds and Balsamic Vinegar

Strawberry month continues! I have not been able to keep my mind off of strawberries. Its been all strawberry this strawberry that all up in my noggin lately.


I'm working on a frozen treat involving strawberries, but it needs a bit more work. Joy the Baker is having a "Baking Boot Camp" and I made this triple berry cinnamon swirl bread. Hopefully I can tweak some of the things I've been working on and share them with you all!

I want to roast all the strawberries there ever were and devour them. If you've never tried roasting fruit, you should. No pressure, but really you should. I also just ordered a ice cream maker. I'm giddy about it. Maybe there will be a roasted strawberry ice cream situation in the future. At the very least there will be buckets of ice cream in my future.


Now for the real strawberry situation at hand, strawberries and cheese. This is a pretty simple, easy and straightforward gooey, salty, tangy and cheesy situation. My first go around at making this resulted in spilled cheese, which is better than spilled milk. Promise. You can still eat spilled cheese.

I tweaked a few things to prevent a spilled cheese situation from happening again. I went for less liquid for the strawberries and created a balsamic glaze instead.


As I tend to do, there is not much added sugar to the strawberries. I like the tartness. The exposed top makes this almost a cross between a gallette and traditional baked brie. Leaving the opening at the top allows the strawberries to become sort of like roasted strawberries - jammy, melty and tart.


The balsamic adds a nice sharp tang on top, while the toasted almonds add a crunch. The pepper is not at the forefront here, but I do think it adds a little something. You could always add more pepper, if you wanted a real peppery kick.


You won't want to drizzle all of the balsamic glaze over the baked brie all at once, but reserve some for you and your friends to drizzle on as much or little as they want. I won't judge though if you just eat this all by yourself. I begrudgingly shared with my father because well he is my father.

Cheers,
April 

Ingredients:
For the brie: 
8oz strawberries, sliced into quarters
1 tablespoon balsamic vinegar
2 teaspoons honey
2 teaspoons all purpose flour
1/8 teaspoons freshly ground black pepper

1/3 cup slivered almonds, toasted

For the balsamic glaze:
1/4 cup balsamic vinegar
2 teaspoons honey
Freshly ground black pepper

Egg wash:
1 large egg, beaten in a small bowl, with a splash of water

Instructions:
  1. Preheat your oven to 375 degrees F. Line a baking sheet with parchment paper and set it aside.
  2. Combine strawberries, balsamic vinegar, honey, flour and black pepper in a bowl. Set aside.
  3. Slice the rind off of the top of the brie and set aside.
  4. Lightly flour your surface with flour and roll out the thawed puff pastry to a 12" by 12" (being a little shy of 12" is better than being to wide/thin). Trim off the corners to make a circle/oval (using a 10" plate is a useful guide, but you want your circle to be slightly larger than 10").
  5. Place the brie in the center of the dough. Drain the strawberries, reserving the juice for later. Add the strawberries on top of the brie (it may seem like they won't all fit and if a few fall along the sides of the brie, that is okay).
  6. Fold the edges of the dough over in small sections, overlapping as you go. Brush it all over with egg wash.
  7. Transfer to the oven and bake for 20-30 minutes, until the pastry is golden brown. Allow the baked brie to cool for 10 minutes. Place slivered almonds on tin foil and place in oven, until golden and nutty, about 3 to 5 minutes.
  8. While the brie is cooling, lets make the balsamic glaze. To a small saucepan, set over medium heat, mix together the reserved strawberry juice, honey, balsamic vinegar and pepper. Simmer for 3-6 minutes, until slightly thickened and sweet. Turn off the heat and drizzle a little over the baked brie. Garnish with a few slivered almonds; serve with remainder of almonds, glaze and crackers. 
Two years ago: Strawberry Shortcake, Chocolate Brownie Cookies

Monday, June 2, 2014

Rye Rhubarb Raspberry Crisp


It is officially my summer! Not technically by the calendar, but my first semester of grad school is complete and I feel free! Not to mention the temperature has remained above freezing for awhile now, which counts as summer for most Wisconsinites. 

I've got a pretty easy next few months ahead of me too, with a light work schedule (it is my last official non-grown-up summer after all!). Hopefully it will continue to be full of bike rides, swimming, cooking and general adventures. 


Now about this here rhubarb crisp. I love a good fruit crisp/crumble, but especially this one. Rhubarb is incredibly easy to prepare. It is simply chopped up into pieces, which totally beats peeling and coring apples.  


I do make myself a little extra work by peeling off any tough strips on the rhubarb. You know what I'm talking about right? Like when you are chopping and all your 1-inch pieces are all being held together by the bottom strip. I peel that off. No stringy or chewy pieces in my crisps. Totally optional.

This crisp started out being only rhubarb, no raspberries. The first time I made it felt like the pan was sparsely filled. I had frozen raspberries in the freezer and here we are.


Using rye flour and rye oats is entirely optional in the topping. The first time around I didn't have rye oats and just used old fashioned oats. Whole wheat flour would be a great substitute for the rye flour, seeing as most of us have it in our pantry.

The rye flour adds a nice earthy sweetness to the topping and complements the tartness of the raspberries and rhubarb.  That being said it is delicious on its on, but I think you would be missing out if you didn't top this with some vanilla ice cream.

xo
April


Ingredients:
For the filling:
1 pound of rhubarb, cut into 1-inch pieces
1 cup fresh or frozen raspberries
1/4 cup granulated sugar
1 tablespoon brown sugar
3 tablespoons all-purpose flour
1 teaspoon vanilla extract
1/4 teaspoon ginger

For the topping:
1/3 cup rye flour or whole wheat flour
1/2 cup rye oats or old fashioned rolled oats
5 tablespoons cold unsalted butter, cut into cubes 
1/2 cup chopped walnuts
1/2 cup light brown sugar
1/4 teaspoon cardamom
1/4 teaspoon salt

Instructions
  1. Preheat oven to 375 degrees F. In a 8 x 8-inch baking dish, mix together the rhubarb, brown sugar, white sugar, flour, vanilla extract and ginger. Set aside while you make the crumble.
  2.  In a medium bowl, add all of the crumble toppings. Using your hands, break up the butter until it resembles pea-side bits or is well incorporated. Place the crumble topping atop the filling; transfer to the oven and bake for 35 to 40 minutes, until the top is lightly golden brown and the filling is bubbly. Serve warm, with vanilla ice cream.
Linking up with Time to Sparkle.

LinkWithin

Related Posts Plugin for WordPress, Blogger...