Showing posts with label Fall. Show all posts

Monday, March 2, 2015

Winter Vegetable Chowder with Crispy Brussel Sprouts and Bacon

This should be called "almost vegetarian winter vegetable chowder," but it is not called that. The name was too long to fit in the allotted space.


That is how we should think of it though - almost vegetarian. Omit the bacon and you've got yourself a vegetarian situation. 

You could go even farther and hold the splash of milk and you'd have yourself a vegan party in a bowl.

Personally, I need the bacon in here. It adds some smoke and a meaty quality. It makes me think of this as more of a meal. Versus a bowl of flavored water and vegetables.

Actually, I could be a vegetarian, if and only if I could keep bacon and sausage. Basically anything pork. I don't really care for the other meats so much, but I do love the dirtiest meat of them all.  


There are lots of people who choose to eat all the meats but pork. I'm the opposite of that. I digress.


It is still healthy with the bacon. Bacon is good for you.

Enough talk about my love affair with bacon and other pork products. This recipe is flexible. I went heavy on the cauliflower because I love cauliflower. Love it.

You could use some celery root, squash, sweet potatoes. Whatever floats your boat.


I added a can of white beans to thicken it up and for a bit of protein. It is finished with some lemon juice, for brightness. 


Lemon truly brightens the whole thing up. Don't skip it. If you forgot to buy a lemon, substitute a splash of cider vinegar. It gets finished off with a small splash of milk too for creaminess.

The chowder is fairly creamy all on its own, but it is no cows milk creamy. You know what I mean? Love me some dairy. Again you can be flexible, work with what you have and like.

The crispy sprouts on top add a little color and texture. I love brussel sprouts. They are the best. Even better with crumbled bacon. I think this would be great with some crumbled goat cheese on top. Be creative. 

Reheating this was a breeze too. It thickens up though. Add some water to thin it out or do like me and pour it over some rice. Variety and flexibility. Words we should all live by.


One word of caution, easy on the salt. Taste as you go. The mustard and lemon combine for a pleasantly salty vibe, but you don't want to go crazy. Not the mention canned beans can have a lot of added salt too.

xo
April   

Ingredients:
for the chowder:
3 slices, bacon
1 large cooking onion, small dice (1 3/4 cups)
1 leek, small dice (white + light green part only)
6 cloves of garlic, minced

2 large carrots, peeled and chopped
4-5 thyme sprigs, leaves removed and chopped
1-2 parsnips, peeled and chopped (1 1/2 cups)
1 large head of small-chopped cauliflower florets
1 ½ tbsp grainy mustard
salt + pepper to taste
1 tsp Old Bay Seasoning

1 can (16 oz) can white beans, drained and rinsed
 

1/4 cup lemon juice
3 1/2 cups vegetable stock

1/3 cup heavy cream 

for the crispy brussel sprouts:
10 brussel sprouts, sliced
2 teaspoons olive oil
1/2 teaspoon Old Bay Seasoning 

Instructions:
Preheat the oven to 400 degrees F. Line a baking sheet with parchment paper and set aside.
Heat a large, heavy soup pot over medium heat. Add the bacon, cooking 8 to 10 minutes, until crispy. Remove and drain bacon, leaving about 2 tablespoons in the pan, setting the bacon aside for later. 
Add the diced onions to the pot and sauté until soft and translucent, about 4-5 minutes. Add the leeks and continue to sauté until the leeks are soft, about 4 minutes more. Add the minced garlic and thyme to the pot and cook until fragrant, about 1 minute, stirring constantly. Add the chopped parsnips and cauliflower florets to the pot and stir to coat in the oil. Add the grainy mustard, salt + pepper to taste, and Old Bay. Stir to coat all the vegetables in spice. 
Add the lemon juice to the pot and stir. Add the vegetable stock to the pot, stir again, cover and bring to a boil. Once boiling, remove the lid and lower heat to simmer. Let the chowder cook and bubble until the parsnips and celery root pieces are tender, about 15-18 minutes.
Ladle half of the chowder into an upright blender, with the white beans, and carefully purée until smooth. Pour puréed portion of chowder back into the soup pot and bring it back to a boil. Reduce heat to low, adding the cream, stirring to combine. Check the chowder for seasoning, adjust and serve hot. (you could also use an immersion blender, be careful to leave enough whole vegetable pieces.)
While the chowder is simmering/cooking, make the crispy Brussels sprouts. Place the sliced sprouts onto a parchment lined baking sheet. Pour the 2 tsp of olive oil over top, season with salt and pepper and a generous pinch of Old Bay seasoning. Toss lightly to combine and spread sprouts evenly on the baking sheet. Slide the sheet into the oven and roast for 10 to 12 minutes, or until browned on the and crispy. You'll want to stir them once while they are roasting. Serve warm sprouts on top of the hot vegetable chowder, with crumbled bacon.

Adapated from The First Mess

Wednesday, February 11, 2015

Chocolate Merlot Truffle Cupcakes with Mascarpone Cream Cheese Frosting

These cupcakes are amazing. Totally perfect for Valentines Day, whether you love Valentines Day or think its just another hallmark holiday, marketing ploy, in that case they are any day perfect.


They might as well be a love potion, these cupcakes. You will love yourself more for making these on this fine upcoming hallmark holiday of love. Believe me.

Truffles are stuffed inside of each one for a little chocolate surprise. Who wouldn't love that? I sure don't know of anyone who wouldn't like it. I'd convert them with these cupcakes though. I'm sure of it.

A lot of recipes call for a little coffee when there is chocolate involved. Coffee and chocolate are a natural pair, but wine and chocolate are too. They both enhance the chocolate factor by 10.

It is quite possible that wine and chocolate are a better pair than chocolate and coffee...particularly if it is afternoon because it is more acceptable to drink after noon. Don't judge me. I'm still a college student for a few more months.


The truffle stuffed inside makes a little semi-molten extra rich chocolate center. These cupcakes are super moist (I'm sorry if you hate that word, but it is true AND have you ever looked at "moist" synonymous; way worse than moist when talking about food. Gross.) all on their own with no truffle but why you wouldn't want the chocolate center, I don't know.

Red wine makes these seem like a red velvet cake. Someone asked me if they were red velvet, which they might as well be.  Red wine velvet cupcakes.

Use any sort of somewhat fruity, well-rounded, smooth red wine that you would normally drink. I used a Merlot.

The wine complements the chocolate by bringing out the fruitiness found in chocolate. It is amazing. These cupcakes are the best cupcakes I've ever made. Maybe the best I've ever consumed. I wouldn't lie to you. Pinky swear.


The frosting in this recipe is probably my favorite frosting of all time. The combination of butter, cream cheese and mascarpone cheese are perfect. I'm always looking to get my boyfriend to say whatever I've cooked for him is the best he has ever had the pleasure of consuming.

This frosting did it. Best he ever had. It isn't too sweet either, which I like. It is honestly the only frosting I ever make. It is just the best. You must try it. Promise me.

Adding a little wine to the frosting is optional. I felt like it made it curdle a little bit, but gave it a lightly pink-red-wine color that I liked. I'd suggest not adding it if you are serving this to children.

These may be adult only cupcakes all together, between a glass of wine and a few cupcakes, I'm not entirely sure if the alcohol cooks off or not. I will let you make the call on serving these to children or not.


The cupcakes come together in around an hour, not counting cooling time. That is okay though. Just think of the time it takes for the cupcakes to cool as the perfect excuse for a glass of wine.

You should probably be drinking a glass while making these. Hell, you should probably just buy two bottles of wine.

Maybe save the second bottle of wine for after the cupcakes are out of the oven, you don't want it going to your head. Dry, overcooked cupcakes are bad, but not as bad as a fire.Either situation is no good though.


I bet you can find time to make these this week. Maybe this weekend, more time to enjoy some wine on a weekend. Treat yourself either way on this lovely hallmark holiday weekend.

I know I'll be treating myself to a to be determined home cooked meal, with white Russians and the Big Lebowski for dessert. I want to know what your plans are! How are you treating yourself this Valentine's day?

xo
April 

Makes about 24 cupcakes
Ingredients:
 for the cupcakes:
24 cupcake liners
24 truffles, such as Lindt Irresistibly Smooth Dark Chocolate Truffles
2 cups all-purpose flour
3/4 cup natural unsweetened cocoa powder, sifted
1 1/4 teaspoon baking soda
1 teaspoon baking powder
1 teaspoon cinnamon
1/2 teaspoon kosher salt

1 cup (2 sticks) unsalted butter, at room temperature
1 1/2 cups granulated sugar
2 large eggs
1 teaspoon vanilla
1 cup Merlot wine (or other red wine)

for the frosting:
1 cup (2 sticks) unsalted butter at room temperature
1 cup (8 ounces) cream cheese at room temperature
2 cups powdered sugar
1 teaspoon vanilla extract
3-4 tablespoons Merlot wine (or other red wine)
Pinch of kosher salt
1 cup (8 ounces) mascarpone (Italian cream cheese, available at most grocery stores)

1/4 cup cocoa powder, for dusting

Instructions:
for the cupcakes:
Heat the oven to 350°F. Line a cupcake pan with 24 cupcake liners, placing a chocolate truffle (I used Lindt truffles) in each cupcake liner. Combine the flour, baking soda, baking powder, salt and cinnamon in a medium bowl, sifting the 3/4 cup cocoa over the top of the flour mixture.

Cream the butter and sugar in an electric mixer, beating until the mixture is light and fluffy, 3 to 5 minutes. Add the eggs, one by one, and then the vanilla, and continue beating 1 to 2 minutes. With the mixer on low, mix in a third of the flour mixture into the wet ingredients and then pour in a third of the Merlot. Mix ingredients together until just combined. Continue this process two more times, alternating between the flour mixture and the wine into the cake batter. (be sure to not over mix the batter, in between each addition it is okay if they are not fully combined until the end.)

Fill each cupcake liner 3/4 of the way full, baking for 15 to 20 minutes; a metal skewer inserted in the cupcake (slightly off to the edge because of the truffle) should come out clean. Let the cupcakes cool 10 minutes in the pans, then place them on a rack to cool completely. While the cupcakes cool, make the frosting.

for the frosting:
In the large bowl of an electric mixer fitted with the paddle attachment, beat the butter, cream cheese, and powdered sugar on medium-high speed until light and fluffy. Scrape down the edges of the bowl and add the vanilla, mixing on low to combine. Then with the mixer going, stream in the 3-4 tablespoons of wine, until combined.

Beat in the mascarpone on very low speed until just combined. (Be careful; once you've added the mascarpone, excessive beating can make the frosting curdle.)

Frost the top of each muffin with the icing.

To finish the cupcakes, sift a little cocoa powder over the top of each one and then top with a truffle (optional).

Frosting slightly adapted from The Pastry Queen Christmas

Wednesday, January 28, 2015

Apple Cider Braised Pork with Apples, Fennel and Potatoes

Does anyone else have the winter blues? This pork is the perfect fix.


The winter hasn't even been that bad here in Wisconsin. No blizzards. Only a few days with below zero wind chills. I'm just so excited for warmer weather but mostly for school to be over.

Braising is the best. This could probably be done in a slow cooker, with less liquid. This recipe was also intended for the Fall, when there was a plethora of apples, but it works for winter too. Am I right? I am. Thanks for agreeing.

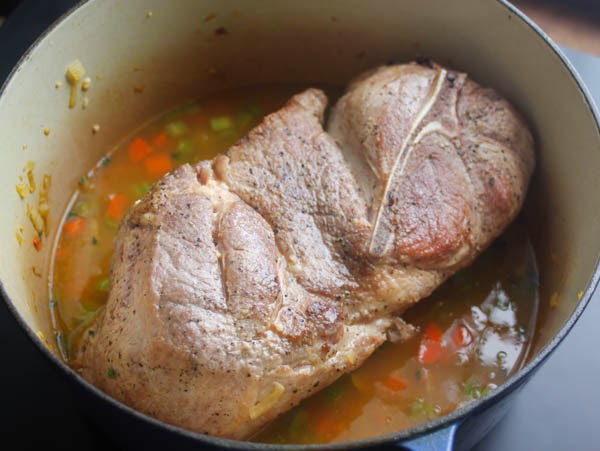
When braising, the initial steps are key for a delicious finished product. Searing the meat, getting a nice caramelized exterior is key for flavor.

Sauteing the mirepoix (fancy for carrots, onions and celery etc.) in the drippings. You want a caramel-y brown color without scorching anything. Balance is key.


Step three is deglaze the pan, with brandy in this case, getting all of those caramelized brown bits off the bottom of the pan. Flavor city. Little flavor bombs. Tiny, yet powerful! Be sure to scrap the bottom of the pan.

Then you add your braising liquid. Enough to go about 1/3 to 1/2 way up your pork butt. We aren't boiling our pork. We are braising. Give the liquid a hand, bringing it to a simmer on the stove and then put it in the oven.

Forget about it for awhile. Simple.

In the last 45 minutes, add your vegetable. Take it to the next level. Fennel and apple add some flavor to the broth, making a nice aromatic of sorts.

Potatoes cooked in with all that flavorful sauce are perfect for serving.

One-pot meal!


This makes a ton of meat. Probably more meat than potato-veg mash. I ended up using leftover meat for tacos, tossing it in some store bought sauce and making a soup.

I would have been eating the same thing twice a day for at least a week otherwise. I need more variety in my meals.
This is a really impressive meal, with minimal effort. Just a little bit of preparation and planning. Braising is really easy, with a crazy flavor impact for such little labor.

Pork not your thing? Chicken could work really well in here too. Or turkey!


I mashed all the veg together to make a little bed for the meat. Not necessary, but that is my preferred vessel for meat of this sort.

The apple cider adds a caramel-y, tangy, sweetness to the whole dish and the fennel and lemon zest add brightness and a little something unexpected. It isn't too sweet though.

Finishing the whole thing off with a little cider vinegar adds brightness, cutting the sweetness. It really makes a difference. Rounds the whole dish out. Promise.

Cheers,
April

Serves 5 to 6 

Ingredients

4 to 5 lb. pork butt
3 Tbs. vegetable oil
Kosher salt
ground black pepper
2 celery stalks, diced
2 carrots, peeled and diced
1 medium onion diced
2 whole dried bay leaves
1 Tbs. chopped fresh thyme
1 Tbs. finely chopped garlic
Zest of half a lemon, wide strips (3-4 strips)
1/4 cup brandy, apple brandy if you have it
1-1/2 cup lower-salt chicken broth
1-1/2 cup apple cider 
1 medium fennel bulb, diced
1 apple, peeled and diced
6 to 8 small red potatoes
1 to 2 tsp. cider vinegar
Instructions
Position a rack in the center of the oven and heat the oven to 325°F. In an 8-quart Dutch oven, heat 2 Tbs. of the oil over medium heat. Season the pork with salt and pepper. Add pork to the pot, and cook, turning with tongs, until nicely browned on all sides, 3 to 4 minutes per side. Pour off all but a thin layer of fat from the pan.

Add the remaining 1 Tbs. oil, carrots, celery and onions to the pan. Season with 1/2 tsp. salt. Cook, stirring and scraping up any browned bits on the bottom of the pan, until the aromatics are soft and lightly browned, 6 to 8 minutes. Add bay leaves, lemon zest, thyme, and garlic, and cook, stirring, until well distributed and fragrant, about 1 minute.

Pour the brandy into the pot and cook, stirring to scrape up any browned bits on the bottom of the pot, until the liquid is reduced to about 2 Tbs., about 1 minute.

Transfer the pork (and any juices that have accumulated) back into the pot. Pour the chicken broth and apple cider over the ribs.

Bring the liquid to a simmer, cover, and put the pot in the oven. Cook, turning the pork with tongs after about an hour, total cooking times is about 2 to 3 hours. In the last 45 minutes of cooking, add the apples, fennel and potatoes, until the potatoes are fork tender and the meat is falling off the bone. (The meat may fall off most of the bone about midway through cooking; this does not mean that the ribs are fully tender.)

Transfer the ribs to a serving platter or dish. Let the sauce and solids sit in the pot for a few minutes to cool and with a shallow spoon, skim off as much of the fat as possible from the surface. Season the sauce to taste with salt and pepper, and add the vinegar.

Optional: spoon out the vegetables, mashing them, making a chunky mashed potato mixture. Then reduce the sauce for 10 to 15 minutes, making a sort of gravy. Serve the meat over the potatoes, drizzled with the reduced sauce.

Tuesday, January 20, 2015

Mixed Greens with Roasted Beets, Pomegranate Dressing and Goat Cheese

Oh my word. This might be my favorite salad of all time. Prepare yourself.


The colors are beautiful. Are they not? You can't deny it. All those reds and oranges. Possibly the perfect Valentines day salad? I might be getting ahead of myself here.

It might be because this salad was supposed to be posted before Christmas, again due to its beautiful reds and some green; therefore, I don't care if its too soon to think about Valentines day.

It is just too pretty, but too tasty not to eat.


Valentines day is a total hallmark holiday scam, but it is just another holiday excuse to eat lots of chocolate and make something extra fancy special for dinner.

I actually do that most weeks anyways, but its good excuse to have. It makes me feel more normal.

In all reality, I will probably be ordering a extra large pizza with my main man, watching The Big Lebowski, drinking white Russians.

Pizza is my favorite and white Russians are his. His and hers. Too cute.


I digress, but this is all connected to the salad. Trust me.

It is truly maybe my favorite salad I've ever made at home. Ever. It borders right on unhealthy and healthy, depending on your veggie to cheese ratio. My cheese ratio is usually, always high.

Don't let the beets scare you. They are tender, like butter and almost sweet, with a hint of earthiness.

The dressing is just the right amount of thick, creamy, a little sweet and tart. It is dreamy. I'm not one to eat salad for dinner or enjoy salad very much.


 I try very hard. I would just rather a big bowl of carbs and cheese. This salad I ate for a whole week straight. All the ingredients, dressing included keep for for at least a week.

Pomegranate molasses might be hard to find. I hear Whole Foods sells it, but you can always make it too. I used this recipe.

The salad toppings are also very customizable. I bet raspberries or strawberries would make great substitution for the pomegranate seeds.

A nice blue cheese would work well here too, in place of the goat cheese. Walnuts or sunflower seeds would be tasty too, depending on what you have in your pantry.


xo,
April

Mixed Greens with Roasted Beets, Pomegranate Dressing and Goat Cheese
Serves 4 to 6
Ingredients:
for dressing:
3 tablespoons pomegranate molasses
1 tablespoon honey
1 tablespoon red cooking wine
1 tablespoon balsamic vinegar
3 tablespoons extra virgin olive oil
2 teaspoons Dijon mustard
Salt
Pepper

for salad:
Spring mix
6 to 8 small beets, roasted, peeled and cut into bite sized pieces
Goat cheese, crumbled
Pumpkin seeds
Pomegranate seeds

Instructions:
roasted beets:
Preheat the oven to 400F. Wrap beets in tin foil, in a single layer (you may need to make two tin foil packages). Roast the beets for 40 to 60 minutes or until fork tender. Let the beets cool until able to handle and then peel.
for dressing:
Combine all the ingredients in a medium mason jar and shake to combine. Dressing will keep for up to a week in the refrigerator
for the salad:
In a large bowl, combine the greens, beets and desired amount of dressing, tossing to coat.
Divide among plates, topping each with a sprinkle of pumpkin seeds, goat cheese and pomegranate seeds.

Wednesday, December 3, 2014

Hard Cider Bourbon Cocktail

You need a cocktail right now, it has been a long busy week and things aren't going to let up anytime soon. You disagree? Well maybe you need a quick cocktail for a party in the coming month because there will plenty of parties in your future. This is it.


This cocktail reminds me of a loaded corona, but for fall and with a boat load more class, mostly because we drink it from a glass and not a bottle. You don't know what a loaded corona is? Well let me enlighten you. Open yourself a corona, take a swig, now that there is a little room in the bottle, fill 'er back up with a shot of tequila and drink responsibly.

This is just like that, but a loaded cider, with bourbon. It is more classy though because we are making in a glass. Trust me, it is classy and tasty most of all.


A lot of ciders are, Crispin in particular, suggested to be served over ice. I'm not a fan of this suggestion though. Not at all.

No body likes a watered down cocktail. To make this super simple cocktail feel special and keep it cool and fall like, I made some apple cider ice cubes. It "apples" the cocktail down instead of watering it down. It just makes sense!

I've tried making this with a lighter cider like Crispin and a darker richer cider like the one pictured from Door County's Island Orchard Cider. Which to use is a personal preference. I think the bourbon boozy flavor comes out more with a lighter cider and the darker, richer cider blends with the bourbon because they are both bold and full flavored, duh. Just kidding.


Garnish the whole thing with some sliced apples. You could even use apple cubes as a garnish. Because who doesn't love a little booze soaked fruit at the bottom of their cocktail to wash the whole thing down.

This is a really easy simple cocktail to bring along to a party last minute. All you need is a bottle or six pack of your favorite cider and a bottle of bourbon and it is cocktail time. You can pick it all up en route to your party. It is perfect. My boyfriend who usually only drinks white russians loved it.

It is just the right amount of sweet, rich, apple and fall in a glass. I realize it doesn't feel like fall anymore, but I think this cocktail is a nice addition to all the eggnog, hot toddy and cocoa that will be consumed in the coming month.


Just remember to always keep it classy and mix your cocktail in a glass, not the bottle. Nothing good ever comes from a beer cocktail made in a beer bottle. Trust me. Plus, it is the holiday season and it should be filled with joy, class, laughter and kindness! I hope you all had a wonderful Thanksgiving. I know I did!

Makes 1 cocktail
Ingredients:
1 shot/jigger or 1.5 ounces bourbon
12 ounces hard cider (such as Crispin or Island Orchard Cider)
Apple cider ice cubes
1 apple, cored and sliced or cubed

Instructions:
to make the ice cubes: Pour your favorite apple cider into and ice cube tray and freeze overnight.
to make the cocktail: Combine the bourbon, hard cider and cider ice cubes in a glass. Garnish with sliced or cubed apples. Enjoy and be merry.

Monday, October 27, 2014

Pumpkin Pie Rice Krispie Treats

We're doing things a little differently around here this week.  Prepare yourself for a mini theme week of all things rice krispies!  To start things off I'm sharing this recipe for Pumpkin Pie Rice Krispie Treats.


Rice krispies treats are one of those classic kinds of snacks.  Somehow I find myself forgetting about them a lot of times when I'm thinking of a treat to make.  I think it might be because they're so simple to make and that there is no baking in the oven required.  When they do slip into my mind and I choose to whip up a batch I'm never disappointed.

It's also easy to forget how versatile of a treat it can be.  Add peanut butter.  Smother them in chocolate.  Stir in sprinkles.  The possibilities are endless!


Seeing as Halloween is only a few days away and I'm in a full on pumpkin mindset, I knew I wanted to incorporate the flavor into my rice krispies.  The key to using pumpkin puree in rice krispie treats is not using too much because the cereal will get soggy, but to compliment the pumpkin with the flavor of your favorite pumpkin pie spices; cinnamon, nutmeg and cloves!  If you want to make them a little more festive looking, mix in some Halloween sprinkles, cut them with cookie cutters or shape them into balls and add a little stem.  The possibilities are endless and I'm sure they'll be just as enjoyable any way.

Cheers,
Kelsey


Recipe slightly adapted from Sally's Baking Addiction.

Ingredients:

  • 3 tablespoons unsalted butter
  • 1/4 cup pumpkin puree (blot moisture out of pumpkin puree with a paper towel)
  • 10 ounces of mini marshmallows
  • 1/4 teaspoon vanilla extract
  • 1/2 teaspoon ground cinnamon
  • 1/4 teaspoon nutmeg
  • 1/8 teaspoon ground cloves
  • 1/8 teaspoon salt
  • 6 cups rice krispie cereal
Directions:
  1. Grease a 9x13 pan and set aside for later.
  2. In a large saucepan over medium-low heat, melt butter.  Stir in pumpkin puree until warmed.  Fold in marshmallows, frequently mixing until they are almost melted.  Stir in vanilla, cinnamon, nutmeg, cloves and salt. Remove from heat.
  3. Let mixture sit for 20-30 minutes, or until it reaches room temperature, occasionally stirring so a hard layer does not form on surface.
  4. Stir in rice krispie cereal and mix until all cereal appears to be coated.
  5. Pour into prepared pan.  Grease either your hands or a spatula to press mixture into pan.  Put pan in refrigerator to set for 30 minutes.  Cut and enjoy!

If you like this recipe, you may also like:

Wednesday, October 22, 2014

Pumpkin Snickerdoodle Cookies

First there was Dulce de Leche Pumpkin Cake (yum), then there was Pumpkin Pound Cake (delish), and now I bring you Pumpkin Snickerdoodle Cookies because Badger Kitchen is currently chugging along on a pumpkin sweets train this month.


You know how there are those special moments in life that are just so memorable that you'll never forget?  I remember picking out our family dog because my sister and I decided he had the softest fur and getting to have him sit on my lap for half the ride home (sharing is caring).  I remember getting engaged and crying my eyes out for a good ten minutes afterwards.  I also remember the first time I baked and ate pumpkin snickerdoodle cookies in my college apartment on a crisp October.

Being the good daughter I am (and because my parents lived 20 minutes away so I'd go home to do laundry), I took my mom a couple of cookies to enjoy and shared the recipe upon request.  It then got shared with Gramma, sisters, aunts and so on.  And now here I am sharing it with you!


To say that these cookies are life changing isn't too far from the truth.  They are superior to the average snickerdoodle cookie thanks to the added pumpkin and spices.  The additional moisture from the pumpkin puree also keeps the cookies chewy, which is good if you're not a fan of hard cookies like me.

The original recipe that I found is so good that has received such rave reviews that I've never felt the need to alter it.  The only change I make is that sometimes I will add a little more pumpkin than the recipe calls for, depending on if I'm in a super pumpkiney mood or not.  Oh, and don't discriminate, pumpkin snickerdoodle cookies can be enjoyed year round!

Enjoy!
Kelsey


Recipe from Sweet Pea's Kitchen.

Ingredients:

  • 2 3/4 cup all-purpose flour
  • 2 teaspoons cream of tartar
  • 1 teaspoon baking soda
  • 1/2 teaspoon salt
  • 1/2 teaspoon pumpkin pie spice
  • 1 3/4 cup sugar, divided
  • 1 cup unsalted butter, softened
  • 1 large egg
  • 3/4 cup pumpkin puree (increase to 1 or 1 1/4 cups if desired)
  • 2 tablespoons ground cinnamon
Directions:
  1. Preheat oven to 400 degrees.  Line two baking sheets with parchment paper.
  2. In a large bowl, whisk together flour, cream of tartar, baking soda, salt and pumpkin pie spice.
  3. In the bowl of a stand mixer (or different large bowl to be used for mixing) cream butter and 1 1/2 cups sugar until light and fluffy, or about two minutes.  Beat in egg.  Then beat in pumpkin puree.  Add dry ingredients from separate bowl and slowly beat in.
  4. In a separate small bowl, stir together 1/4 cup sugar and cinnamon.
  5. Form dough into 1 1/2 inch balls and roll in cinnamon-sugar mixture until coated.  Space apart evenly on baking sheet.
  6. Bake one cookie sheet of cookies at a time for 10-12 minutes, or until edges of cookies are starting to brown but centers are still puffy and soft.
Tip: Cookies freeze well either after baking and fully cooled, or in dough ball form without cinnamon-sugar coating.

If you like this recipe, be sure to check out:

Wednesday, October 15, 2014

Pumpkin Pound Cake


I could start this post taking about how much I love pumpkin and how when baking this recipe I was drinking pumpkin spice flavored coffee and had a pumpkin scented candle burning, but then this would sound like every other wonderful pumpkin blog post out there. When it comes to fall, who doesn't like pumpkin [cough, besides my fiancé, cough]?

Earlier in the summer when Badger Kitchen was thinking up the coming months' themes, pumpkin just couldn't be overlooked. But come October (ok, ok I was thinking about this since September), I just couldn't decided on a recipe to try. I really wanted to step out of my comfort zone and try something, non-baked good recipe. You know, get away from the traditional cinnamon, nutmeg, pumpkin trio recipe. But I was afraid of not liking it and my fiancé not even trying it. So, baked good it is. However, I've never had pumpkin pound cake before. I was pretty excited when I found this.


This recipe is super easy. Believe me, I made this after a very long wedding weekend while finishing up scientific figures for a grant and doing laundry and keeping the dog occupied. It reminds me of banana bread in the fact that it's really good without much effort. Also, this pound cake has the texture like banana bread in that it's dense but [dare I use the word] moist. Also, that cup of pumpkin goes a long way! I was afraid of it being bland but this pound cake is far from! The only thing I would do differently next time is maybe add a walnut or oatmeal topping to give it more texture diversity.

Bon Appétit,
Brittany

Slightly adapted from Something Swanky

Ingredients
1 1/2 c. All Purpose Flour
1 tsp. Ground Cinnamon
1/2 tsp. Salt
1/2 tsp. Baking Soda
1/2 tsp. Baking Powder
1/4 tsp. Ground Cloves
1/4 tsp. Ground Nutmeg
1 c. Granulated Sugar
1/2 c. Brown Sugar
1/2 c. Vanilla Yogurt
3 Egg Whites
1 c. Canned Pumpkin

Fall sprinkles optional (but why not? After all, it is cake)

Instructions
1. Preheat oven to 350 degrees. Grease bread pan or mini loaf pan.
2. Combine flour, cinnamon, salt, baking soda, baking powder, cloves and nutmeg.
3. In a separate bowl add together the sugars, yogurt and egg whites. Mix until blended.
4. Fold pumpkin into the wet ingredients. Then add the dry ingredients. Stir just until all is blended together.
5. Pour into pan (should make about 8-9 mini loaves).
6. Bake for 60 minutes if large bread pan or 25 minutes if mini loaf pan.
7. Enjoy!


Wednesday, October 8, 2014

Dulce de Leche Pumpkin Cake

Its pumpkin time! Hopefully you aren't already sick of everything pumpkin because we got a lot of pumpkin coming your way.


Do we all remember better than sex cake from about 10 years ago? That is what I was going for here, pumpkin better than sex cake. Because I can't seem to help myself, I not only changed the cake to pumpkin but changed the sweetened condensed milk to dulce de leche.


This is not a typical recipe for me at all. I'm usually very against boxed cake. It doesn't take that long to mix up your ingredients, lets be honest, but sometimes you have to trash things up and make them super easy, semi-homemade and decadent, because sometimes they just taste better that way.

Whip cream is another easy thing to make at home, but it doesn't really stand up to cool whip. I'm secretly a huge fan of cool whip amongst other super processed dairy items. Nacho cheese, anyone? Velvetta?!  Love. I try to avoid them because they are so processed, but sometimes you just have to give into that guilty pleasure.


Back to the cake, you can choose to use the sweetened condensed milk and not turn it into dulce de leche, but I think you would be missing out. There isn't any work involved in making it, other than making sure it stays covered in water. You wouldn't want it to explode. Not to alarm you, but honesty is important in any relationship.


The cake is sort of dense, chewy and moist. It isn't overly sweet. I really like that some, but not all, of the dulce de leche soaks into the cake while some rests on top too. So indulgent and fall like! It got rave reviews from all my friends and by friend I mean my boyfriend and dearest friend, Leah, who also happens to be the photographer for this post!

xo,
April

Ingredients:
1 can sweetened condensed milk (label removed)

1 box yellow cake mix
1 14 oz. can pumpkin puree
1- 8oz container cool whip
1/2 cup heath bits

Instructions:
Dulce de leche:
  1. In a large pot, fill with water to cover the can of sweetened condensed milk. Over high heat, bring to a boil Let simmer for 2 1/2 to 3 hours, making sure to add more water as necessary. Remove the can of dulce de leche from the water and let cool to room temperature.
Pumpkin cake:
  1. Preheat an oven to 350F. Grease a 9 x 13 inch baking dish and set aside. 
  2. In a large bowl, combine cake mix and pumpkin puree (add only the pumpkin puree to the cake mix; DO NOT add any of the ingredients listed on the box, like eggs), until a smooth batter forms.
  3.  Pour batter into prepared pan (it was pretty thick and made a thin layer, not to fear though!) and bake for 20 to 25 minutes. 
  4. Remove cake from pan and let cool for 10 minutes. Using the end of a wooden spoon, poke holes all over the cake. 
  5. Place the dulce de leche in a microwave safe container and reheat for 30 seconds and pour over the cake, spreading evenly over the cake and filling in the holes (a spatula is helpful here depending on how viscous the dulce de leche is). Refrigerate the cake for 30 minutes or overnight.
  6. Spread cool whip evenly over cake and sprinkle heath bits evenly on top. Cake is best enjoyed in 2 to 3 days.
Similar posts: Pumpkin Cheese Cake, Pumpkin Chocolate Chip Bars, Cranberry Upside Down Cake

Thursday, September 25, 2014

Jalapeño Beer Brat Macaroni and Cheese


To wrap up out football theme, I have some macaroni and cheese with all the quintessential Wisconsin fixings mixed into it. 


I made this at my boyfriend’s house. Big mistake. The most useful thing he had was a grill. Real bachelor kitchen. I should have known. It works for him apparently but it almost caused me a nervous breakdown. Now by no means do I have a ton of fancy pots and pans or equipment, but I do have some. Most of it is hand me downs. I might have overreacted to not having the things I’m used to cooking with. That should not be a surprise to anyone though. Cooking in a new place is stressful, but totally doable and you don’t need anything fancy to make macaroni and cheese from scratch.
The stuff in the blue box or Annie’s macaroni and cheese is wonderful, but you just can’t beat homemade macaroni and cheese. I think it is intimidating for most people, but even a sparsely equipped bachelor pad kitchen has the equipment to make it: medium sized saucepan, large pot to boil noodles and a baking dish.


I grilled the brats, but you could totally throw them in the oven or on the stove top, in a pan. If you grill the brats, don’t be like me and spend 6 minutes futzing around trying to take pictures.  The charcoal grill will get to hot with all that air and then everything will go up in flames and your brats will be split open and be flame cooked in 4 minutes.  Lesson learned.


It is all pretty straightforward. If you have never made a roux (butter and flour), don’t be scared. Keep and eye on it and stir constantly. This is what will thicken your cheese sauce. Once it is a light nutty brown, pour in your beer slowly and then the milk. This avoids clumps. Bring this mixture almost to a boil, which means for me where there are tons of tiny bubbles all around the edge of the pan. Add the cheese. Add the brats and peppers.

You’re going to probably look at this sauce and freak out like I did, thinking it is way to runny and that there is way too much of it. I know there can never be too much cheese, but proportions and balance are key to a solid mac. I know I freaked out, but it came out of the oven perfectly, with just the right amount of spice, which will depend on the heat of your jalapeños. 


It was even better the next day for lunch! I didn’t try it but I bet this would work great to make the day before, refrigerate and reheat in the oven at your friend’s house or before your own football party. Make it for any party really, it is delicious and oh-so very Wisconsin. I promise. 

cheers,
April
 
Ingredients:
for topping:
2 1/2 cups panko bread crumbs
2 tablespoons butter, melted
1 cup cheddar cheese, grated
1/4 cup gruyere or fontina cheese, grated
1 jalapeno, grilled, seeded and chopped

for macaroni & cheese:
1 lb. sharp cheddar cheese, grated
5 ounce Gruyere cheese, grated

1 jalapenos, grilled, seeded, chopped
1 poblano pepper, grilled, seeded, sliced into quarter inch pieces
4 brats, grilled (I used D&G Sausage Shop bacon and jalapeno brats)
1 lb pasta (such as cavatapi, fusulli or macaroni) cooked to al dente
6 tablespoons unsalted butter
6 tablespoons all-purpose flour
3/4 cup amber or pilsner beer
1 cup heavy cream
2 1/2 cups whole milk

Instructions:
grilling:
Start by heating your grill to medium heat. Place brats, two jalapenos and poblano pepper on the grill. Cook the peppers for 2 to 5 minutes, or until lightly charred. Cook the brats, turning, for 6 to 8 minutes. 

Topping:
Preheat oven to 400F, with rack in middle. Combine the butter, panko bread crumbs, cheddar, Gruyere and one jalapeno pepper, in a bowl, until well combined. Set aside for later.

Macaroni and Sauce
Bring a large pot of salted water to a boil. Meanwhile, melt the butter in a heavy medium saucepan over medium-low heat. Once butter has melted whisk in the flour, continue whisking for 3 minutes, until the mixture is a light golden color and thick, then slowly whisk in the beer and milk.

Increase the heat to medium and bring sauce to a low boil, whisking constantly (this takes about 8 minutes). Reduce heat and simmer for 4 minutes or until sauce has thickened. Stir in cheeses, until smooth. Add in the remaining jalapeno, poblano and brats. Season to taste with salt and pepper.

Cook the pasta in boiling water until al dente, 8 to 10 minutes (a few minutes shy of done). Drain pasta in a colander. Combine the noodles and cheese sauce, until evenly coated. Transfer to a 9 x 12 baking dish, sprinkling topping over the pasta evenly.

Bake for 20-25 minutes, until topping is golden.

LinkWithin

Related Posts Plugin for WordPress, Blogger...