Showing posts with label main dish. Show all posts

Thursday, April 9, 2015

Strawberry and Mixed Greens Salad


A couple of months ago I shared by go-to lunch salad, a sweet potato and mixed greens salad.  Honestly, after eating it almost daily for a month straight, my love for that salad faded (don't worry, I'm sure I will become obsessed again in the future because it's too tasty not too!)

Recently I decided to revamp it a bit to make it a little less wintery, and a little more springy.  While it's nowhere near strawberry season in Wisconsin, it must be it other places because they're all over at the grocery store in a rich red color and at such great prices!  Fresh, sweet strawberries replace the cinnamon honey roasted sweet potatoes while a salty, light feta steps in for the tangy goat cheese crumbles.  This salad is also topped with a sprinkling of craisins and a small handful of pecans.  If you're looking for a little more protein to round out this salad, go ahead and throw on some grilled chicken or some quinoa.  Feel free to customize with whatever you have on hand!


As you can see, after I photographed this beauty I threw it in a tupperware to take for my work lunch.  I suggest keeping the dressing separate if you're doing this as the balsamic vinaigrette can really eat away at the lettuce and by lunchtime it'll be really soggy.  If you don't have little dressing containers like I do, I'm intrigued with the mason jar salads as well.  If you're going to do that, I would suggest putting the dressing in first, then top with the pecans, craisins and feta, then throw in the strawberries and put the lettuce on top.  If you give it a try, let me know how it goes!


Ingredients:

  • 2-3 cups spring mix lettuce (or other choice of greens)
  • 1/4 cup strawberries, quartered
  • 2 tablespoons craisins
  • 2 tablespoons feta, crumbled
  • 1/8 cup pecans (or other choice of nut)
  • 2-3 tablespoons balsamic vinaigrette

Directions:

  1. Spread spring mix lettuce over large plate or bowl.
  2. Top with strawberries, craisins, feta and pecans.
  3. Drizzle with balsamic vinaigrette.
  4. Toss and enjoy!
If you like this salad, you may also like:

Monday, March 2, 2015

Winter Vegetable Chowder with Crispy Brussel Sprouts and Bacon

This should be called "almost vegetarian winter vegetable chowder," but it is not called that. The name was too long to fit in the allotted space.


That is how we should think of it though - almost vegetarian. Omit the bacon and you've got yourself a vegetarian situation. 

You could go even farther and hold the splash of milk and you'd have yourself a vegan party in a bowl.

Personally, I need the bacon in here. It adds some smoke and a meaty quality. It makes me think of this as more of a meal. Versus a bowl of flavored water and vegetables.

Actually, I could be a vegetarian, if and only if I could keep bacon and sausage. Basically anything pork. I don't really care for the other meats so much, but I do love the dirtiest meat of them all.  


There are lots of people who choose to eat all the meats but pork. I'm the opposite of that. I digress.


It is still healthy with the bacon. Bacon is good for you.

Enough talk about my love affair with bacon and other pork products. This recipe is flexible. I went heavy on the cauliflower because I love cauliflower. Love it.

You could use some celery root, squash, sweet potatoes. Whatever floats your boat.


I added a can of white beans to thicken it up and for a bit of protein. It is finished with some lemon juice, for brightness. 


Lemon truly brightens the whole thing up. Don't skip it. If you forgot to buy a lemon, substitute a splash of cider vinegar. It gets finished off with a small splash of milk too for creaminess.

The chowder is fairly creamy all on its own, but it is no cows milk creamy. You know what I mean? Love me some dairy. Again you can be flexible, work with what you have and like.

The crispy sprouts on top add a little color and texture. I love brussel sprouts. They are the best. Even better with crumbled bacon. I think this would be great with some crumbled goat cheese on top. Be creative. 

Reheating this was a breeze too. It thickens up though. Add some water to thin it out or do like me and pour it over some rice. Variety and flexibility. Words we should all live by.


One word of caution, easy on the salt. Taste as you go. The mustard and lemon combine for a pleasantly salty vibe, but you don't want to go crazy. Not the mention canned beans can have a lot of added salt too.

xo
April   

Ingredients:
for the chowder:
3 slices, bacon
1 large cooking onion, small dice (1 3/4 cups)
1 leek, small dice (white + light green part only)
6 cloves of garlic, minced

2 large carrots, peeled and chopped
4-5 thyme sprigs, leaves removed and chopped
1-2 parsnips, peeled and chopped (1 1/2 cups)
1 large head of small-chopped cauliflower florets
1 ½ tbsp grainy mustard
salt + pepper to taste
1 tsp Old Bay Seasoning

1 can (16 oz) can white beans, drained and rinsed
 

1/4 cup lemon juice
3 1/2 cups vegetable stock

1/3 cup heavy cream 

for the crispy brussel sprouts:
10 brussel sprouts, sliced
2 teaspoons olive oil
1/2 teaspoon Old Bay Seasoning 

Instructions:
Preheat the oven to 400 degrees F. Line a baking sheet with parchment paper and set aside.
Heat a large, heavy soup pot over medium heat. Add the bacon, cooking 8 to 10 minutes, until crispy. Remove and drain bacon, leaving about 2 tablespoons in the pan, setting the bacon aside for later. 
Add the diced onions to the pot and sauté until soft and translucent, about 4-5 minutes. Add the leeks and continue to sauté until the leeks are soft, about 4 minutes more. Add the minced garlic and thyme to the pot and cook until fragrant, about 1 minute, stirring constantly. Add the chopped parsnips and cauliflower florets to the pot and stir to coat in the oil. Add the grainy mustard, salt + pepper to taste, and Old Bay. Stir to coat all the vegetables in spice. 
Add the lemon juice to the pot and stir. Add the vegetable stock to the pot, stir again, cover and bring to a boil. Once boiling, remove the lid and lower heat to simmer. Let the chowder cook and bubble until the parsnips and celery root pieces are tender, about 15-18 minutes.
Ladle half of the chowder into an upright blender, with the white beans, and carefully purée until smooth. Pour puréed portion of chowder back into the soup pot and bring it back to a boil. Reduce heat to low, adding the cream, stirring to combine. Check the chowder for seasoning, adjust and serve hot. (you could also use an immersion blender, be careful to leave enough whole vegetable pieces.)
While the chowder is simmering/cooking, make the crispy Brussels sprouts. Place the sliced sprouts onto a parchment lined baking sheet. Pour the 2 tsp of olive oil over top, season with salt and pepper and a generous pinch of Old Bay seasoning. Toss lightly to combine and spread sprouts evenly on the baking sheet. Slide the sheet into the oven and roast for 10 to 12 minutes, or until browned on the and crispy. You'll want to stir them once while they are roasting. Serve warm sprouts on top of the hot vegetable chowder, with crumbled bacon.

Adapated from The First Mess

Wednesday, February 25, 2015

Sweet Potato and Mixed Greens Salad

Lately I've been trying to work more and more on developing my own recipes and just sort of winging it when I'm in the kitchen.  I'm becoming more confident in my ability to cook intuitively as I become more comfortable with different spices and ingredients.


I've found that it's best to have some inspiration when getting going and one of the best types of inspiration I've found is thinking about meals that I've really enjoyed from a restaurant or other food establishment and trying to copy it, maybe not to a tee, but at least as a base.  As I have mentioned before on the blog, the Good Food cart is one of my favorite places to grab lunch when I'm at work and you better believe that it inspired this Sweet Potato and Mixed Greens Salad.


A bed of mixed greens are topped with cinnamon honey roasted sweet potatoes, craisins, pecans and crumbles of tangy goat cheese.  The finishing touches come from a homemade balsamic vinaigrette.  I can be lazy at times so I usually just toss some pecans on the salad right out of the bag, but feel free to toast them or even go a little crazy and use candied pecans.  If you'd like a little more protein go ahead and throw on some chicken breast.  One of the great things about salads is they can be so easily customizable depending on your tastes by swapping out ingredients or switching up the proportions.

The recipe below is for one personal size salad that serves as the main dish for the meal.  I've increased the quantities at times as well to serve multiple people, just use your best judgement.  Be careful though, because the toppings tend to sink to the bottom of the serving dish!

Enjoy!
Kelsey


Ingredients:
  • 2-3 cups loosely packed greens, depending on what lettuce to toppings ratio you prefer (I like to use a spring mix for the greens)
  • 1/4 cup cinnamon honey roasted sweet potatoes
  • 3 tablespoons craisins
  • 2 tablespoons goat cheese, crumbled
  • 1/8 cup pecans
  • 2 tablespoons balsamic vinaigrette
Directions:
  1. Spread greens over large plate or bowl.
  2. Top with sweet potatoes, craisins, goat cheese and pecans.  Drizzle with balsamic vinaigrette dressing.
  3. Toss as desired and enjoy!


Wednesday, January 28, 2015

Apple Cider Braised Pork with Apples, Fennel and Potatoes

Does anyone else have the winter blues? This pork is the perfect fix.


The winter hasn't even been that bad here in Wisconsin. No blizzards. Only a few days with below zero wind chills. I'm just so excited for warmer weather but mostly for school to be over.

Braising is the best. This could probably be done in a slow cooker, with less liquid. This recipe was also intended for the Fall, when there was a plethora of apples, but it works for winter too. Am I right? I am. Thanks for agreeing.

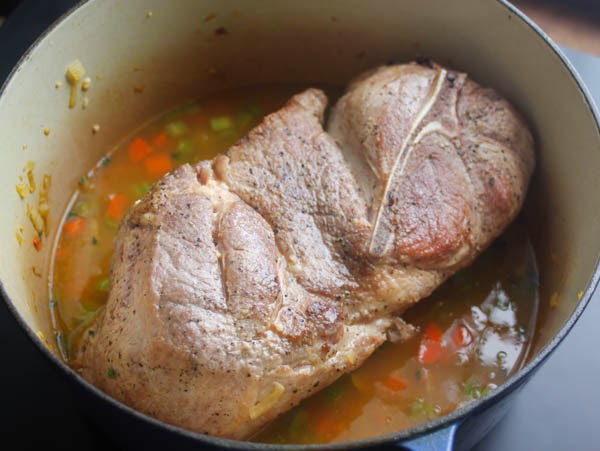
When braising, the initial steps are key for a delicious finished product. Searing the meat, getting a nice caramelized exterior is key for flavor.

Sauteing the mirepoix (fancy for carrots, onions and celery etc.) in the drippings. You want a caramel-y brown color without scorching anything. Balance is key.


Step three is deglaze the pan, with brandy in this case, getting all of those caramelized brown bits off the bottom of the pan. Flavor city. Little flavor bombs. Tiny, yet powerful! Be sure to scrap the bottom of the pan.

Then you add your braising liquid. Enough to go about 1/3 to 1/2 way up your pork butt. We aren't boiling our pork. We are braising. Give the liquid a hand, bringing it to a simmer on the stove and then put it in the oven.

Forget about it for awhile. Simple.

In the last 45 minutes, add your vegetable. Take it to the next level. Fennel and apple add some flavor to the broth, making a nice aromatic of sorts.

Potatoes cooked in with all that flavorful sauce are perfect for serving.

One-pot meal!


This makes a ton of meat. Probably more meat than potato-veg mash. I ended up using leftover meat for tacos, tossing it in some store bought sauce and making a soup.

I would have been eating the same thing twice a day for at least a week otherwise. I need more variety in my meals.
This is a really impressive meal, with minimal effort. Just a little bit of preparation and planning. Braising is really easy, with a crazy flavor impact for such little labor.

Pork not your thing? Chicken could work really well in here too. Or turkey!


I mashed all the veg together to make a little bed for the meat. Not necessary, but that is my preferred vessel for meat of this sort.

The apple cider adds a caramel-y, tangy, sweetness to the whole dish and the fennel and lemon zest add brightness and a little something unexpected. It isn't too sweet though.

Finishing the whole thing off with a little cider vinegar adds brightness, cutting the sweetness. It really makes a difference. Rounds the whole dish out. Promise.

Cheers,
April

Serves 5 to 6 

Ingredients

4 to 5 lb. pork butt
3 Tbs. vegetable oil
Kosher salt
ground black pepper
2 celery stalks, diced
2 carrots, peeled and diced
1 medium onion diced
2 whole dried bay leaves
1 Tbs. chopped fresh thyme
1 Tbs. finely chopped garlic
Zest of half a lemon, wide strips (3-4 strips)
1/4 cup brandy, apple brandy if you have it
1-1/2 cup lower-salt chicken broth
1-1/2 cup apple cider 
1 medium fennel bulb, diced
1 apple, peeled and diced
6 to 8 small red potatoes
1 to 2 tsp. cider vinegar
Instructions
Position a rack in the center of the oven and heat the oven to 325°F. In an 8-quart Dutch oven, heat 2 Tbs. of the oil over medium heat. Season the pork with salt and pepper. Add pork to the pot, and cook, turning with tongs, until nicely browned on all sides, 3 to 4 minutes per side. Pour off all but a thin layer of fat from the pan.

Add the remaining 1 Tbs. oil, carrots, celery and onions to the pan. Season with 1/2 tsp. salt. Cook, stirring and scraping up any browned bits on the bottom of the pan, until the aromatics are soft and lightly browned, 6 to 8 minutes. Add bay leaves, lemon zest, thyme, and garlic, and cook, stirring, until well distributed and fragrant, about 1 minute.

Pour the brandy into the pot and cook, stirring to scrape up any browned bits on the bottom of the pot, until the liquid is reduced to about 2 Tbs., about 1 minute.

Transfer the pork (and any juices that have accumulated) back into the pot. Pour the chicken broth and apple cider over the ribs.

Bring the liquid to a simmer, cover, and put the pot in the oven. Cook, turning the pork with tongs after about an hour, total cooking times is about 2 to 3 hours. In the last 45 minutes of cooking, add the apples, fennel and potatoes, until the potatoes are fork tender and the meat is falling off the bone. (The meat may fall off most of the bone about midway through cooking; this does not mean that the ribs are fully tender.)

Transfer the ribs to a serving platter or dish. Let the sauce and solids sit in the pot for a few minutes to cool and with a shallow spoon, skim off as much of the fat as possible from the surface. Season the sauce to taste with salt and pepper, and add the vinegar.

Optional: spoon out the vegetables, mashing them, making a chunky mashed potato mixture. Then reduce the sauce for 10 to 15 minutes, making a sort of gravy. Serve the meat over the potatoes, drizzled with the reduced sauce.

Tuesday, January 20, 2015

Mixed Greens with Roasted Beets, Pomegranate Dressing and Goat Cheese

Oh my word. This might be my favorite salad of all time. Prepare yourself.


The colors are beautiful. Are they not? You can't deny it. All those reds and oranges. Possibly the perfect Valentines day salad? I might be getting ahead of myself here.

It might be because this salad was supposed to be posted before Christmas, again due to its beautiful reds and some green; therefore, I don't care if its too soon to think about Valentines day.

It is just too pretty, but too tasty not to eat.


Valentines day is a total hallmark holiday scam, but it is just another holiday excuse to eat lots of chocolate and make something extra fancy special for dinner.

I actually do that most weeks anyways, but its good excuse to have. It makes me feel more normal.

In all reality, I will probably be ordering a extra large pizza with my main man, watching The Big Lebowski, drinking white Russians.

Pizza is my favorite and white Russians are his. His and hers. Too cute.


I digress, but this is all connected to the salad. Trust me.

It is truly maybe my favorite salad I've ever made at home. Ever. It borders right on unhealthy and healthy, depending on your veggie to cheese ratio. My cheese ratio is usually, always high.

Don't let the beets scare you. They are tender, like butter and almost sweet, with a hint of earthiness.

The dressing is just the right amount of thick, creamy, a little sweet and tart. It is dreamy. I'm not one to eat salad for dinner or enjoy salad very much.


 I try very hard. I would just rather a big bowl of carbs and cheese. This salad I ate for a whole week straight. All the ingredients, dressing included keep for for at least a week.

Pomegranate molasses might be hard to find. I hear Whole Foods sells it, but you can always make it too. I used this recipe.

The salad toppings are also very customizable. I bet raspberries or strawberries would make great substitution for the pomegranate seeds.

A nice blue cheese would work well here too, in place of the goat cheese. Walnuts or sunflower seeds would be tasty too, depending on what you have in your pantry.


xo,
April

Mixed Greens with Roasted Beets, Pomegranate Dressing and Goat Cheese
Serves 4 to 6
Ingredients:
for dressing:
3 tablespoons pomegranate molasses
1 tablespoon honey
1 tablespoon red cooking wine
1 tablespoon balsamic vinegar
3 tablespoons extra virgin olive oil
2 teaspoons Dijon mustard
Salt
Pepper

for salad:
Spring mix
6 to 8 small beets, roasted, peeled and cut into bite sized pieces
Goat cheese, crumbled
Pumpkin seeds
Pomegranate seeds

Instructions:
roasted beets:
Preheat the oven to 400F. Wrap beets in tin foil, in a single layer (you may need to make two tin foil packages). Roast the beets for 40 to 60 minutes or until fork tender. Let the beets cool until able to handle and then peel.
for dressing:
Combine all the ingredients in a medium mason jar and shake to combine. Dressing will keep for up to a week in the refrigerator
for the salad:
In a large bowl, combine the greens, beets and desired amount of dressing, tossing to coat.
Divide among plates, topping each with a sprinkle of pumpkin seeds, goat cheese and pomegranate seeds.

Wednesday, January 14, 2015

Tomato Salmon Foil Packets for Two

The only fish I ate growing up came in a can and can also be referred to as chicken of the sea.  Unless you're Jessica Simpson then you know I'm talking about tuna.  My mom did pretty much all of the cooking and since she doesn't like fish, we never ate fish.


When I was in high school I worked as a waitress for a couple of years at a restaurant with a Friday night fish fry.  If you're from Wisconsin, you know what I'm talking about.  If you're not, then you're missing out.  Trying bites of my coworkers fried cod was the start of a very gradual transformation to my taste buds pleasure.


The big bang came when I studied abroad in Spain for a summer and lived with a host family.  When you live with a host family you eat what they eat, and the Spaniards sure do love their fish.  Much to my pleasure (and relief) I found that I enjoyed eating fish, even when it wasn't battered and fried in beer.

I became a fish eating machine, eating the fish whose names I never understood that were put on my plate.  I chowed down on pan fried fish.  Fish off the bone.  A fish that was good for stomach aches.  Sardines (I'm 90% sure that's what those little guys were at least).  And even fish that still had eyes!  While I still haven't adventured full on into the world of seafood, I'm definitely on my way.


Thanks to the masterful cooking and kind urging of Badger Kitchen's good friend Emily, I have discovered a new found love of salmon!  This salmon recipe is perfect for a fish cooking newbie like myself.

The fish stays super moist and juicy since each fillet is cooked enclosed in it's own foil packet.  Once you cut into the salmon it practically falls apart.  The olive oil and spices add flavor to the salmon and are complimented nicely by the tomato and oniony shallot.  I enjoy serving it with a side of vegetables and a chunk of bread to soak up the juices for a healthy, balanced and filling meal.

Hope you enjoy!
Kelsey


Recipe adapted from Food Network.

Ingredients:
  • 2 (5oz.) salmon fillets
  • 1 teaspoon olive oil plus 1 tablespoon
  • Freshly ground salt and pepper
  • 7 oz canned diced tomatoes
  • 1 shallot, chopped
  • 1 tablespoon lemon juice
  • 1/2 teaspoon dried oregano
  • 1/2 teaspoon dried thyme
  • aluminum foil
Directions:
  1. Preheat oven to 400 degrees.
  2. In a small mixing bowl, combine diced tomatoes, shallot, lemon juice, oregano, thyme, salt, pepper and 1 tablespoon olive oil.
  3. Massage 1 teaspoon olive oil, salt and pepper onto salmon fillets.  Place fillets oil side down on individual foil pieces.
  4. Spoon tomato mixture onto salmon fillets until they are fully covered.  
  5. Fold the sides of the foil so the fillets are fully covered and fold it so that it's sealed.
  6. Place foil packets on a baking sheet.  Cook for 25 minutes or until fish is just cooked through.
  7. Transfer from foil packets to plates and enjoy!
If you like this recipe, you may also like:

Wednesday, January 7, 2015

Cowboy Skillet Chicken


The super cold weather has set in, leaving me drinking hot chocolate with a fire going as I write this post. Sure I love to snuggle with a blanket and have a fire going, but isn't this a bit too cold? I mean -11, seriously Madison, WI? This cold weather has got me thinking about the warm summer months where the best part of the week is the Farmer's Market! I had first made this recipe over the summer with green beans and fingerling potatoes from the Madison farmer's market. Ok, fingerling potatoes are my absolute favorite. They're so cute and so tasty!  


Besides being able to use farmer's market fresh goods, this recipe is perfect for the I-only-want-to-make-one-thing-for-dinner meal. It's all in one skillet and it's hearty ingredients make a well-rounded dish! I called it Cowboy Skillet Chicken because it reminded me of what a cowboy might cook over a fire. Well and because the cook book I got it from had a three lined title just explaining the ingredients. Boring. Although...looking at my pictures, I must be a very sophisticated cowboy. There's no fire or spurs or rustic anything. But trust me, this recipe is great for the cowboys or the city dwellers. It's so good.

Enjoy!
Brittany


Adapted from one of my favs, The Cast Iron Skillet Cookbook
(and I hear there's a second edition!!)

Ingredients
1 lb. fingerling potatoes
8 oz. green beans, ends removed
4 Tbsp. extra virgin olive oil
4 chicken breasts
1 c. chopped yellow onion
1 clove garlic, minced
12 oz. andouille sausage, cut into 1/4 inch thick slices
1/2 c. chicken stock
Salt and pepper to taste

Instructions
1. Boil the potatoes in a pot until tender
2. At the same time, add green beans to a pot with boiling water. Cook until they start to soften, about 3-5 minutes
3. Drain the potatoes and beans and set aside.
4. Warm a large 12 inch cast iron skillet over medium-high heat. Add 2 tablespoons of olive oil.
5. Season the chicken with salt and pepper and cook for about 4 minutes on each side. Set aside on a platter.
6. Add remaining 2 tablespoons of olive oil to the skillet and reduce heat to medium. Add the onions and garlic, stir occasionally.
7. Add in the sausage and cook for a few minutes. Add in the potatoes and green beans. Mix all together.
8. Add the chicken over the top, cut beforehand if desired.
9. Add the chicken stock and loosely cover skillet with foil. Reduce heat to medium-low and cook for 12-15 minutes.
10. Serve and enjoy from the skillet!

Wednesday, November 19, 2014

Baked Blintz

Just one more week until Thanksgiving is here!  Are you excited for the holiday season to officially be in full swing or what?!  While lunch or dinner are always the star of the show on Turkey Day, you can't let the family starve in the morning either.  Sweet Potato Hash with Caramelized Onions, Chorizo and Eggs or a French Toast Bake are great options to serve, as is this Baked Blintz!


Baked blintz is actually part of my family's Christmas Day tradition.  Every year on Christmas morning we would always go to my grandparent's house for brunch after opening our presents from Santa.  Baked blintz was always sure to be part of the spread on the table along with all other sorts of brunchy goodies.


Now, you may have never heard of blintz and have no idea what it is.  Traditionally, it is a type of thin pancake that you put a filling in and roll up, similar to a crepe.

To simplify the recipe for serving to a crowd it can also be easily converted to a dish bake.  A layer of the batter is spread on the bottom of a baking dish, coated with a cottage cheese mixture for the filling, and then topped of with another layer of that batter.  It ends up as a sort of egg souffle.  Serve with a side of sour cream and fruit preserves to lather on top as you please.


There's actually only three eggs in the dish so it's neither super eggy nor super cheesy since cottage cheese doesn't have an overwhelming amount of flavor.  The sour cream and fruit preserve toppings can really direct the flavor of the dish.  It's not bland in and of itself, I've enjoyed it plain plenty of times, the toppings just give it a flavor boost.  It's very similar to pancakes where they can still taste great plain, but when you load them up with chocolate chips and berries it just takes them to a new level!


If you've never had baked blintz before and you're looking for something new to try, I definitely suggest you give it a shot.  It's pretty simple and straightforward to prepare and can easily be doubled to make a larger batch.  Just a warning that if you aren't able to spread the top layer of batter all the way to the edges, it may lift up and curl a bit (as you can see it did in my pictures) but don't worry, it still tastes just as good!

Enjoy!
Kelsey


Ingredients:

Batter

  • 1/2 cup softened butter
  • 3 tablespoons sugar
  • 2 large eggs
  • 3/4 cup milk (skim or 2%)
  • 1 teaspoon baking powder
  • 1 1/4 cup flour

Filling

  • 1 lb (16 oz) cottage cheese, creamed
  • 2 tablespoons softened butter
  • 1 large egg
  • 1 tablespoon sour cream
  • 1/2 teaspoon salt
Fruit preserves or fresh berries and sour cream for topping.

Directions:
  1. Preheat oven to 350 degrees.  Grease a 9x9 (or similar sized) baking dish.
  2. To prepare batter, in a medium bowl mix butter and sugar.  Beat in eggs.  Blend in milk.  Add baking powder and flour and mix until combined.  Set aside.
  3. To prepare filling, in a medium bowl mix creamed cottage cheese and butter.  Beat in egg.  Mix in sour cream and salt.
  4. Spread half of batter in prepared baking dish.  Add all the filling.  Cover with other half of the batter.
  5. Bake for 45-50 minutes, or until golden brown.
  6. Serve with fruit preserves or fresh berries and sour cream.

Wednesday, November 5, 2014

Sweet Potato Hash with Carmalized Onions, Chorizo and Eggs

Its about that time to start thinking about the holidays and what you are going to be making for holiday dinners and gatherings! Its the best time of year. I wish I had a bit more time to think and plan these things, but honestly school has really gotten the best of me.

My mom doesn't know it yet, but Thanksgiving dinner is all hers this year. Usually I claim things. By things I mean every single holiday that calls for a meal. What I will lay claim to is breakfast the morning after!


This here hash is the perfect make-ahead breakfast for a crowd. Its more creative than your standard egg bake too. Really wow your guests. I actually made this on a Thursday night and then cooked 2/3 of it on Sunday morning for friends that were visiting.

Who doesn't love a runny eggs?! Crazy people. No offense, but seriously! I will never understand how you couldn't like a runny egg yolk. It acts like a magical dressing for whatever it sits on top of. Delicious, silky, greatness. Food porn at its finest.

For those who prefer a hard cooked egg, don't worry. Your eggs can take a trip into the oven for an extra five minutes. After five minutes, take out the hash and add the rest of the eggs for another 10 minutes.


The meat and potatoes are also very flexible. I think a nice breakfast sausage, with sweet or russet potatoes would be delicious, maybe will a little bacon and maple syrup. For a more smoky take you could use andouille sausage.

The chorizo that I used here makes your kitchen smell divine. A sort of sweet, peppery and smoky party for your nose. I think it is the paprika, which might be my newest spice obsession.  I got my chorizo at Whole Foods, if you can't find it you could substitute any other sausage you see fit.


The preparation of the hash is a bit labor intensive but totally worth it! Reheating the hash with the eggs is what really makes the hash special. Its bottom layer gets super crunchy, but the top layer of taters are still soft. Sweet, with a little hint of spice. I think chorizo and sweet potatoes were made for eachother.

Because I only served 2/3 of it to my friends, I cooked up the rest for these here photos and ate it for lunch the next two days. If you don't have a huge crowd to feed, still make the whole batch and treat yourself throughout the week to a special breakfast.


You, you're guests and bellies will not regret this. It is a must make for the upcoming holiday season and will make your house smell delicious!

xo
April


Adapted from The Kitchn
Serves 5-8
Ingredients:
for the hash:
2 large onions, thinly sliced into half-moons
1 tablespoon unsalted butter
Kosher salt
1 1/4 pound fresh chorizo

3 pounds sweet potatoes, about 3 large potatoes, cut into 1/2-inch cubes
6 large garlic cloves, minced
3 tablespoons olive oil
1 tablespoon kosher salt, plus more to taste if necessary
Freshly ground black pepper

To serve:
Large eggs
Kosher salt and freshly ground black pepper

Instructions:
To make the hash:
Heat the oven to 450°F. Place the sausage in a large skillet and brown over medium-high heat, chopping it up into fine crumbles with a spatula. Cook the sausage for about 10 minutes, or until it is browned and beginning to crisp. Drain the sausage, reserving 1 tablespoon fat and set aside, in a large bowl (large enough that you can mix everything together before it goes onto a baking sheet and into the oven).

While the sausage cooks, peel the onions and cut them in half lengthwise, then cut them into thin half-moons. Cut the half-moons in half. In the same skillet, melt the butter with the drippings, over medium-high heat. When it foams up add the onions and sprinkle lightly with salt. (Don't worry if they are crammed into the pan; they will rapidly cook down.) Lower the heat slightly and cook the onions for about 20-30 minutes, stirring occasionally, and lowering the heat if they seem to be burning. Cook them until they are dark brown.

While the onions are cooking, chop the unpeeled sweet potatoes into cubes that are about 1/2-inch to a side. Finely mince the garlic and toss it in a large bowl with the sweet potatoes and sausage. Toss with the olive oil, kosher salt, and a generous helping of black pepper.

When the onions are dark brown, stir these into the sweet potatoes as well. Line a large baking sheet with foil or parchment paper, and spread out the sweet potatoes evenly, depending on the size of you baking sheets you may need to use two. Roast the sweet potatoes for 30 to 45 minutes (roasting time depends on the size and uniformity of the sweet potato chunks, as well as the variety of sweet potato you buy) or until they are soft and browned.

Refrigerate the cooled hash for up to 5 days.

To serve:
Heat the oven to 425°F. Spread a relatively thin layer of the (already cooked) sweet potato hash in a baking dish, such as a cast iron skillet or a 9x13-inch baking dish (I've done it with both). You can also bake in individual ramekins. Make small wells in the sweet potatoes and crack in large eggs. Sprinkle lightly with salt and pepper.

Bake for 12 to 15 minutes for a runny yolk and 15 to 20 minutes for a hard cooked egg. (Test the eggs by prodding them with a fork to check the firmness of the white and the yolk; baked eggs are deceptive in that the white often looks much less cooked than it really is.)

Thursday, September 25, 2014

Jalapeño Beer Brat Macaroni and Cheese


To wrap up out football theme, I have some macaroni and cheese with all the quintessential Wisconsin fixings mixed into it. 


I made this at my boyfriend’s house. Big mistake. The most useful thing he had was a grill. Real bachelor kitchen. I should have known. It works for him apparently but it almost caused me a nervous breakdown. Now by no means do I have a ton of fancy pots and pans or equipment, but I do have some. Most of it is hand me downs. I might have overreacted to not having the things I’m used to cooking with. That should not be a surprise to anyone though. Cooking in a new place is stressful, but totally doable and you don’t need anything fancy to make macaroni and cheese from scratch.
The stuff in the blue box or Annie’s macaroni and cheese is wonderful, but you just can’t beat homemade macaroni and cheese. I think it is intimidating for most people, but even a sparsely equipped bachelor pad kitchen has the equipment to make it: medium sized saucepan, large pot to boil noodles and a baking dish.


I grilled the brats, but you could totally throw them in the oven or on the stove top, in a pan. If you grill the brats, don’t be like me and spend 6 minutes futzing around trying to take pictures.  The charcoal grill will get to hot with all that air and then everything will go up in flames and your brats will be split open and be flame cooked in 4 minutes.  Lesson learned.


It is all pretty straightforward. If you have never made a roux (butter and flour), don’t be scared. Keep and eye on it and stir constantly. This is what will thicken your cheese sauce. Once it is a light nutty brown, pour in your beer slowly and then the milk. This avoids clumps. Bring this mixture almost to a boil, which means for me where there are tons of tiny bubbles all around the edge of the pan. Add the cheese. Add the brats and peppers.

You’re going to probably look at this sauce and freak out like I did, thinking it is way to runny and that there is way too much of it. I know there can never be too much cheese, but proportions and balance are key to a solid mac. I know I freaked out, but it came out of the oven perfectly, with just the right amount of spice, which will depend on the heat of your jalapeños. 


It was even better the next day for lunch! I didn’t try it but I bet this would work great to make the day before, refrigerate and reheat in the oven at your friend’s house or before your own football party. Make it for any party really, it is delicious and oh-so very Wisconsin. I promise. 

cheers,
April
 
Ingredients:
for topping:
2 1/2 cups panko bread crumbs
2 tablespoons butter, melted
1 cup cheddar cheese, grated
1/4 cup gruyere or fontina cheese, grated
1 jalapeno, grilled, seeded and chopped

for macaroni & cheese:
1 lb. sharp cheddar cheese, grated
5 ounce Gruyere cheese, grated

1 jalapenos, grilled, seeded, chopped
1 poblano pepper, grilled, seeded, sliced into quarter inch pieces
4 brats, grilled (I used D&G Sausage Shop bacon and jalapeno brats)
1 lb pasta (such as cavatapi, fusulli or macaroni) cooked to al dente
6 tablespoons unsalted butter
6 tablespoons all-purpose flour
3/4 cup amber or pilsner beer
1 cup heavy cream
2 1/2 cups whole milk

Instructions:
grilling:
Start by heating your grill to medium heat. Place brats, two jalapenos and poblano pepper on the grill. Cook the peppers for 2 to 5 minutes, or until lightly charred. Cook the brats, turning, for 6 to 8 minutes. 

Topping:
Preheat oven to 400F, with rack in middle. Combine the butter, panko bread crumbs, cheddar, Gruyere and one jalapeno pepper, in a bowl, until well combined. Set aside for later.

Macaroni and Sauce
Bring a large pot of salted water to a boil. Meanwhile, melt the butter in a heavy medium saucepan over medium-low heat. Once butter has melted whisk in the flour, continue whisking for 3 minutes, until the mixture is a light golden color and thick, then slowly whisk in the beer and milk.

Increase the heat to medium and bring sauce to a low boil, whisking constantly (this takes about 8 minutes). Reduce heat and simmer for 4 minutes or until sauce has thickened. Stir in cheeses, until smooth. Add in the remaining jalapeno, poblano and brats. Season to taste with salt and pepper.

Cook the pasta in boiling water until al dente, 8 to 10 minutes (a few minutes shy of done). Drain pasta in a colander. Combine the noodles and cheese sauce, until evenly coated. Transfer to a 9 x 12 baking dish, sprinkling topping over the pasta evenly.

Bake for 20-25 minutes, until topping is golden.

Wednesday, August 27, 2014

Skillet Chicken with Cherry Tomatoes and Garlic

It's the last Wednesday in August so you know what that means, the last installment of Tomato Month!  We've already brought you a salad, a pasta and a sandwich, so now I'm coming at you with this Skillet Chicken with Cherry Tomatoes and Garlic.


One thing that having a garden has really helped me with is eating more seasonable produce.  You're basically forcing it on yourself because, well, it pops up in your garden right when it's in season.  Besides when you grow it yourself, there are just so many other benefits to eating seasonably; from lower prices to having it likely grown locally so you're probably helping small businesses and farmers (especially if you hit up the farmer's market on the regular) while also reducing your produce's carbon footprint.


This dish is really a great way to maximize on seasonable produce right now.  Raise your hand if you have tomatoes coming out of your ears.  Yup, me too.  And while I love just popping cherry tomatoes in my mouth as a snack or tossing them in a salad, it's great to mix up the flavors a little bit and this skillet chicken definitely delivers on flavor.  The seasoned chicken tastes totally delicious and every time you bite into a cherry tomato it's like a miniature explosion of juices in your mouth.  Not only is it tasty but it definitely falls into the healthy category and takes minimal time and effort to make so it's a perfect weeknight dinner option.

Hope you enjoy!
Kelsey

Ingredients
  • 2 large chicken breasts (I cut mine in half so they would cook better)
  • 1/2 teaspoon salt
  • 1/2 teaspoon black pepper
  • 1/2 teaspoon crushed red pepper
  • 1 tablespoon olive oil
  • 2 cups cherry tomatoes
  • 2 large garlic cloves, minced
  • 3 tablespoons cider vinegar
  • 2 tablespoons water
  • 1 teaspoon Italian seasoning
Directions
  1. Spray large skillet with non-stick spray and set over medium heat.  Sprinkle chicken breasts with 1/4 teaspoon salt, 1/4 teaspoon pepper and 1/4 teaspoon crushed red pepper.  Add chicken to heated skillet and cook until golden and cooked through, about 15 minutes depending on size.  Try to only flip chicken once.  Remove from skillet and set aside.
  2. Add olive oil to same skillet and heat over medium.  Add garlic and tomatoes and stir until garlic is golden, 1-2 minutes.  Add water, vinegar, Italian seasoning, 1/4 teaspoon salt, 1/4 teaspoon pepper and 1/4 teaspoon crushed red pepper.  Continue stirring until tomatoes are softened, 2-4 minutes.
  3. Spoon tomato and garlic mixture over chicken breasts and enjoy!

LinkWithin

Related Posts Plugin for WordPress, Blogger...