Showing posts with label pie/tart. Show all posts

Friday, May 22, 2015

Roasted Strawberry-Rhubarb Buckwheat Biscuit Cake

Happy Memorial Day weekend, friends! I have this to die for strawberry-rhubarb biscuit cake. Ah-mazing.


Before we get to the food, I have to share how difficult it has been to get this post up. My cat has been a relentless snuggle bean. I can't sit down without her showing up and climbing into my lap.

I often complain how she doesn't give me enough loving, finding it very hard to kick her off my lap. When she was too slow to get on my lap before my computer, she still climbs on. Sprawled out, one leg on the keyboard, belly up. Cuteness.


As I write this she is sitting on my belly giving me the stink-eye. She has obviously claimed my lap as her own and has some computer jealousy.

It may be that she knows her mother, me, is about to leave her for two weeks and she wants all the snuggles she can get before that day arrives.
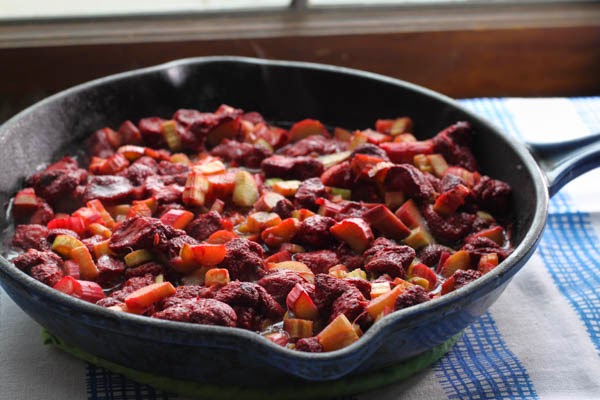
Now about this cake, cobbler, fruit and biscuit situation. It is maybe the most delicious thing I've ever made. I had frozen strawberries from last summer and rhubarb from the farmers market.

If you are using frozen berries, be sure to drain them. If you don't, you'll end up with way too much liquid. Which is bad. We don't want that. Set them in a strainer overnight on the counter or in the refrigerator.

Did I mention how easy this is to make? It took like 45 minutes all together, including dishes. The cake was gone in about the same amount of time. Remember, this is a judge free zone.

The biscuits come together really quickly, they are fairly doughy and dense, not so light and fluffy, but it worked for me. Using all white flour is totally acceptable.

I sort of just used what I had on hand. You could substitute creme fraiche or sour cream for the yogurt.


Roasting the fruit results in a super jammy and buttery consistency. I would have slathered it all over myself, if I had more of it. That is right, it is that good.

It is so good you want to sit down all alone, dim the lights and turn on your favorite cooking show and savor the moment.
xo
April

Ingredients:
for the fruit:
2 cups rhubarb, cut into 1/4 inch pieces
2 cups strawberries, fresh or frozen, if frozen, defrost and drain first
2 tablespoons granulated sugar
1/2 teaspoon vanilla
1/2 vanilla bean, scraped
2 tablespoons cornstarch
3 tablespoons butter
for the biscuits:
1 cup all purpose flour
1/2 cup buckwheat flour
1 1/2 tablespoons sugar
1 1/2 teaspoons baking powder
1/2 teaspoon sea salt
8 tablespoons butter, cold, cut into quarter inch cubes
1/2 cup full fat greek yogurt or creme fraiche
1/2 vanilla bean, seeds removed and scraped
for the egg wash:
1 large egg
splash of water or milk
brown sugar

Instructions:
  1. Place a rack in the middle of the oven, preheat the oven to 375F. 
  2. In a medium bowl, combine the first six ingredients for the fruit, tossing to fully coat the fruit. Place the fruit mixture into an 8-inch oven proof skillet or metal baking dish, placing small pads of butter on top of the fruit. Place in the oven to roast for 12 to 15 minutes. While the fruit roasts, prepare the biscuit dough.
  3. To make the biscuits, in a medium bowl whisk together flour, sugar, baking powder and salt. Add the cold butter and vanilla bean seeds and use your fingers to quickly break the butter down into the flour and sugar mixture. Some of the butter pieces will be the size of oat flakes, others will be the size of small peas.
  4. Create a well in the center of the flour mixture and add the cold yogurt . Stir with a spoon. The mixture will be rather wet. Shape the dough into a rough disk, dividing the dough into 6 pieces. Brush the top of each biscuit with the egg wash (whisk together one egg with a splash of milk or water) and top with brown sugar.
  5. Remove the strawberries from the oven and carefully place the biscuits over the hot strawberries. Return the skillet to the oven and bake for another 15-20 minutes, or until the biscuits are cooked through and the biscuits are golden.
  6. Remove from the oven, allow to cool until the strawberries are no longer bubbling, and serve warm.

Wednesday, July 23, 2014

Cookies n' Cream Frozen Pie


Frozen treats month continues here at Badger Kitchen and the timing couldn't have been more impeccable as we're wrapping up a little two day heat wave here in Madison.  We've had a generally mild summer weather wise here which has made for some really beautiful days to enjoy the outdoors.  I'm thinking Mother Nature might be trying to make up for what felt like the coldest winter ever by giving us lots of nice weather to enjoy.


For those days when the mercury rises and the humidity comes out to frizz up everyone's hair, this cookies n' cream frozen pie is a very refreshing treat to enjoy.  It's very easy to make as you're creating somewhat of a mock ice cream.  It's more like a frozen pudding actually, kind of like April's chocolate pudding pops.  No ice cream maker or anything fancy like that is required, just a little patience while it hardens in the freezer and a little self control so you don't dip all the extra Oreos in the pie filling while it's still soft.


Ingredients
  • 2 1/2 cups crushed Oreos, separated
  • 1/4 cup butter, melted
  • 1 1/2 cups cold half-and-half cream
  • 1 package (3.4 oz) instant vanilla pudding mix
  • 1 carton (8 oz) frozen whipped topping, thawed
Directions
  1. In a small bowl, combine 1 1/2 cups crushed Oreos with melted butter.  Press to the bottom of a 9 inch pie pan.  Place in fridge.
  2. In a medium mixing bowl, beat half-and-half and pudding on low speed for two minutes.  Let thicken for five more minutes.
  3. Fold in whipped topping and crushed cookies.
  4. Pour onto crust.  Chill in freezer for at least six hours.  Remove from freezer ten minutes before serving.
Recipe adapted from Best of Country Pies.

Wednesday, June 11, 2014

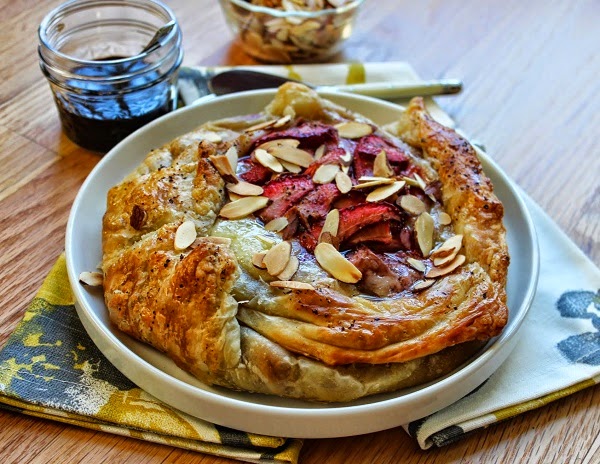
Baked Brie with Strawberries, Almonds and Balsamic Vinegar

Strawberry month continues! I have not been able to keep my mind off of strawberries. Its been all strawberry this strawberry that all up in my noggin lately.


I'm working on a frozen treat involving strawberries, but it needs a bit more work. Joy the Baker is having a "Baking Boot Camp" and I made this triple berry cinnamon swirl bread. Hopefully I can tweak some of the things I've been working on and share them with you all!

I want to roast all the strawberries there ever were and devour them. If you've never tried roasting fruit, you should. No pressure, but really you should. I also just ordered a ice cream maker. I'm giddy about it. Maybe there will be a roasted strawberry ice cream situation in the future. At the very least there will be buckets of ice cream in my future.


Now for the real strawberry situation at hand, strawberries and cheese. This is a pretty simple, easy and straightforward gooey, salty, tangy and cheesy situation. My first go around at making this resulted in spilled cheese, which is better than spilled milk. Promise. You can still eat spilled cheese.

I tweaked a few things to prevent a spilled cheese situation from happening again. I went for less liquid for the strawberries and created a balsamic glaze instead.


As I tend to do, there is not much added sugar to the strawberries. I like the tartness. The exposed top makes this almost a cross between a gallette and traditional baked brie. Leaving the opening at the top allows the strawberries to become sort of like roasted strawberries - jammy, melty and tart.


The balsamic adds a nice sharp tang on top, while the toasted almonds add a crunch. The pepper is not at the forefront here, but I do think it adds a little something. You could always add more pepper, if you wanted a real peppery kick.


You won't want to drizzle all of the balsamic glaze over the baked brie all at once, but reserve some for you and your friends to drizzle on as much or little as they want. I won't judge though if you just eat this all by yourself. I begrudgingly shared with my father because well he is my father.

Cheers,
April 

Ingredients:
For the brie: 
8oz strawberries, sliced into quarters
1 tablespoon balsamic vinegar
2 teaspoons honey
2 teaspoons all purpose flour
1/8 teaspoons freshly ground black pepper

1/3 cup slivered almonds, toasted

For the balsamic glaze:
1/4 cup balsamic vinegar
2 teaspoons honey
Freshly ground black pepper

Egg wash:
1 large egg, beaten in a small bowl, with a splash of water

Instructions:
  1. Preheat your oven to 375 degrees F. Line a baking sheet with parchment paper and set it aside.
  2. Combine strawberries, balsamic vinegar, honey, flour and black pepper in a bowl. Set aside.
  3. Slice the rind off of the top of the brie and set aside.
  4. Lightly flour your surface with flour and roll out the thawed puff pastry to a 12" by 12" (being a little shy of 12" is better than being to wide/thin). Trim off the corners to make a circle/oval (using a 10" plate is a useful guide, but you want your circle to be slightly larger than 10").
  5. Place the brie in the center of the dough. Drain the strawberries, reserving the juice for later. Add the strawberries on top of the brie (it may seem like they won't all fit and if a few fall along the sides of the brie, that is okay).
  6. Fold the edges of the dough over in small sections, overlapping as you go. Brush it all over with egg wash.
  7. Transfer to the oven and bake for 20-30 minutes, until the pastry is golden brown. Allow the baked brie to cool for 10 minutes. Place slivered almonds on tin foil and place in oven, until golden and nutty, about 3 to 5 minutes.
  8. While the brie is cooling, lets make the balsamic glaze. To a small saucepan, set over medium heat, mix together the reserved strawberry juice, honey, balsamic vinegar and pepper. Simmer for 3-6 minutes, until slightly thickened and sweet. Turn off the heat and drizzle a little over the baked brie. Garnish with a few slivered almonds; serve with remainder of almonds, glaze and crackers. 
Two years ago: Strawberry Shortcake, Chocolate Brownie Cookies

Monday, June 2, 2014

Rye Rhubarb Raspberry Crisp


It is officially my summer! Not technically by the calendar, but my first semester of grad school is complete and I feel free! Not to mention the temperature has remained above freezing for awhile now, which counts as summer for most Wisconsinites. 

I've got a pretty easy next few months ahead of me too, with a light work schedule (it is my last official non-grown-up summer after all!). Hopefully it will continue to be full of bike rides, swimming, cooking and general adventures. 


Now about this here rhubarb crisp. I love a good fruit crisp/crumble, but especially this one. Rhubarb is incredibly easy to prepare. It is simply chopped up into pieces, which totally beats peeling and coring apples.  


I do make myself a little extra work by peeling off any tough strips on the rhubarb. You know what I'm talking about right? Like when you are chopping and all your 1-inch pieces are all being held together by the bottom strip. I peel that off. No stringy or chewy pieces in my crisps. Totally optional.

This crisp started out being only rhubarb, no raspberries. The first time I made it felt like the pan was sparsely filled. I had frozen raspberries in the freezer and here we are.


Using rye flour and rye oats is entirely optional in the topping. The first time around I didn't have rye oats and just used old fashioned oats. Whole wheat flour would be a great substitute for the rye flour, seeing as most of us have it in our pantry.

The rye flour adds a nice earthy sweetness to the topping and complements the tartness of the raspberries and rhubarb.  That being said it is delicious on its on, but I think you would be missing out if you didn't top this with some vanilla ice cream.

xo
April


Ingredients:
For the filling:
1 pound of rhubarb, cut into 1-inch pieces
1 cup fresh or frozen raspberries
1/4 cup granulated sugar
1 tablespoon brown sugar
3 tablespoons all-purpose flour
1 teaspoon vanilla extract
1/4 teaspoon ginger

For the topping:
1/3 cup rye flour or whole wheat flour
1/2 cup rye oats or old fashioned rolled oats
5 tablespoons cold unsalted butter, cut into cubes 
1/2 cup chopped walnuts
1/2 cup light brown sugar
1/4 teaspoon cardamom
1/4 teaspoon salt

Instructions
  1. Preheat oven to 375 degrees F. In a 8 x 8-inch baking dish, mix together the rhubarb, brown sugar, white sugar, flour, vanilla extract and ginger. Set aside while you make the crumble.
  2.  In a medium bowl, add all of the crumble toppings. Using your hands, break up the butter until it resembles pea-side bits or is well incorporated. Place the crumble topping atop the filling; transfer to the oven and bake for 35 to 40 minutes, until the top is lightly golden brown and the filling is bubbly. Serve warm, with vanilla ice cream.
Linking up with Time to Sparkle.

Tuesday, April 1, 2014

Spring is in the air!

Happy first of the month friends! I feel like once April arrives, spring is really really here. Here in Madison the first farmers market starts in just a few weeks! We thought this would make a good time to share some of our best spring recipes from this here little blog.


Carrots scream spring, after all the Easter bunny seems to be a pretty big fan. There are also a really easy and simple way to jazz up your standard vegetable side.


Morel mushrooms were among some of the first things I got last spring at the first farmers market of the year!


Lemons are wonderful this time of year for their zesty flavor and color, especially for us in Wisconsin where winter is still lingering. Brittany's Poppy Seed Lemon Cake with Lemon Buttercream, would make a wonderful addition to your Easter table or any table at that. 


Rhubarb will be coming out of our ears before we know it and Kelsey's Starwberry Rhubarb Pie is a perfect way to use some of it up.


If you want something a bit lighter and simple, try this rhubarb tart. It is delicious and pretty. The best of both worlds.

We hope you can find something delicious to make with springs bounty and we will be coming at you with some new spring recipes very soon!

Wednesday, March 26, 2014

Caramel Chocolate Tartlets


The other weekend, my fiancé and I met up with our wedding photographers to thank them for doing such a good job on our engagement photos. Seriously, I couldn't ask for better pictures. If you are on the look-out for talented and personable photographers, check them out here! We treated them to a little Madison secret, the Chocolaterian cafe. If you love all things chocolate, you need to stop into this wonderful cafe. I ordered the caramel chocolate tart. Oh my goodness. It was oh-so-good! Naturally, I decided this had to be my next culinary adventure. 


After researching recipes, I realized it shouldn't be too difficult to make. What's the hard part about making tarts? It's finding a store that carries the pans! After a few disappointing trips, I landed at Williams-Sonoma. That store ceases to fail me! Finally, I was all set to recreate the caramel chocolate tart that I fell in love with at Chocolaterian.
This dessert has every element to satisfy any dessert craving. It's sweet, rich and topped off with a hint of salt. It's delectable flavor is perfectly enjoyed in it's tiny tartlet size.  

Caramel Chocolate Tartlets

adapted from Martha Stewart

Ingredients

Tart Shell
10 tbsp butter
1/2 c. sugar
2 eggs
2 c. flour
1/2 tsp salt

Caramel Filling
1/8 c. water
1/2 c. sugar
1 tbsp corn syrup
2 tbsp butter
1/8 c. heavy cream
pinch of salt

Chocolate Ganache
1/8 c. heavy cream
1 oz. bittersweet chocolate

coarse sea salt to garnish

Instructions

Tart Shell
1. Preheat oven to 325 degrees.  
2. Cream butter and sugar. Mix in eggs.
3. Add flour and salt until combined.
4. Ball the dough and wrap up. Refrigerate for at least 30 minutes but up to overnight.
5. Roll out the dough to 1/4 inch. Cut the dough to size and press into 6 tartlet pans. Chill 20 minutes.
6. If desired, cover dough with parchment paper and add pie weights. Bake 15 minutes. Remove pie weights and parchment paper. Bake another 5 minutes or until golden edges appear. Let cool.

Caramel Filling
1. Combine water, corn syrup and sugar in a sauce pan on medium to high heat. 
2. Stir sugar mixture often. It will become bubbly. 
3. Turn to low heat once mixture is an amber-yellow color. Add in butter, heavy cream and a pinch of salt. Be careful, the mixture will fizzle up. 
4. Once all combined, transfer to a glass measuring cup and distribute evenly between tartlets. 
5. Let caramel set for at least 45 minutes.

Chocolate Ganache 
1. Heat heavy cream in sauce pan until a light boil.
2. Pour hot cream over chopped chocolate that is in a glass measuring cup.
3. Once chocolate is soft and melting, stir until a smooth consistency.
4. Pour evenly over tartlets.
5. Let tartlets reach room temperature, which takes about 2 hours.

Sprinkle coarse salt over each tartlet and enjoy!

Tuesday, July 23, 2013

Strawberry-Rhubarb Hand Pies with a Rye Crust

I'm back in the game people. My photography may have taken a bit of a hit, but I can still cook. Promise. It only took me six something months to get back into the blogging, just as I'm packing to move, going to Thailand and starting graduate school. This all happens in the next like month and half. Blogging is a good way for me to feel productive while I procrastinate. At a certain point I'm going to have to give in and pack up my kitchen.


I have about two weeks to pack up three years of crap. A lot of junk. I don't like to get rid of things. You just never know when you might shrink (I'm an pretty tall lady) a little bit and that dress you accidentally put in the drier might be appropriately long enough to wear again. These are the things I tell myself.

The kitchen is the easiest place for me to get rid of things. Lots of brilliant plans to clean out the pantry and liquor cabinet. Food and booze is what I am good at. And you can consume it and easily replace it again, unlike your dress that you can no longer even sit down in with out showing the world your business.


Today I decided I'm going to have a I'm moving less than two miles down the road party. There will be lots of rice, beans and punch. I have a ridiculous amount of liquor with maybe a few shots left in it. Some sort of punch will be delicious. I'm really proud of this idea, if you couldn't tell. You're all invited.

Now onto these hand pies. These are perfect for a picnic, pie on the go or when you are out of clean dishes. These come out being not to sweet. If you aren't into desserts, you may enjoy these. If you like your pie sweet, add more sugar. You will also have a little extra filling left, but that is okay. Put it on some ice cream or just eat it. It made me very happy to do that, so I can only imagine it will do the same for you.


The addition of rye flour adds a nice earthiness to the crust. You don't have to use rye, its just a fancy twist. This crust also is pretty amazing. Everything about its texture is perfect. All sorts of flaky goodness. The crust also is not overly sweet, again add more sugar or replace the rye flour with all-purpose. You will get a more sweet and less savory-esque crust. I hope you enjoy them as much as I did and hopefully I will be back with another post before September!

xo
April

Ingredients:
Crust:
2 cups all-purpose flour
1/2 cup rye flour
1/2 teaspoon salt
1 tablespoon sugar
1/4 teaspoon cardamon
8 ounces (2 sticks) cold unsalted butter, 1/4 inch cubes
3/4 cup water, cold, separated

Filling:
1 pound rhubarb, diced
2 cups strawberries, quartered
1/4 cup corn starch
2 tablespoons sugar
1/4 teaspoon salt
1/2 teaspoon cardamon
1/4 teaspoon nutmeg

Topping:
1 large egg beaten with a splash of water (for the egg wash)
Granulated or turbinado sugar

Instructions:


  1.  In a food processor, combine the dry ingredients: all-purpose flour, rye flour, sugar, salt and cardamom, pulsing to combine. Add the butter cubes to the food processor and pulse until the butter is evenly distributed and resemble the size of small peas. Add 1/2 cup of water; pulse the dough together until it just begins to clump together. The dough will be shaggy. Add one tablespoon at a time until it starts to come together.
  2. Remove the dough from the bowl of the food processor and place it on a lightly floured counter. Knead the dough a few times until it comes together and shape it into a mound. Shape the disc into 2 discs and wrap them in plastic wrap; transfer them to the refrigerator to chill for 1 hour or overnight.
  3. While the dough is chilling, make the filling! To a medium saucepan, add the strawberries, corn starch, sugar, salt, cardamom and nutmeg. Over medium heat cook the mixture for 5 minutes, until the fruit has softened. Depending on your fruit, there may be a bit of liquid and this is okay.
  4. Preheat the oven to 400 degrees F. Remove one of the discs of dough from the refrigerator. Liberally flour your work surface and rolling pin. Begin to roll the dough, being sure to rotate it every so often to avoid sticking, to a 1/8-inch thick. Using a 3 1/2-inch cookie cutter, cut circles out. Repeat the process with the second disc of dough. You should end up with about 12 circles of dough.
  5. Spoon a small amount of the fruit mixture into the center of the dough, leaving about 3/4-inch space around the edges. Brush egg wash along the edges of each of the dough circles. Fold the dough over the filling, pressing the edges to seal. Using the tines of a fork, sealing the edges. Repeat the process until all of the hand pies are made. Transfer the pies to a parchment-lined baking sheet.
  6. Brush the tops of the hand pies with egg wash and sprinkle with turbinado sugar. Bake the pies for 15-17 minutes, until the tops and edges are golden brown. Remove from the oven and transfer to a cooling rack. Eat warm or room temperature.


Thursday, September 20, 2012

Apple Crisp Pie


My mouth has been watering for fall food flavors since August! I've been waiting patiently to make apple pie for weeks! I finally decided it was a good time to buy some apples for this tasty treat. My boyfriend and I made sure to buy the best of the best apples for this recipe. The only place to go for those, is the Madison Farmers' Market! The absolute best stand for apples has to be Ten Eyck Orchard. That is where these honeycrisp apples are from. We decided on honeycrisp instead of a more traditional baking apple because we wanted extras to snack on. 


This was the first time I ever made pie, and I have to say I coming into it I was nervous but quickly found out making this was as easy as, well, pie. I was extremely nervous to make homemade crust. You have to do everything just right otherwise it is not flaky enough. Most people just skip it entirely and by store bought crust. I'm glad I didn't! The recipe I have for the pie crust was very simple and it was very delicious! It went perfectly with the apple crisp center. As for the meat of the pie, it is very simple. Besides the labor put into peeling and cutting 10 apples, it is a cinch!


This apple crisp pie is sweet and savory. Don't be nervous when the first piece taken out of the dish reveals a lot of juice. My honeycrisp apples were very juicy and left a pool. This is yummy to drizzle on top of your helping! Apart from the delicious apples and cinnamon, the crust and topping add a crunch! It is the perfect combination of apples and crisp that can be enjoyed warm or chilled.

Apple Crisp Pie with Homemade Pie Crust

Pie Crust
from Williams-Sonoma

Ingredients
1 1/4 c. flour
1 Tbsp. sugar
1/4 tsp. salt
1 stick cold to frozen butter
3 Tbs. very cold water (I measured my water out into a small cup, then I placed it into a bowl of ice)

Instructions
1. Mix flour, sugar and salt in a large bowl.
2. Cut the butter into small chunks and place into bowl. With a pastry cutter, get the butter incorporated into the dry ingredients. Use knives or a fork if you do not have a pastry cutter.
3. Add the cold water and mix with a fork until the dough pulls together. I actually needed about a tablespoon more of water to get all the ingredients to stay together.
4. Place dough ball onto a floured surface and roll out using a rolling pin. Sprinkle flour on the rolling pin or dough if it sticks. Roll out until it fits into a 9-in pie pan.

Mrs. Mohoney's Apple Crisp 

Ingredients
10 apples
3/4 c. white sugar
3 tsp. cinnamon

For the Topping:
1 1/2 c. white sugar
1 c. flour
1 stick butter, softened

Instructions
1. Peel and cut apples into tiny pieces
2. Mix apple pieces, sugar and cinnamon into a large bowl, making sure the apples are evenly coated.
3. Place mixture into a pie shell or for simply apple crisp, place in a buttered 8x8 baking dish.
4. Mix the topping ingredients together until it forms little pea sized balls.
5. Sprinkle on top of the apple mixture.
6. Bake at 375 for about 35-40 minutes.
7. Enjoy!


Monday, August 20, 2012

Peach Almond Galette

It has been a long while since I have wrote a post or cooked anything at all. Like the peach gallette, made it over a week ago. I have good reasons though. I wasn't cooking; instead, I was eating my way through San Francisco. Fair reason? I think so. Eating amazing food. Drinking delicious Californian wine. Yum! It was pretty amazing, which helps me forget what a giant cow I feel like, after overeating and drinking for a week.


Did I mention visiting my sister-in-law was the whole reason for going to California? She graduated from the Defensive Language Institute, in Monterey. Seeing her was probably the highlight of the trip, along with Tortas Frontera (the only place to get a good bite to eat in O'hare airport) making amazing margaritas, to go. That is right carry on margaritas. Never slept so well on a flight, ever.


I made this peach galette for my brother before going to Cali, so he didn't miss us too much. More like so he didn't feel so bad about not being able to go see his little lady graduate, after a year of intensive Farsi learning. It was a problem for me to take one for the team and go instead.


I really like this "pie" because it is rustic. There is no pie pan necessary. You of course could make this as a traditional pie, as the recipe is the same one I use for pie pans. This is much easier though, no perfect circles needed. This is perfect for your peach lover. It is mostly fruit, with  just a little sugar, making it all peachy perfect.


The almond mixture on the bottom of the pie just adds a nice flair to the pie, a little extra something. The same goes for the little bit of ground ginger. All barely noticeable, but without them the pie may not be nearly as tasty. I wouldn't know, never tried. You could always try using chopped/ground walnuts or crystallized ginger, neither of which I had on at the time.

xo
April


Ingredients:
Crust
1 1/2 cups all purpose flour
2 teaspoons sugar
1/2 teaspoon salt
1/2 cup (1 stick) unsalted butter, cut into 1/4-inch cubes
3-5 tablespoons ice water

Peaches
4-5 peaches, cored and sliced 1/4-inch thick
1/3 cup blanched almonds, coarsely ground
1/4 cup sugar
1/2 teaspoon ground ginger
1 tablespoon butter, melted

Instructions:

  1. In a food processor, combine the flour, sugar and salt, pulsing several times to combine. Scatter the butter evenly over the flour, pulsing until the mixture resembles coarse meal. Add 3 tablespoons of water, pulsing several times. If the mixture looks too dry, add more water by the tablespoon, until the dough is evenly moistened and just starts to come together. This can all be done using a fork/fingers, if you don't have a food processor. 
  2. Remove the dough from the food processor, onto a clean counter. Being careful not to overwork the dough, shape the dough into a disk. Wrap it in plastic wrap and chill for at least 1 hour.
  3. Preheat the oven to 400F. Remove the dough from the fridge. Working on a lightly floured surface, roll the dough into a 14-inch circle. Place the dough onto a parchment lined baking sheet. 
  4. In a small bowl, combine the almonds, sugar and ginger. Sprinkle 3/4 of the mixture into the center of the dough, leaving a 1 1/2-inch border. Arrange the peaches in a roughly concentric circle, overlapping them as needed. Sprinkle the remaining almond mixture over the peaches. 
  5. Fold the border of dough, at an angle, into the peaches, pinching the edges to make sure they are sealed. Brush the border with the melted butter.
  6. Bake for 45-50 minutes, until the crust is well browned and its edges are slightly caramelized. Remove from oven and allow to cool for 20 minutes before serving.

Thursday, May 31, 2012

Strawberry-Rhubarb Pie


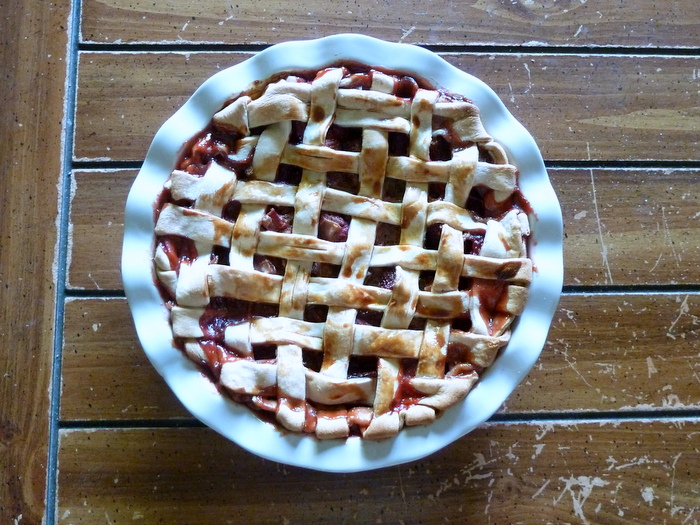
For Mother's Day this year I volunteered to make dessert for our family dinner and asked my Mom what she wanted me to make.  She said anything with rhubarb.  Ironically, I had just been telling my roommates about how I was going to buy rhubarb the next time I went to the farmer's market and make a strawberry-rhubarb pie.  I borrowed Brittany's pie pan and off I was making my first ever pie!  The family gave it rave reviews.  Unfortunately, the lattice top did not permit for attractive pictures after the pie was cut.


Recipe from Epicurious.

Ingredients

  • 2 9-inch pie crusts (I used store bought crusts)
  • 3 1/2 cups 1/2 inch thick slices trimmed rhubarb (about 1 1/2 lbs untrimmed)
  • 1 16-ounce container of strawberries, cut in half with green leaves removed (about 3 1/2 cups)
  • 1/2 cup packed brown sugar
  • 1/2 cup sugar
  • 1/4 cup cornstarch
  • 1 teaspoon ground cinnamon
  • 1/4 teaspoon salt
  • 1 large egg yolk beaten to blend, mixed with 1 teaspoon water
Directions
  1. Preheat oven to 400 degrees.
  2. Combine rhubarb, strawberries, brown sugar, sugar, cornstarch, cinnamon, and salt in a bowl.  Gently toss.
  3. Place one pie crust in a 9-inch pie dish.  Depending on your pie dish there should be some overhang.  Trim overhang to about 3/4 of an inch.
  4. Spoon filling into crust.
  5. Lay the other pie crust out on the counter and cut into 14 strips about 1/2-3/4 inch wide.
  6. Now make the lattice top.  Lay every other strip evenly spaced across the pie.  Fold back every other strip and lay a new strip down in the opposite direction.  Fold strips back.  Fold back the other strips and place a new one down.  Repeat until the remaining seven strips have been woven in.  Trim excess dough from strips. (Watch a video on how to make a lattice top here.)
  7. Tuck any excess crust or strips under and seal crust.  Crimp decoratively as desired.
  8. Brush egg and water mixture over top of pie.
  9. Place pie pan on a baking pan in case pie filling overflows.  Bake for 20 minutes.  Reduce temperature to 350 degrees and bake for another 1 hour and 25 minutes.  Let cool.

Monday, April 30, 2012

Rhubarb Tart with Orange Glaze

It is rhubarb season! There are so many things you can do with rhubarb and I adore the tartness of it in deserts or savory dishes. This tart is simple, easy and elegant. It looks like you put a lot of work into it but didn't, making it perfect for guests.


The hardest part of this dish is cutting the stalks on a large enough angle to make them big beautiful slices. It could have been that my stalks of rhubarb were on the smaller size in the thickness department or I just don't get how to cut diagonally. The diagonal cutting is for appearance more than anything. If you decided to throw appearance out the window, just spread the rhubarb evenly over the tart. Taste is what really matters anyways and this is a perfect dish for people who may be skeptical about rhubarb. The rhubarb is not overwhelming and the orange juice mellows it out at the same time. Serve it up with some vanilla ice cream and enjoy!!

xo

April

Adapted from Gourmet
Ingredients:
1 cup fresh orange juice (about 2-3 large oranges)
1 tablespoon fresh lime juice (about half a lime)
1/2 cup sugar
1 pound rhubarb stalks (6-8 medium stalks), thinly sliced diagonally (1/8 inch)
1 sheet frozen puff pastry, thawed

Instructions:

  1. Preheat oven to 400F.
  2. Stir together orange juice, lime juice, and sugar in a medium bowl. Add rhubarb and let stand, stirring occasionally, 10 minutes, while rolling out the puff pastry.
  3. Cut the pastry in half lengthwise, then roll out each piece into a 11-by 7-inch rectangle, on a lightly floured surface. Arrange the pastry rectangles side by side on a large ungreased baking sheet. Score a 1/2-inch border around each pastry rectangle (do not cut all the way through). Prick the pastry inside the border all over with a fork.
  4. Strain rhubarb mixture, reserving the liquid. Top 1 pastry rectangle (inside the border) with half the rhubarb, overlapping slices slightly. Repeat with the other pastry rectangle.
  5. Bake until the pastry is puffed and golden on the top and underside, about 25-30 minutes.  Meanwhile, boil the reserved rhubarb liquid in a small saucepan, skimming foam off the top, until it has reduced to about a 1/4 cup, 15-20 minutes. 
  6. Transfer tarts to a rack, brushing the rhubarb and pastry with the glaze.


LinkWithin

Related Posts Plugin for WordPress, Blogger...