Showing posts with label breakfast. Show all posts

Friday, May 22, 2015

Roasted Strawberry-Rhubarb Buckwheat Biscuit Cake

Happy Memorial Day weekend, friends! I have this to die for strawberry-rhubarb biscuit cake. Ah-mazing.


Before we get to the food, I have to share how difficult it has been to get this post up. My cat has been a relentless snuggle bean. I can't sit down without her showing up and climbing into my lap.

I often complain how she doesn't give me enough loving, finding it very hard to kick her off my lap. When she was too slow to get on my lap before my computer, she still climbs on. Sprawled out, one leg on the keyboard, belly up. Cuteness.


As I write this she is sitting on my belly giving me the stink-eye. She has obviously claimed my lap as her own and has some computer jealousy.

It may be that she knows her mother, me, is about to leave her for two weeks and she wants all the snuggles she can get before that day arrives.
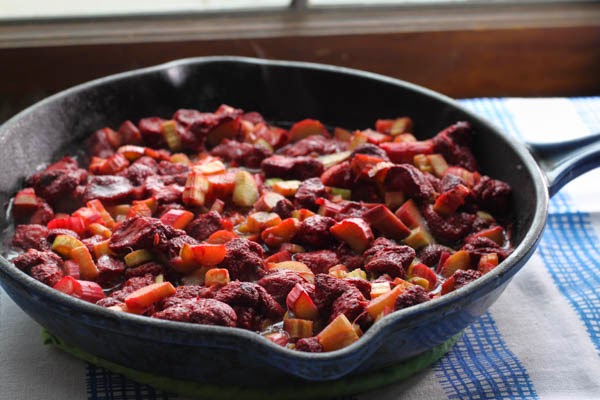
Now about this cake, cobbler, fruit and biscuit situation. It is maybe the most delicious thing I've ever made. I had frozen strawberries from last summer and rhubarb from the farmers market.

If you are using frozen berries, be sure to drain them. If you don't, you'll end up with way too much liquid. Which is bad. We don't want that. Set them in a strainer overnight on the counter or in the refrigerator.

Did I mention how easy this is to make? It took like 45 minutes all together, including dishes. The cake was gone in about the same amount of time. Remember, this is a judge free zone.

The biscuits come together really quickly, they are fairly doughy and dense, not so light and fluffy, but it worked for me. Using all white flour is totally acceptable.

I sort of just used what I had on hand. You could substitute creme fraiche or sour cream for the yogurt.


Roasting the fruit results in a super jammy and buttery consistency. I would have slathered it all over myself, if I had more of it. That is right, it is that good.

It is so good you want to sit down all alone, dim the lights and turn on your favorite cooking show and savor the moment.
xo
April

Ingredients:
for the fruit:
2 cups rhubarb, cut into 1/4 inch pieces
2 cups strawberries, fresh or frozen, if frozen, defrost and drain first
2 tablespoons granulated sugar
1/2 teaspoon vanilla
1/2 vanilla bean, scraped
2 tablespoons cornstarch
3 tablespoons butter
for the biscuits:
1 cup all purpose flour
1/2 cup buckwheat flour
1 1/2 tablespoons sugar
1 1/2 teaspoons baking powder
1/2 teaspoon sea salt
8 tablespoons butter, cold, cut into quarter inch cubes
1/2 cup full fat greek yogurt or creme fraiche
1/2 vanilla bean, seeds removed and scraped
for the egg wash:
1 large egg
splash of water or milk
brown sugar

Instructions:
  1. Place a rack in the middle of the oven, preheat the oven to 375F. 
  2. In a medium bowl, combine the first six ingredients for the fruit, tossing to fully coat the fruit. Place the fruit mixture into an 8-inch oven proof skillet or metal baking dish, placing small pads of butter on top of the fruit. Place in the oven to roast for 12 to 15 minutes. While the fruit roasts, prepare the biscuit dough.
  3. To make the biscuits, in a medium bowl whisk together flour, sugar, baking powder and salt. Add the cold butter and vanilla bean seeds and use your fingers to quickly break the butter down into the flour and sugar mixture. Some of the butter pieces will be the size of oat flakes, others will be the size of small peas.
  4. Create a well in the center of the flour mixture and add the cold yogurt . Stir with a spoon. The mixture will be rather wet. Shape the dough into a rough disk, dividing the dough into 6 pieces. Brush the top of each biscuit with the egg wash (whisk together one egg with a splash of milk or water) and top with brown sugar.
  5. Remove the strawberries from the oven and carefully place the biscuits over the hot strawberries. Return the skillet to the oven and bake for another 15-20 minutes, or until the biscuits are cooked through and the biscuits are golden.
  6. Remove from the oven, allow to cool until the strawberries are no longer bubbling, and serve warm.

Wednesday, March 25, 2015

Everyday Granola

Simple, homemade, good for you granola is tough to beat.


I buy a lot of granola at the store, but when I have the time I like to make it myself. By no means am I a super healthy eater. I eat what I want.

Sometimes it might be organic other times it might be super processed, deliciously fake cheese. Cheetos! I digress.

When I buy granola though, I'm buying it to be somewhat healthy. Some whole grains. A few nuts. The perfect snack or fiber for your morning yogurt.


What I am trying to say is that I like to have a little control over what goes into my granola, specifically sugar. There does not need to be much in your granola, in terms of fats or sugars.

It can be hard to find a store-bough granola with just a few ingredients. Hence, making it is the way to go, when time permits. It is simple, clean and easy to make.

This is a pretty basic granola, hence "Everyday Granola." Original, I know, but everyone needs a good and safe based to venture out on their own from, knowing they can always come back.

I sort of just use what I have in my cupboard. All the little leftover handfuls of nuts. You know what I'm talking about. A recipe called for all but 1/4 cup of slivered almonds, what to do with the leftovers? Stash 'em away for some granola. 


Perfect opportunity to use up various seeds, like sesame or flax, as in this recipe. So many sesame and flax seeds, with so few opportunities to use them and then there was granola. Everyone gets to play! No, your granola is not going to taste like sesame.

Any flavorful oil will work in here. Until coconut oil was all the rage, I used olive oil. The coconut oil also does not make this taste overwhelmingly like coconut, for all those coconut haters out there.

Egg whites make your granola a bit more crunchy and you could add up to about 3 tablespoons. I used egg beaters and would probably skip egg whites, if I had not had egg beaters on hand. The protein bonus does not hurt either.


If you like granola that is in bigger pieces, press the granola down firmly, with a spatula, not stirring it for the remainder of time in the oven.

After it comes out of the oven do the same thing, letting it cool completely before breaking it up, tossing in the fruit at this point.

If you have not gotten the gist by now, this recipe is flexible. Change the amount of oil or honey you add, maybe it is too much for. Maybe it isn't sweet enough. That is okay. Not offended, promise.


Spread you wings and play around with the ingredients. Use what you have on hand. Go wild. It will be fun. You deserve it.

xo
April 

Ingredients:
2 cup old-fashioned oats
1 cup slivered almonds
3/4 cup chopped walnuts
1/2 cup macadamia nuts, chopped
1/4 cup sunflower seeds
1 tablespoon sesame seeds
1 tablespoon flax seeds

3 tablespoon honey
3 tablespoons coconut oil
1 tablespoon egg white
1/4 teaspoon sea salt
1/2 teaspoon cinnamon

1/2 cup dried fruit

Instructions:
  1. Preheat oven to 300°F. Line rimmed baking sheet with parchment. Mix first 7 ingredients in large bowl. Stir honey and oil in saucepan over medium-low heat until smooth, or microwave in a measuring cup for 30 seconds. Pour honey mixture and salt over oat mixture; toss. Add tablespoon of egg; toss. Spread on prepared sheet. Bake until golden, stirring every 15 minutes, about 40 minutes. 
  2. Place sheet on rack, to cool. Stirring immediately for a less chunky mixture or let cook fully for bigger chunks. Mix in fruit. Granola will keep for up to a week, in a air-tight container.

Wednesday, November 19, 2014

Baked Blintz

Just one more week until Thanksgiving is here!  Are you excited for the holiday season to officially be in full swing or what?!  While lunch or dinner are always the star of the show on Turkey Day, you can't let the family starve in the morning either.  Sweet Potato Hash with Caramelized Onions, Chorizo and Eggs or a French Toast Bake are great options to serve, as is this Baked Blintz!


Baked blintz is actually part of my family's Christmas Day tradition.  Every year on Christmas morning we would always go to my grandparent's house for brunch after opening our presents from Santa.  Baked blintz was always sure to be part of the spread on the table along with all other sorts of brunchy goodies.


Now, you may have never heard of blintz and have no idea what it is.  Traditionally, it is a type of thin pancake that you put a filling in and roll up, similar to a crepe.

To simplify the recipe for serving to a crowd it can also be easily converted to a dish bake.  A layer of the batter is spread on the bottom of a baking dish, coated with a cottage cheese mixture for the filling, and then topped of with another layer of that batter.  It ends up as a sort of egg souffle.  Serve with a side of sour cream and fruit preserves to lather on top as you please.


There's actually only three eggs in the dish so it's neither super eggy nor super cheesy since cottage cheese doesn't have an overwhelming amount of flavor.  The sour cream and fruit preserve toppings can really direct the flavor of the dish.  It's not bland in and of itself, I've enjoyed it plain plenty of times, the toppings just give it a flavor boost.  It's very similar to pancakes where they can still taste great plain, but when you load them up with chocolate chips and berries it just takes them to a new level!


If you've never had baked blintz before and you're looking for something new to try, I definitely suggest you give it a shot.  It's pretty simple and straightforward to prepare and can easily be doubled to make a larger batch.  Just a warning that if you aren't able to spread the top layer of batter all the way to the edges, it may lift up and curl a bit (as you can see it did in my pictures) but don't worry, it still tastes just as good!

Enjoy!
Kelsey


Ingredients:

Batter

  • 1/2 cup softened butter
  • 3 tablespoons sugar
  • 2 large eggs
  • 3/4 cup milk (skim or 2%)
  • 1 teaspoon baking powder
  • 1 1/4 cup flour

Filling

  • 1 lb (16 oz) cottage cheese, creamed
  • 2 tablespoons softened butter
  • 1 large egg
  • 1 tablespoon sour cream
  • 1/2 teaspoon salt
Fruit preserves or fresh berries and sour cream for topping.

Directions:
  1. Preheat oven to 350 degrees.  Grease a 9x9 (or similar sized) baking dish.
  2. To prepare batter, in a medium bowl mix butter and sugar.  Beat in eggs.  Blend in milk.  Add baking powder and flour and mix until combined.  Set aside.
  3. To prepare filling, in a medium bowl mix creamed cottage cheese and butter.  Beat in egg.  Mix in sour cream and salt.
  4. Spread half of batter in prepared baking dish.  Add all the filling.  Cover with other half of the batter.
  5. Bake for 45-50 minutes, or until golden brown.
  6. Serve with fruit preserves or fresh berries and sour cream.

Wednesday, November 12, 2014

French Toast Bake


Another recipe for breakfast for a crowd is here again! I think this is the perfect time to give you all ideas on how to satisfy the breakfast cravings of your soon to be holiday guests. Holiday breakfasts are some of my favorite recipes. I just love how breakfast can be such a comfort food and what memories it brings back! Holiday breakfast is especially meaningful to me because every Christmas Eve morning just the immediate family gets together. Of course I love seeing all my uncles, aunts, cousins, and grandparents but there's something I just love about the small, intimate group of Christmas Eve morning.

For Christmas Eve morning, each of my sisters, myself and my parents prepare some sort of dish. Egg bakes are normally the hit of the table, but the spread also almost always includes fruit, monkey pull-apart bread, mimosas and a few desserts (because we don't get enough of those during the holidays). This year, I wanted to find a recipe that didn't fit the traditional ham and egg bake mold. So, off to search Pioneer Woman's website, because does Ree ever leave you disappointed? And then I found it!


This french toast bake is sweet and delicious. It closely resembles regular french toast but the nice thing about it is that you're not stuck in the kitchen flipping toast all morning. You can prepare it all the night before. The next day, all you do is pop it in the oven and voilĂ ! You have french toast for all to enjoy at the same time! Needless to say, I think this recipe will make it onto the Christmas Eve morning table.

Enjoy!
Brittany

Slightly adapted from Pioneer Woman

Ingredients
French Toast
1 loaf crusty french bread
8 eggs
2 c. milk
1/2 c. heavy cream
1/2 c. sugar
1/2 c. brown sugar
1 Tbsp. vanilla extract

Topping
1/2 c. flour
1/2 c. brown sugar
1 Tbsp. cinnamon
1/4 tsp. salt
1/2 tsp. nutmeg
1 stick cold butter

Instructions
1. Grease a 13x9 pan with butter.
2. Cut the french bread into cubes and add to pan.
3. In a large bowl, whisk together the eggs. Next, add the milk, cream, sugars, and vanilla extract. Pour over bread cubes.
4. Cover and place in refrigerator overnight. This step can be reduced or skipped all together.
5. For the topping, mix the flour, brown sugar, cinnamon, salt, and nutmeg in a bowl.
6. Cut the cold butter into small pieces and scatter into bowl. Using a fork or pastry cutter, work in the butter until the mixture resembles corse pebbles. This, too may be refrigerated in a bag or container. Makes things a bit easier the next morning :)
7. The next morning, or when you're all set to bake the dish, preheat oven to 350.
8. Sprinkle topping over the soaked bread.
9. Bake on the middle rack for 45-60minutes. 45 minutes will give you a nice bread pudding texture; 60 minutes will yield a crispy and firmer texture.
10. Enjoy with your favorite traditional french toast toppings: syrup, fruit, powdered sugar, etc!


Wednesday, November 5, 2014

Sweet Potato Hash with Carmalized Onions, Chorizo and Eggs

Its about that time to start thinking about the holidays and what you are going to be making for holiday dinners and gatherings! Its the best time of year. I wish I had a bit more time to think and plan these things, but honestly school has really gotten the best of me.

My mom doesn't know it yet, but Thanksgiving dinner is all hers this year. Usually I claim things. By things I mean every single holiday that calls for a meal. What I will lay claim to is breakfast the morning after!


This here hash is the perfect make-ahead breakfast for a crowd. Its more creative than your standard egg bake too. Really wow your guests. I actually made this on a Thursday night and then cooked 2/3 of it on Sunday morning for friends that were visiting.

Who doesn't love a runny eggs?! Crazy people. No offense, but seriously! I will never understand how you couldn't like a runny egg yolk. It acts like a magical dressing for whatever it sits on top of. Delicious, silky, greatness. Food porn at its finest.

For those who prefer a hard cooked egg, don't worry. Your eggs can take a trip into the oven for an extra five minutes. After five minutes, take out the hash and add the rest of the eggs for another 10 minutes.


The meat and potatoes are also very flexible. I think a nice breakfast sausage, with sweet or russet potatoes would be delicious, maybe will a little bacon and maple syrup. For a more smoky take you could use andouille sausage.

The chorizo that I used here makes your kitchen smell divine. A sort of sweet, peppery and smoky party for your nose. I think it is the paprika, which might be my newest spice obsession.  I got my chorizo at Whole Foods, if you can't find it you could substitute any other sausage you see fit.


The preparation of the hash is a bit labor intensive but totally worth it! Reheating the hash with the eggs is what really makes the hash special. Its bottom layer gets super crunchy, but the top layer of taters are still soft. Sweet, with a little hint of spice. I think chorizo and sweet potatoes were made for eachother.

Because I only served 2/3 of it to my friends, I cooked up the rest for these here photos and ate it for lunch the next two days. If you don't have a huge crowd to feed, still make the whole batch and treat yourself throughout the week to a special breakfast.


You, you're guests and bellies will not regret this. It is a must make for the upcoming holiday season and will make your house smell delicious!

xo
April


Adapted from The Kitchn
Serves 5-8
Ingredients:
for the hash:
2 large onions, thinly sliced into half-moons
1 tablespoon unsalted butter
Kosher salt
1 1/4 pound fresh chorizo

3 pounds sweet potatoes, about 3 large potatoes, cut into 1/2-inch cubes
6 large garlic cloves, minced
3 tablespoons olive oil
1 tablespoon kosher salt, plus more to taste if necessary
Freshly ground black pepper

To serve:
Large eggs
Kosher salt and freshly ground black pepper

Instructions:
To make the hash:
Heat the oven to 450°F. Place the sausage in a large skillet and brown over medium-high heat, chopping it up into fine crumbles with a spatula. Cook the sausage for about 10 minutes, or until it is browned and beginning to crisp. Drain the sausage, reserving 1 tablespoon fat and set aside, in a large bowl (large enough that you can mix everything together before it goes onto a baking sheet and into the oven).

While the sausage cooks, peel the onions and cut them in half lengthwise, then cut them into thin half-moons. Cut the half-moons in half. In the same skillet, melt the butter with the drippings, over medium-high heat. When it foams up add the onions and sprinkle lightly with salt. (Don't worry if they are crammed into the pan; they will rapidly cook down.) Lower the heat slightly and cook the onions for about 20-30 minutes, stirring occasionally, and lowering the heat if they seem to be burning. Cook them until they are dark brown.

While the onions are cooking, chop the unpeeled sweet potatoes into cubes that are about 1/2-inch to a side. Finely mince the garlic and toss it in a large bowl with the sweet potatoes and sausage. Toss with the olive oil, kosher salt, and a generous helping of black pepper.

When the onions are dark brown, stir these into the sweet potatoes as well. Line a large baking sheet with foil or parchment paper, and spread out the sweet potatoes evenly, depending on the size of you baking sheets you may need to use two. Roast the sweet potatoes for 30 to 45 minutes (roasting time depends on the size and uniformity of the sweet potato chunks, as well as the variety of sweet potato you buy) or until they are soft and browned.

Refrigerate the cooled hash for up to 5 days.

To serve:
Heat the oven to 425°F. Spread a relatively thin layer of the (already cooked) sweet potato hash in a baking dish, such as a cast iron skillet or a 9x13-inch baking dish (I've done it with both). You can also bake in individual ramekins. Make small wells in the sweet potatoes and crack in large eggs. Sprinkle lightly with salt and pepper.

Bake for 12 to 15 minutes for a runny yolk and 15 to 20 minutes for a hard cooked egg. (Test the eggs by prodding them with a fork to check the firmness of the white and the yolk; baked eggs are deceptive in that the white often looks much less cooked than it really is.)

Friday, August 29, 2014

Zucchini Chocolate Chip Muffins


I've been trying to make a conscious effort to eat healthier which is why lately I've been using zucchini to justify all things baked goods.  I also use baked goods on the regular to justify my chocolate addiction, so this recipe is really a win-win.  But fo cereal, aside from begging every single person I know to take six pound zucchinis off my hands I've grating them up and tossing them in zucchini bread, zucchini brownies and now these zucchini chocolate chip muffins because everything is better in single servings, plus don't forget they're "healthy" so you can really eat two or three.


But don't worry, I've been eating zucchini the real healthy way too, slicing these bad boys and either roasting or sauteing them as well.  I've got another 10 months until wedding bells ring but only a couple until the hunt for the perfect white dress takes place and I'm hoping to have a good start on being in wedding dress shape by then.

These muffins honestly aren't the healthiest thing I could be eating, but they're a smarter option for satisfy a sweet tooth and because they're already separated into servings, you can easily freeze them and pull one or two out to thaw every few days instead of chowing down for a week straight.


If you want to try lightening them up a little more, consider halving or skipping altogether the chocolate chips and/or streusel topping.  I ended up only using about two-thirds of the topping on mine.  I'm warning you now though, you will risk getting your chocolate fix from these muffins if you omit the chocolate chips and might find yourself eating them out of the bag instead anyways!

Happy Labor Day weekend everyone!
Kelsey

Yields 22 muffins.

Ingredients

Brown Sugar Oat Streusel
  • 1 1/3 cup oats (old fashioned or quick)
  • 1 cup brown sugar
  • 4 tablespoons all-purpose flour
  • 1 teaspoon ground cinnamon
  • 1/2 cup unsalted butter, cold
Zucchini Muffins
  • 2 large eggs, beaten
  • 1 cup brown sugar
  • 1 cup granulated sugar
  • 1/2 cup canola oil
  • 1/2 cup unsweetened applesauce
  • 2 cups grated zucchini
  • 4 teaspoons vanilla extract
  • 2 cups all-purpose flour
  • 1 cup whole-wheat flour
  • 1 teaspoon baking powder
  • 1 teaspoon baking soda
  • 1 teaspoon salt
  • 4 teaspoons ground cinnamon
  • 1/2 teaspoon ground nutmeg
  • 1 1/2 cups semi-sweet chocolate chips
Directions
  1. Preheat oven to 425 degrees.  Grease or line muffin tins.
  2. In a medium bowl, add oats, brown sugar, flour, cinnamon and butter for the brown sugar oat streusel.  Using your hands, combine ingredients until they are well mixed and crumbly.  Set aside for later.
  3. In a different medium sized bowl, whisk together eggs, brown sugar, granulated sugar, canola oil, applesauce, zucchini and vanilla extract.
  4. Using a large bowl and large rubber spatula, combine flours, baking powder, baking soda, salt, cinnamon, nutmeg and chocolate chips.
  5. Pour the wet ingredients into the large bowl with the dry ingredients and mix with the rubber spatula until just combined.
  6. Using a 1/4 cup measuring cup, transfer batter into prepared muffin tin.  Top each muffin fully with crumbled streusel mixture.
  7. Bake for 5 minutes at 425 degrees before lowering the temperature to 350 degrees for an additional 14 minutes, or until toothpick inserted in the center comes out clean.  Let cool for 5 minutes before removing from muffin tin.
Recipe adapted from Sally's Baking Addiction (also includes bread version).

Friday, July 25, 2014

Zucchini Bread

Back in May when I was picking out the seedlings to plant in my garden, I grabbed one for a zucchini mound kind of on a whim.  I had mostly planned out my garden ahead of time and hadn't been planning on growing zucchini, but boy I'm sure glad I did.


It's been a major confidence booster every since the start.  It was kind of unnerving when two weeks after planting my very first garden, the tomatoes and cucumbers all looked like they were dying but the zucchini was clearly growing.  And when I saw those first blossoms appear, I knew I must be doing something right.  I go one day to find that an actual little zucchini was growing (holy cow I can grow my own food!) and four days later when I go back the same one is now 16 inches long, 4 inches in diameter ripe for the picking.  Talk about success!


That first zucchini that I grew is the special ingredient that went into this zucchini bread.  I knew that I had a lot of the vegetable on hand so I chose to double the recipe and put both of my bread pans to good use.  Two loaves of bread only ended up using about a third of my giant zucchini, plus the four other ones that are sitting in my kitchen right now; I think I've got a lot of roasting to do.


Makes one loaf.

Ingredients:
  • 3/4 cup whole wheat flour
  • 3/4 cup all purpose flour
  • 1/2 cup sugar
  • 1 teaspoon cinnamon
  • 1 teaspoon baking soda
  • 1/2 teaspoon ground nutmeg
  • 1/4 teaspoon salt
  • 1/3 cup canola oil
  • 1/3 cup unsweetened applesauce
  • 2 large eggs
  • 1 1/4 cups coarsely grated zucchini
  • (Optional) 1/3 cup walnuts or chocolate chips
Directions:
  1. Preheat oven to 350 degrees.  Grease loaf pan.
  2. In a large bowl, mix together dry ingredients (flours, sugar, cinnamon, baking soda, nutmeg, and salt).
  3. In a different large bowl, whisk together oil, applesauce, and eggs.  Then stir in the zucchini.
  4. Stir the wet ingredients into the dry ingredients.  Stir in optional additions, such as walnuts or chocolate chips, if desired.
  5. Pour batter into greased loaf pan.  Bake 50-60 minutes, or until a toothpick inserted into the center comes out clean.
  6. Cool on wire rack for 15 minutes before removing bread from pan.

Wednesday, June 4, 2014

Strawberry Banana Bread


Here at Badger Kitchen headquarters we are officially declaring June to be Strawberry Month!  Check back each Wednesday this month for a new recipe using strawberries.  We're kicking off the month with this recipe for strawberry banana bread.


I finished my undergrad degree about a year ago now and having been working in the professional world (well part of the time working on getting into the professional world) ever since.  I've always enjoyed learning and generally speaking liked going to classes, but the main part of school that I do not miss is spending my free time studying.  Evenings that are free to do whatever I want you say?  Sold.

Which is why when I signed up to take the LSAT exam, it has been a little bit of a struggle to get back into studying mode.  No, I don't really want to come home from a day of work and spend my free time studying, but I better if I want to do well on this test!  Which is why I had been studying a little bit here and there for a while, but as the the test date is quickly approaching it has become my free time.


So when world collided this weekend and I had ripe bananas sitting on the counter, fresh strawberries in the fridge and was looking for a reason to take a study break, this strawberry banana bread was born.  If I had wanted to take a trip to the grocery store I would've made a healthier version, throwing in some applesauce and greek yogurt, but I had all the ingredients for this version already so I went with it.  I can at least pretend it's healthier since I didn't throw any chocolate chips in, right?

The strawberries add a nice twist to your typical banana bread recipe.  The banana flavor isn't super strong, so if that's the way you like it then perfect, otherwise you may want to try and sneak in another banana.  I had intended to freeze half the loaf but it made such a great study snack that before I knew it, it was almost gone anyways.

I hope you enjoy!
Kelsey


Recipe from Chew Out Loud

Ingredients
  • 2 cups fresh strawberries, sliced
  • 2 very ripe bananas, mashed
  • 1/2 cup packed brown sugar
  • 1/4 cup granulated sugar
  • 1 1/2 cups all purpose flour
  • 1 tsp baking powder
  • 1/2 tsp baking soda
  • 1/4 tsp salt
  • 1 tsp cinnamon
  • 2 large eggs, room temperature
  • 1/2 tsp vanilla extract
  • 1/2 cup salted butter, melted
Directions
  1. In a bowl, toss sliced strawberries with granulated sugar, making sure all are coated.  Let sit.
  2. Preheat oven to 350 degrees.  Grease and flour a loaf pan.
  3. In a medium bowl, whisk together flour, baking powder, baking soda, salt and cinnamon.
  4. In a separate large bowl, beat eggs until slightly foamy.  Mix in vanilla, brown sugar and melted butter.  Add in macerated strawberries and mashed bananas.
  5. Using a rubber spatula, fold flour mixture into wet mixture until dry ingredients are just mixed in.
  6. Scrape into prepared loaf pan and bake for an hour, with additional time if needed so that toothpick inserted in the center comes out almost clean, with just a few crumbs.
  7. Let bread cool in pan on wire rack.  Wait until fully cooled before removing.
Two Years Ago: Caramel Oatmeal Chewies

Friday, March 21, 2014

Brown Butter Roasted Banana Bread


I have not had a blog post in way too long, but all three of us are apparently on the same page with giving the blog a little bit of loving. A lot has gone on since the last time we were together on this here little blog. I moved out of my apartment of three years, went to Sydney and Thailand, moved into a new apartment, started my masters program and got the most adorable cat, Artemis, ever. I'm not technically allowed to have. Please, don't tell anyone.


I realize I just shared with the internet world that I'm housing a cat in no animal apartment, but I trust you not to tell. I'm pretty obsessed with her. I'm going to try my very best to not constantly talk about her. It has come to my attention that other people do not find her nearly as fascinating as I do, but I don't really care.

You see I have never had the privilege of having a little fur-ball companion of any sort before. It is sort of a big deal and I think I'm in love. Enough about my apparent transition to being a crazy cat lady and lets talk about banana bread.


Everyone loves banana bread and it is so easy to make. I have a tendency to make really simple things a little less simple, but what is five more minutes to add a little nutty buttery goodness to your banana bread? Its no big thing. Plus, we have all had the standard banana bread and should try something new. Right? I think so.


Browning butter is pretty easy too. Don't be afraid. Once tiny light to medium brown specks start to appear and it smells nutty you are pretty much there. Don't walk away from it at this point or you'll have burnt butter.


I also chose to roast the bananas before smashing them up and putting them in the mix. This, like the brown butter is not necessary, but it can be helpful if you have bananas that aren't so ripe. If you have super ripe bananas, go ahead and skip this step or not.

You roast them inside of their peels. After they cool, you have a super soft ripe and juicy banana awaiting you inside the peel. Be sure to peel them over a bowl so you don't loose a drop of banana flavor.

Go ahead and take a little time to make this nutty and moist banana bread this weekend. Your home will smell amazing. It is a win win situation.

April


Ingredients:
3 medium bananas

6 tablespoons unsalted butter, melted and browned
2 cups all-purpose flour
3/4 cup light brown sugar
1 teaspoon baking soda
1/2 teaspoon salt
3/4 teaspoon ground cinnamon
1/8 teaspoon nutmeg
2 large eggs
1 teaspoon pure vanilla extract
1/4 cup plain yogurt (any fat content) or buttermilk
1/2 cup chopped walnuts

Instructions:
Place a rack in the center of the oven and preheat to 350 degrees F. Line a baking sheet with aluminum foil and place the three bananas, unpeeled, evenly spaced, on the baking sheet. Bake the bananas for 10-15 minutes, until dark brown to almost black in color. Remove from oven and let cool, until ready to use.

Maintain oven temperature and grease a 9x5-inch loaf pan and set aside.

Melt butter in a saucepan over medium heat. Butter will begin to foam and crackled as it melts. When the crackling subsides, the butter will begin to brown. Swirl the pan occasionally as the butter cooks. When the butter browns and begins to smell nutty, remove the pan from the burner and transfer the butter to a small bowl. Taking the butter out of the hot saucepan will stop the butter from burning. Set aside to cool.

In a large bowl, whisk together flour, sugar, baking soda, salt, cinnamon and nutmeg.

In a medium bowl, whisk together eggs, vanilla extract, and yogurt or buttermilk. Then add the roasted bananas by peeling them over the bowl, allowing both the banana and any juices to be combined with the egg mixture. Whisk well to combine. When the butter has cooled, whisk in the browned butter.

Add the wet ingredients, all at once to the dry ingredients. Fold together, making sure to scrape the bottom of the bowl to reveal any hidden pockets of flour. Fold in the chopped pecans. Try not to over stir the batter.

Pour batter into prepared pan. Bake for 50 minutes to 1 hour, or until a skewer inserted into the center of the loaf comes out clean. Remove from the oven and allow to rest in the pan for 15 minutes, before inverting onto a wire rack to cool completely.

Bread will last 4 days, well wrapped at room temperature. It will also freeze well.

Adapted from Joy the Baker


Saturday, October 13, 2012

Pumpkin French Toast Bread Pudding


Food and I have not been getting along lately. There has been a lot of cooking and eating, but will sub par success. Failed attempts at the perfect pumpkin Bourbon bread pudding (determination pays off people). Restaurant meals not meeting my highly anticipated expectations. Burning cookies.

Buying the same smoked butterkase, on two separate occasions, for a Badger Cheese Club Meeting, and I call myself president. Don't worry, I caught the mistake in time to dash to the store and by smoked mozzarella, but really I had already been to three stores for cheese that same day. Where was my head at?!


I made biscuits that were over mixed and poorly risen. The whole reasoning for making them was because they are the perfect fail safe. Biscuits are supposed to be my friend. It seemed like there wasn't anything to lose by giving the pumpkin bread pudding a fourth try at perfection.


A lot of lessons were learned on the road to this fabulous baked french toast bread pudding. Brioche bread makes better bread pudding than french bread. If you do chose to use french or country bread, try to use drier day old bread.

More bourbon for me and less for the bread pudding. Too much for the pudding and it gets a sick texture and taste. Same goes for too much bourbon for me, but that's a whole other story. Be sure to really let all the bread get well coated with the pumpkin custard mixture. Keep stirring it in a large bowl, until it is mostly all absorbed. Its important.


If you find the texture of bread pudding unpleasant, this may be for you. Its more like french toast, hence the name. It's super delicious and not too sweet. Double it to feed a crowd french toast, minus the hour standing in front of the griddle, for breakfast, on Thanksgiving morning. Give it a try with ice cream and caramel sauce, for dessert.

xo
April

Serves: 6
Ingredients:
5 cups brioche bread (11 ounces), cut into 1-inch cubes
1 cup heavy cream
1/4 cup whole milk
2 whole large eggs, 1 large egg yolk
1 tablespoon and 1 teaspoon bourbon
1/2 cup sugar
2/3 cup pumpkin
1/4 teaspoon salt
1 teaspoon cinnamon
1/4 teaspoon ginger
1/8 teaspoon allspice
1/4 teaspoon nutmeg
pinch ground cloves

Instructions:
  1. Preheat oven to 350F, with rack in middle.
  2. Whisk together the cream, milk, eggs, sugar, pumpkin, spices and bourbon in a medium bowl.
  3. In another large bowl, pour the custard mixture over the bread cubes. Toss the bread cubes until well coated and mostly absorbed. Transfer to a 8x8 inch ungreased baking dish and bake until custard is set, 25-30 minutes.
Adapted from Gourmet

Wednesday, September 26, 2012

Red Tomato Hash

People have been asking me a lot lately how school is going. My response is usually its been going for three weeks too many. That is right people, can't a girl just be ready to be done with school? We have all been there, right?


The best part of my semester, maybe the second best class ever taken at UW-Madison, is my 50 minutes of relaxation twice a week. It is pretty awesome. We stretch, relax, clear our minds, focus on breathing, all that cool stuff. I'm going to be a zen relaxation machine come December.


You may wonder to yourself, what could be a more awesome class than that? A literature class dedicated to J.R.R Tolkien. What I have to read The Hobbit tonight? Well, I am not going to argue with that, ever. Speaking of being a total LOTR nerd, who is way excited for The Hobbit movie to come out December 14th? I don't even care that it is right before finals week, I will be there at midnight.


Enough LOTR nerd talk and on to this hash. It is pretty delicious and fairly easy. You roast some tomatoes, garlic and jalapenos. Don't be afraid to let the tomatoes get really blackened, it makes the salsa more thick and delicious. Add it all to a food processor, making it a chunky salsa consistency. Finally toss in some finely chopped onion and cilantro and done.


You can also double the tomato salsa and get salsa one day and hash the next. I do suggest, depending on how hot your peppers are, one jalapeno for salsa and two for hash. The peppers I used, where like crazy stupid hot. Locally grown for the win. Grocery store jalapenos, weak.


After you make the salsa you cook up some onion and other vegetables you have on hand, in a non-stick skillet, with a little oil. Then add some salsa to the skillet, letting it reduce and thicken. Finally add some roughly mashed potatoes, stirring occasionally letting everything get all golden delicious before shoveling into your mouth.

xo
April

Ingredients:
Salsa:
1 pound (3 medium) tomatoes
1-2 fresh jalapeno chiles
3 garlic cloves, unpeeled
1/2 teaspoon salt
1/2 small onion, finely chopped
1/3 cup chopped cilantro
1 1/2 teaspoons cider vinegar

Hash:
1/2 small onion, chopped
1 medium red bell pepper, chopped
1 ear corn, kernels removed
3 cups roughly mashed red potatoes (from about 2 pounds boiled potatoes)
3 tablespoons vegetable oil

Instructions:
  1. Lay the tomatoes on a rimmed baking sheet and place about 4 inches under a hot broiler. Roast until blistered and blackened on one side, about 6 minutes. Remove the baking sheet from the oven, flipping the tomatoes over and adding the jalapenos. Return the baking sheet to the oven and continue to broil for 6 minutes, at 3 minutes, add the unpeeled garlic cloves to the baking sheet.
  2. Cool, then peel the skins off the tomatoes and garlic and stem and seed the jalapenos. In a food processor, grind the jalapenos, garlic and 1/2 teaspoon salt to a paste. Add the tomatoes to the paste, pulsing several times to achieve a coarse puree.
  3. In a strainer, rinse the onion under running water, shake off any excess and add to the salsa, along with the cilantro and vinegar. (At this point you could use this as a salsa or continue on to make the hash).
  4. In a large non-stick skillet over medium heat, fry the onion, pepper and corn in the vegetable oil for 5-8 minutes. Add 1 1/2 cups of the salsa and cook until thick and reduced, about 5 minutes. Finally stir in the 3 cups of coarsely mashed potatoes, continuing to fry and turn everything together until the potatoes brown and the mixtures holds together, about 5-10 minutes.
  5. Serve the hash with a fried or poached egg.
Adapted from Ricky Bayless


Friday, July 6, 2012

Funfetti Birthday Cake Doughnuts


These are the best doughnuts I have ever made! They may be close to the best doughnut I have ever had, or at least right up there. This is saying a lot because I love doughnuts. AKA I eat and try loads of them, whenever I get a chance.


These make the perfect alternative to cake, when you plan to celebrate a birthday at 10AM. Although, I am not above eating cake for breakfast some people are. Put cake in a doughnut form and BAM you've got yourself breakfast. All those eating cake for breakfast haters think they aren't eating cake, but they are. Tricky.

This recipe is awesome too, so easy. I made these before work, managing to fry and photograph them and then drive 20 minutes to work. There was only a little bit of rushing, but then again I lolly gag a lot.  Doing things like taking pictures with my phone instead of my camera. Ending up with a better pictures on my phone actually. Can you tell which one it is? 


The hardest part about making them for me was getting the oil to the proper temperature. I think it is my lack of patience, turning the heat to high does not save you time. It just makes you have to wait for the oil to cool back down, lame.

In addition to being easy, these just taste  and look amazing. Not too sweet. A little bit crispy on the outside and moist on the inside. Other recipes I have tried in the past tend to be dry or have a weird filmy-skin on the outside. Yuck. Come one who doesn't love rainbow sprinkles, too cute. They are even good a several hours after frying, if they last that long! They won't last that long though, trust me. 

xo
April

Adapted from Spoon Fork Bacon
Ingredients:
1 quart vegetable oil
Doughnuts:
1 tablespoon vegetable shortening
1 egg yolk
1/2cup granulated sugar
1 3/4 cup plus 2 tablespoons all-purpose flour
1 tablespoon baking powder
1/2 cup (3 ounce) jimmie sprinkles
1/2 teaspoon salt
1/2 cup whole milk
3/4 teaspoon vanilla
Glaze:
1 cup powdered sugar
1-2 tablespoons whole milk, depending on desired consitency
1/2 teaspoon vanilla
Sprinkles

Instructions:

  1. Preheat the oil to 365F
  2. Whisk together the shortening, egg yolk and sugar, until well combined.
  3. In another bowl, whisk together the flour, baking powder, sprinkles and salt. Combine the milk and vanilla, in a measuring cup.
  4. Alternate adding the flour and milk to the sugar mixture until the dough just comes together. 
  5. Turn the dough out onto a clean surface and knead until smooth, 3 to 5 minutes.
  6. Lightly flour the surface and roll the dough out to 1/2 inch thick.
  7. Use a 2 to 2 1/2 inch circular cookie cutter, glass, or mason jar lid to cut out the doughnuts. Use a small piping tip, 1/2 inch, to cut out doughnut holes.
  8. Carefully drop 3 to 4 doughnuts into the oil frying for 2 1/2 minutes, flipping the doughnuts after 1 minute.
  9. Drain on paper towels and repeat until all the doughnuts have been, re-rolling the scraps to make more doughnuts.
  10. For the glaze: whisk all the ingredients together, until smooth. Dip each doughnut top into the glaze, topping with sprinkles. Serve warm or at room temperature.


LinkWithin

Related Posts Plugin for WordPress, Blogger...