Showing posts with label vegetables. Show all posts

Thursday, April 9, 2015

Strawberry and Mixed Greens Salad


A couple of months ago I shared by go-to lunch salad, a sweet potato and mixed greens salad.  Honestly, after eating it almost daily for a month straight, my love for that salad faded (don't worry, I'm sure I will become obsessed again in the future because it's too tasty not too!)

Recently I decided to revamp it a bit to make it a little less wintery, and a little more springy.  While it's nowhere near strawberry season in Wisconsin, it must be it other places because they're all over at the grocery store in a rich red color and at such great prices!  Fresh, sweet strawberries replace the cinnamon honey roasted sweet potatoes while a salty, light feta steps in for the tangy goat cheese crumbles.  This salad is also topped with a sprinkling of craisins and a small handful of pecans.  If you're looking for a little more protein to round out this salad, go ahead and throw on some grilled chicken or some quinoa.  Feel free to customize with whatever you have on hand!


As you can see, after I photographed this beauty I threw it in a tupperware to take for my work lunch.  I suggest keeping the dressing separate if you're doing this as the balsamic vinaigrette can really eat away at the lettuce and by lunchtime it'll be really soggy.  If you don't have little dressing containers like I do, I'm intrigued with the mason jar salads as well.  If you're going to do that, I would suggest putting the dressing in first, then top with the pecans, craisins and feta, then throw in the strawberries and put the lettuce on top.  If you give it a try, let me know how it goes!


Ingredients:

  • 2-3 cups spring mix lettuce (or other choice of greens)
  • 1/4 cup strawberries, quartered
  • 2 tablespoons craisins
  • 2 tablespoons feta, crumbled
  • 1/8 cup pecans (or other choice of nut)
  • 2-3 tablespoons balsamic vinaigrette

Directions:

  1. Spread spring mix lettuce over large plate or bowl.
  2. Top with strawberries, craisins, feta and pecans.
  3. Drizzle with balsamic vinaigrette.
  4. Toss and enjoy!
If you like this salad, you may also like:

Monday, March 2, 2015

Winter Vegetable Chowder with Crispy Brussel Sprouts and Bacon

This should be called "almost vegetarian winter vegetable chowder," but it is not called that. The name was too long to fit in the allotted space.


That is how we should think of it though - almost vegetarian. Omit the bacon and you've got yourself a vegetarian situation. 

You could go even farther and hold the splash of milk and you'd have yourself a vegan party in a bowl.

Personally, I need the bacon in here. It adds some smoke and a meaty quality. It makes me think of this as more of a meal. Versus a bowl of flavored water and vegetables.

Actually, I could be a vegetarian, if and only if I could keep bacon and sausage. Basically anything pork. I don't really care for the other meats so much, but I do love the dirtiest meat of them all.  


There are lots of people who choose to eat all the meats but pork. I'm the opposite of that. I digress.


It is still healthy with the bacon. Bacon is good for you.

Enough talk about my love affair with bacon and other pork products. This recipe is flexible. I went heavy on the cauliflower because I love cauliflower. Love it.

You could use some celery root, squash, sweet potatoes. Whatever floats your boat.


I added a can of white beans to thicken it up and for a bit of protein. It is finished with some lemon juice, for brightness. 


Lemon truly brightens the whole thing up. Don't skip it. If you forgot to buy a lemon, substitute a splash of cider vinegar. It gets finished off with a small splash of milk too for creaminess.

The chowder is fairly creamy all on its own, but it is no cows milk creamy. You know what I mean? Love me some dairy. Again you can be flexible, work with what you have and like.

The crispy sprouts on top add a little color and texture. I love brussel sprouts. They are the best. Even better with crumbled bacon. I think this would be great with some crumbled goat cheese on top. Be creative. 

Reheating this was a breeze too. It thickens up though. Add some water to thin it out or do like me and pour it over some rice. Variety and flexibility. Words we should all live by.


One word of caution, easy on the salt. Taste as you go. The mustard and lemon combine for a pleasantly salty vibe, but you don't want to go crazy. Not the mention canned beans can have a lot of added salt too.

xo
April   

Ingredients:
for the chowder:
3 slices, bacon
1 large cooking onion, small dice (1 3/4 cups)
1 leek, small dice (white + light green part only)
6 cloves of garlic, minced

2 large carrots, peeled and chopped
4-5 thyme sprigs, leaves removed and chopped
1-2 parsnips, peeled and chopped (1 1/2 cups)
1 large head of small-chopped cauliflower florets
1 ½ tbsp grainy mustard
salt + pepper to taste
1 tsp Old Bay Seasoning

1 can (16 oz) can white beans, drained and rinsed
 

1/4 cup lemon juice
3 1/2 cups vegetable stock

1/3 cup heavy cream 

for the crispy brussel sprouts:
10 brussel sprouts, sliced
2 teaspoons olive oil
1/2 teaspoon Old Bay Seasoning 

Instructions:
Preheat the oven to 400 degrees F. Line a baking sheet with parchment paper and set aside.
Heat a large, heavy soup pot over medium heat. Add the bacon, cooking 8 to 10 minutes, until crispy. Remove and drain bacon, leaving about 2 tablespoons in the pan, setting the bacon aside for later. 
Add the diced onions to the pot and sauté until soft and translucent, about 4-5 minutes. Add the leeks and continue to sauté until the leeks are soft, about 4 minutes more. Add the minced garlic and thyme to the pot and cook until fragrant, about 1 minute, stirring constantly. Add the chopped parsnips and cauliflower florets to the pot and stir to coat in the oil. Add the grainy mustard, salt + pepper to taste, and Old Bay. Stir to coat all the vegetables in spice. 
Add the lemon juice to the pot and stir. Add the vegetable stock to the pot, stir again, cover and bring to a boil. Once boiling, remove the lid and lower heat to simmer. Let the chowder cook and bubble until the parsnips and celery root pieces are tender, about 15-18 minutes.
Ladle half of the chowder into an upright blender, with the white beans, and carefully purée until smooth. Pour puréed portion of chowder back into the soup pot and bring it back to a boil. Reduce heat to low, adding the cream, stirring to combine. Check the chowder for seasoning, adjust and serve hot. (you could also use an immersion blender, be careful to leave enough whole vegetable pieces.)
While the chowder is simmering/cooking, make the crispy Brussels sprouts. Place the sliced sprouts onto a parchment lined baking sheet. Pour the 2 tsp of olive oil over top, season with salt and pepper and a generous pinch of Old Bay seasoning. Toss lightly to combine and spread sprouts evenly on the baking sheet. Slide the sheet into the oven and roast for 10 to 12 minutes, or until browned on the and crispy. You'll want to stir them once while they are roasting. Serve warm sprouts on top of the hot vegetable chowder, with crumbled bacon.

Adapated from The First Mess

Wednesday, February 25, 2015

Sweet Potato and Mixed Greens Salad

Lately I've been trying to work more and more on developing my own recipes and just sort of winging it when I'm in the kitchen.  I'm becoming more confident in my ability to cook intuitively as I become more comfortable with different spices and ingredients.


I've found that it's best to have some inspiration when getting going and one of the best types of inspiration I've found is thinking about meals that I've really enjoyed from a restaurant or other food establishment and trying to copy it, maybe not to a tee, but at least as a base.  As I have mentioned before on the blog, the Good Food cart is one of my favorite places to grab lunch when I'm at work and you better believe that it inspired this Sweet Potato and Mixed Greens Salad.


A bed of mixed greens are topped with cinnamon honey roasted sweet potatoes, craisins, pecans and crumbles of tangy goat cheese.  The finishing touches come from a homemade balsamic vinaigrette.  I can be lazy at times so I usually just toss some pecans on the salad right out of the bag, but feel free to toast them or even go a little crazy and use candied pecans.  If you'd like a little more protein go ahead and throw on some chicken breast.  One of the great things about salads is they can be so easily customizable depending on your tastes by swapping out ingredients or switching up the proportions.

The recipe below is for one personal size salad that serves as the main dish for the meal.  I've increased the quantities at times as well to serve multiple people, just use your best judgement.  Be careful though, because the toppings tend to sink to the bottom of the serving dish!

Enjoy!
Kelsey


Ingredients:
  • 2-3 cups loosely packed greens, depending on what lettuce to toppings ratio you prefer (I like to use a spring mix for the greens)
  • 1/4 cup cinnamon honey roasted sweet potatoes
  • 3 tablespoons craisins
  • 2 tablespoons goat cheese, crumbled
  • 1/8 cup pecans
  • 2 tablespoons balsamic vinaigrette
Directions:
  1. Spread greens over large plate or bowl.
  2. Top with sweet potatoes, craisins, goat cheese and pecans.  Drizzle with balsamic vinaigrette dressing.
  3. Toss as desired and enjoy!


Wednesday, January 28, 2015

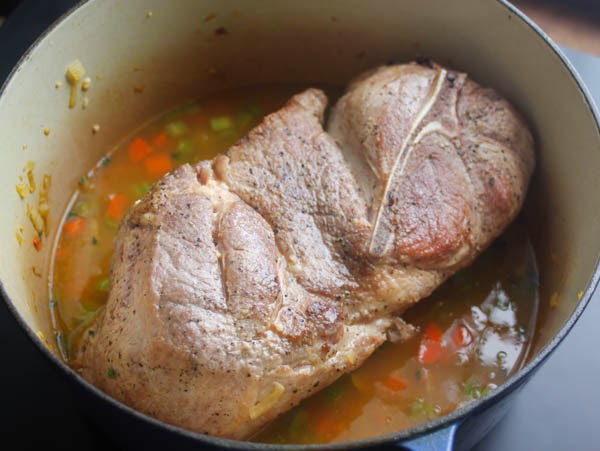
Apple Cider Braised Pork with Apples, Fennel and Potatoes

Does anyone else have the winter blues? This pork is the perfect fix.


The winter hasn't even been that bad here in Wisconsin. No blizzards. Only a few days with below zero wind chills. I'm just so excited for warmer weather but mostly for school to be over.

Braising is the best. This could probably be done in a slow cooker, with less liquid. This recipe was also intended for the Fall, when there was a plethora of apples, but it works for winter too. Am I right? I am. Thanks for agreeing.

When braising, the initial steps are key for a delicious finished product. Searing the meat, getting a nice caramelized exterior is key for flavor.

Sauteing the mirepoix (fancy for carrots, onions and celery etc.) in the drippings. You want a caramel-y brown color without scorching anything. Balance is key.


Step three is deglaze the pan, with brandy in this case, getting all of those caramelized brown bits off the bottom of the pan. Flavor city. Little flavor bombs. Tiny, yet powerful! Be sure to scrap the bottom of the pan.

Then you add your braising liquid. Enough to go about 1/3 to 1/2 way up your pork butt. We aren't boiling our pork. We are braising. Give the liquid a hand, bringing it to a simmer on the stove and then put it in the oven.

Forget about it for awhile. Simple.

In the last 45 minutes, add your vegetable. Take it to the next level. Fennel and apple add some flavor to the broth, making a nice aromatic of sorts.

Potatoes cooked in with all that flavorful sauce are perfect for serving.

One-pot meal!


This makes a ton of meat. Probably more meat than potato-veg mash. I ended up using leftover meat for tacos, tossing it in some store bought sauce and making a soup.

I would have been eating the same thing twice a day for at least a week otherwise. I need more variety in my meals.
This is a really impressive meal, with minimal effort. Just a little bit of preparation and planning. Braising is really easy, with a crazy flavor impact for such little labor.

Pork not your thing? Chicken could work really well in here too. Or turkey!


I mashed all the veg together to make a little bed for the meat. Not necessary, but that is my preferred vessel for meat of this sort.

The apple cider adds a caramel-y, tangy, sweetness to the whole dish and the fennel and lemon zest add brightness and a little something unexpected. It isn't too sweet though.

Finishing the whole thing off with a little cider vinegar adds brightness, cutting the sweetness. It really makes a difference. Rounds the whole dish out. Promise.

Cheers,
April

Serves 5 to 6 

Ingredients

4 to 5 lb. pork butt
3 Tbs. vegetable oil
Kosher salt
ground black pepper
2 celery stalks, diced
2 carrots, peeled and diced
1 medium onion diced
2 whole dried bay leaves
1 Tbs. chopped fresh thyme
1 Tbs. finely chopped garlic
Zest of half a lemon, wide strips (3-4 strips)
1/4 cup brandy, apple brandy if you have it
1-1/2 cup lower-salt chicken broth
1-1/2 cup apple cider 
1 medium fennel bulb, diced
1 apple, peeled and diced
6 to 8 small red potatoes
1 to 2 tsp. cider vinegar
Instructions
Position a rack in the center of the oven and heat the oven to 325°F. In an 8-quart Dutch oven, heat 2 Tbs. of the oil over medium heat. Season the pork with salt and pepper. Add pork to the pot, and cook, turning with tongs, until nicely browned on all sides, 3 to 4 minutes per side. Pour off all but a thin layer of fat from the pan.

Add the remaining 1 Tbs. oil, carrots, celery and onions to the pan. Season with 1/2 tsp. salt. Cook, stirring and scraping up any browned bits on the bottom of the pan, until the aromatics are soft and lightly browned, 6 to 8 minutes. Add bay leaves, lemon zest, thyme, and garlic, and cook, stirring, until well distributed and fragrant, about 1 minute.

Pour the brandy into the pot and cook, stirring to scrape up any browned bits on the bottom of the pot, until the liquid is reduced to about 2 Tbs., about 1 minute.

Transfer the pork (and any juices that have accumulated) back into the pot. Pour the chicken broth and apple cider over the ribs.

Bring the liquid to a simmer, cover, and put the pot in the oven. Cook, turning the pork with tongs after about an hour, total cooking times is about 2 to 3 hours. In the last 45 minutes of cooking, add the apples, fennel and potatoes, until the potatoes are fork tender and the meat is falling off the bone. (The meat may fall off most of the bone about midway through cooking; this does not mean that the ribs are fully tender.)

Transfer the ribs to a serving platter or dish. Let the sauce and solids sit in the pot for a few minutes to cool and with a shallow spoon, skim off as much of the fat as possible from the surface. Season the sauce to taste with salt and pepper, and add the vinegar.

Optional: spoon out the vegetables, mashing them, making a chunky mashed potato mixture. Then reduce the sauce for 10 to 15 minutes, making a sort of gravy. Serve the meat over the potatoes, drizzled with the reduced sauce.

Tuesday, January 20, 2015

Mixed Greens with Roasted Beets, Pomegranate Dressing and Goat Cheese

Oh my word. This might be my favorite salad of all time. Prepare yourself.


The colors are beautiful. Are they not? You can't deny it. All those reds and oranges. Possibly the perfect Valentines day salad? I might be getting ahead of myself here.

It might be because this salad was supposed to be posted before Christmas, again due to its beautiful reds and some green; therefore, I don't care if its too soon to think about Valentines day.

It is just too pretty, but too tasty not to eat.


Valentines day is a total hallmark holiday scam, but it is just another holiday excuse to eat lots of chocolate and make something extra fancy special for dinner.

I actually do that most weeks anyways, but its good excuse to have. It makes me feel more normal.

In all reality, I will probably be ordering a extra large pizza with my main man, watching The Big Lebowski, drinking white Russians.

Pizza is my favorite and white Russians are his. His and hers. Too cute.


I digress, but this is all connected to the salad. Trust me.

It is truly maybe my favorite salad I've ever made at home. Ever. It borders right on unhealthy and healthy, depending on your veggie to cheese ratio. My cheese ratio is usually, always high.

Don't let the beets scare you. They are tender, like butter and almost sweet, with a hint of earthiness.

The dressing is just the right amount of thick, creamy, a little sweet and tart. It is dreamy. I'm not one to eat salad for dinner or enjoy salad very much.


 I try very hard. I would just rather a big bowl of carbs and cheese. This salad I ate for a whole week straight. All the ingredients, dressing included keep for for at least a week.

Pomegranate molasses might be hard to find. I hear Whole Foods sells it, but you can always make it too. I used this recipe.

The salad toppings are also very customizable. I bet raspberries or strawberries would make great substitution for the pomegranate seeds.

A nice blue cheese would work well here too, in place of the goat cheese. Walnuts or sunflower seeds would be tasty too, depending on what you have in your pantry.


xo,
April

Mixed Greens with Roasted Beets, Pomegranate Dressing and Goat Cheese
Serves 4 to 6
Ingredients:
for dressing:
3 tablespoons pomegranate molasses
1 tablespoon honey
1 tablespoon red cooking wine
1 tablespoon balsamic vinegar
3 tablespoons extra virgin olive oil
2 teaspoons Dijon mustard
Salt
Pepper

for salad:
Spring mix
6 to 8 small beets, roasted, peeled and cut into bite sized pieces
Goat cheese, crumbled
Pumpkin seeds
Pomegranate seeds

Instructions:
roasted beets:
Preheat the oven to 400F. Wrap beets in tin foil, in a single layer (you may need to make two tin foil packages). Roast the beets for 40 to 60 minutes or until fork tender. Let the beets cool until able to handle and then peel.
for dressing:
Combine all the ingredients in a medium mason jar and shake to combine. Dressing will keep for up to a week in the refrigerator
for the salad:
In a large bowl, combine the greens, beets and desired amount of dressing, tossing to coat.
Divide among plates, topping each with a sprinkle of pumpkin seeds, goat cheese and pomegranate seeds.

Wednesday, November 5, 2014

Sweet Potato Hash with Carmalized Onions, Chorizo and Eggs

Its about that time to start thinking about the holidays and what you are going to be making for holiday dinners and gatherings! Its the best time of year. I wish I had a bit more time to think and plan these things, but honestly school has really gotten the best of me.

My mom doesn't know it yet, but Thanksgiving dinner is all hers this year. Usually I claim things. By things I mean every single holiday that calls for a meal. What I will lay claim to is breakfast the morning after!


This here hash is the perfect make-ahead breakfast for a crowd. Its more creative than your standard egg bake too. Really wow your guests. I actually made this on a Thursday night and then cooked 2/3 of it on Sunday morning for friends that were visiting.

Who doesn't love a runny eggs?! Crazy people. No offense, but seriously! I will never understand how you couldn't like a runny egg yolk. It acts like a magical dressing for whatever it sits on top of. Delicious, silky, greatness. Food porn at its finest.

For those who prefer a hard cooked egg, don't worry. Your eggs can take a trip into the oven for an extra five minutes. After five minutes, take out the hash and add the rest of the eggs for another 10 minutes.


The meat and potatoes are also very flexible. I think a nice breakfast sausage, with sweet or russet potatoes would be delicious, maybe will a little bacon and maple syrup. For a more smoky take you could use andouille sausage.

The chorizo that I used here makes your kitchen smell divine. A sort of sweet, peppery and smoky party for your nose. I think it is the paprika, which might be my newest spice obsession.  I got my chorizo at Whole Foods, if you can't find it you could substitute any other sausage you see fit.


The preparation of the hash is a bit labor intensive but totally worth it! Reheating the hash with the eggs is what really makes the hash special. Its bottom layer gets super crunchy, but the top layer of taters are still soft. Sweet, with a little hint of spice. I think chorizo and sweet potatoes were made for eachother.

Because I only served 2/3 of it to my friends, I cooked up the rest for these here photos and ate it for lunch the next two days. If you don't have a huge crowd to feed, still make the whole batch and treat yourself throughout the week to a special breakfast.


You, you're guests and bellies will not regret this. It is a must make for the upcoming holiday season and will make your house smell delicious!

xo
April


Adapted from The Kitchn
Serves 5-8
Ingredients:
for the hash:
2 large onions, thinly sliced into half-moons
1 tablespoon unsalted butter
Kosher salt
1 1/4 pound fresh chorizo

3 pounds sweet potatoes, about 3 large potatoes, cut into 1/2-inch cubes
6 large garlic cloves, minced
3 tablespoons olive oil
1 tablespoon kosher salt, plus more to taste if necessary
Freshly ground black pepper

To serve:
Large eggs
Kosher salt and freshly ground black pepper

Instructions:
To make the hash:
Heat the oven to 450°F. Place the sausage in a large skillet and brown over medium-high heat, chopping it up into fine crumbles with a spatula. Cook the sausage for about 10 minutes, or until it is browned and beginning to crisp. Drain the sausage, reserving 1 tablespoon fat and set aside, in a large bowl (large enough that you can mix everything together before it goes onto a baking sheet and into the oven).

While the sausage cooks, peel the onions and cut them in half lengthwise, then cut them into thin half-moons. Cut the half-moons in half. In the same skillet, melt the butter with the drippings, over medium-high heat. When it foams up add the onions and sprinkle lightly with salt. (Don't worry if they are crammed into the pan; they will rapidly cook down.) Lower the heat slightly and cook the onions for about 20-30 minutes, stirring occasionally, and lowering the heat if they seem to be burning. Cook them until they are dark brown.

While the onions are cooking, chop the unpeeled sweet potatoes into cubes that are about 1/2-inch to a side. Finely mince the garlic and toss it in a large bowl with the sweet potatoes and sausage. Toss with the olive oil, kosher salt, and a generous helping of black pepper.

When the onions are dark brown, stir these into the sweet potatoes as well. Line a large baking sheet with foil or parchment paper, and spread out the sweet potatoes evenly, depending on the size of you baking sheets you may need to use two. Roast the sweet potatoes for 30 to 45 minutes (roasting time depends on the size and uniformity of the sweet potato chunks, as well as the variety of sweet potato you buy) or until they are soft and browned.

Refrigerate the cooled hash for up to 5 days.

To serve:
Heat the oven to 425°F. Spread a relatively thin layer of the (already cooked) sweet potato hash in a baking dish, such as a cast iron skillet or a 9x13-inch baking dish (I've done it with both). You can also bake in individual ramekins. Make small wells in the sweet potatoes and crack in large eggs. Sprinkle lightly with salt and pepper.

Bake for 12 to 15 minutes for a runny yolk and 15 to 20 minutes for a hard cooked egg. (Test the eggs by prodding them with a fork to check the firmness of the white and the yolk; baked eggs are deceptive in that the white often looks much less cooked than it really is.)

Wednesday, September 10, 2014

Greek Hummus Dip

Calling all football fans!  Ok, fine, even if you don't like football but are just a fan of munchies you're welcome too!  Throughout September we'll be bringing you recipes that are perfect for tailgating outside of Camp Randall Stadium or watching the Green Bay Packers play on a Sunday afternoon from the comfort of your couch. (Go ahead and insert your own favorite football team if you must.)  These munchies and snacks are the perfect compliment to any football experience!


Truth be told, the first time I made this Greek Hummus Dip was actually for my sister's baby shower.  But don't worry, I know it's football worthy because during said baby shower my dad and brother were downstairs in the man cave watching football and they kept coming upstairs to steal food, with this dip being one of their main targets.

I'm halfway convinced that my dad mainly enjoys dips because they give him an excuse to eat a whole bunch of chips.  His go-to dip is some sort of melted Velveeta concoction, which might be tasty, but when I sit down to enjoy some munchies I know that I usually end up enjoying a few too many so it's better to go with something a little easier on the waistline.


This Greek Hummus Dip is a great healthier alternative.  The base layer of hummus is packed with protein which is then topped with a variety of fresh veggies, dill, olives and my favorite cheese, feta!  Pita chips or veggies are my preferred dipping receptacles.  I like to think of this as the Mediterranean version of taco dip because it has all the same elements, the end result is just a different flavor.

I chose to use Sabra Roasted Pine Nut as my flavor of hummus because I don't like the hummus overpowering the fresh flavor of the toppings, but feel free to use whatever flavor you'd like.  I like using diced red bell pepper as a topping because of the color it adds but green would work as well.  Kalamata olives are seriously one of my favorite things, but if you have green or black olives on hand, go ahead and use those instead.  This is a very easy recipe to accommodate to your tastes or what ingredients you already have on hand.


Enjoy!
Kelsey

Ingredients
  • 16 oz hummus, your choice of flavor
  • 1 small cucumber, diced
  • 1 red bell pepper, diced
  • 1/4 cup kalamata olives, diced
  • 1/4 cup feta cheese, crumbled
  • 1 tablespoon dill
Directions
  1. In a serving dish, evenly spread a layer of hummus.
  2. Sprinkle cucumber, red bell pepper, kalamata olives, feta cheese and dill over hummus so it is evenly dispersed and all hummus is covered.
  3. Enjoy with your favorite choice of scooping device, like pita chips or vegetables.
Two Years Ago: Green Olive Red Noodles

Friday, August 29, 2014

Zucchini Chocolate Chip Muffins


I've been trying to make a conscious effort to eat healthier which is why lately I've been using zucchini to justify all things baked goods.  I also use baked goods on the regular to justify my chocolate addiction, so this recipe is really a win-win.  But fo cereal, aside from begging every single person I know to take six pound zucchinis off my hands I've grating them up and tossing them in zucchini bread, zucchini brownies and now these zucchini chocolate chip muffins because everything is better in single servings, plus don't forget they're "healthy" so you can really eat two or three.


But don't worry, I've been eating zucchini the real healthy way too, slicing these bad boys and either roasting or sauteing them as well.  I've got another 10 months until wedding bells ring but only a couple until the hunt for the perfect white dress takes place and I'm hoping to have a good start on being in wedding dress shape by then.

These muffins honestly aren't the healthiest thing I could be eating, but they're a smarter option for satisfy a sweet tooth and because they're already separated into servings, you can easily freeze them and pull one or two out to thaw every few days instead of chowing down for a week straight.


If you want to try lightening them up a little more, consider halving or skipping altogether the chocolate chips and/or streusel topping.  I ended up only using about two-thirds of the topping on mine.  I'm warning you now though, you will risk getting your chocolate fix from these muffins if you omit the chocolate chips and might find yourself eating them out of the bag instead anyways!

Happy Labor Day weekend everyone!
Kelsey

Yields 22 muffins.

Ingredients

Brown Sugar Oat Streusel
  • 1 1/3 cup oats (old fashioned or quick)
  • 1 cup brown sugar
  • 4 tablespoons all-purpose flour
  • 1 teaspoon ground cinnamon
  • 1/2 cup unsalted butter, cold
Zucchini Muffins
  • 2 large eggs, beaten
  • 1 cup brown sugar
  • 1 cup granulated sugar
  • 1/2 cup canola oil
  • 1/2 cup unsweetened applesauce
  • 2 cups grated zucchini
  • 4 teaspoons vanilla extract
  • 2 cups all-purpose flour
  • 1 cup whole-wheat flour
  • 1 teaspoon baking powder
  • 1 teaspoon baking soda
  • 1 teaspoon salt
  • 4 teaspoons ground cinnamon
  • 1/2 teaspoon ground nutmeg
  • 1 1/2 cups semi-sweet chocolate chips
Directions
  1. Preheat oven to 425 degrees.  Grease or line muffin tins.
  2. In a medium bowl, add oats, brown sugar, flour, cinnamon and butter for the brown sugar oat streusel.  Using your hands, combine ingredients until they are well mixed and crumbly.  Set aside for later.
  3. In a different medium sized bowl, whisk together eggs, brown sugar, granulated sugar, canola oil, applesauce, zucchini and vanilla extract.
  4. Using a large bowl and large rubber spatula, combine flours, baking powder, baking soda, salt, cinnamon, nutmeg and chocolate chips.
  5. Pour the wet ingredients into the large bowl with the dry ingredients and mix with the rubber spatula until just combined.
  6. Using a 1/4 cup measuring cup, transfer batter into prepared muffin tin.  Top each muffin fully with crumbled streusel mixture.
  7. Bake for 5 minutes at 425 degrees before lowering the temperature to 350 degrees for an additional 14 minutes, or until toothpick inserted in the center comes out clean.  Let cool for 5 minutes before removing from muffin tin.
Recipe adapted from Sally's Baking Addiction (also includes bread version).

Wednesday, August 27, 2014

Skillet Chicken with Cherry Tomatoes and Garlic

It's the last Wednesday in August so you know what that means, the last installment of Tomato Month!  We've already brought you a salad, a pasta and a sandwich, so now I'm coming at you with this Skillet Chicken with Cherry Tomatoes and Garlic.


One thing that having a garden has really helped me with is eating more seasonable produce.  You're basically forcing it on yourself because, well, it pops up in your garden right when it's in season.  Besides when you grow it yourself, there are just so many other benefits to eating seasonably; from lower prices to having it likely grown locally so you're probably helping small businesses and farmers (especially if you hit up the farmer's market on the regular) while also reducing your produce's carbon footprint.


This dish is really a great way to maximize on seasonable produce right now.  Raise your hand if you have tomatoes coming out of your ears.  Yup, me too.  And while I love just popping cherry tomatoes in my mouth as a snack or tossing them in a salad, it's great to mix up the flavors a little bit and this skillet chicken definitely delivers on flavor.  The seasoned chicken tastes totally delicious and every time you bite into a cherry tomato it's like a miniature explosion of juices in your mouth.  Not only is it tasty but it definitely falls into the healthy category and takes minimal time and effort to make so it's a perfect weeknight dinner option.

Hope you enjoy!
Kelsey

Ingredients
  • 2 large chicken breasts (I cut mine in half so they would cook better)
  • 1/2 teaspoon salt
  • 1/2 teaspoon black pepper
  • 1/2 teaspoon crushed red pepper
  • 1 tablespoon olive oil
  • 2 cups cherry tomatoes
  • 2 large garlic cloves, minced
  • 3 tablespoons cider vinegar
  • 2 tablespoons water
  • 1 teaspoon Italian seasoning
Directions
  1. Spray large skillet with non-stick spray and set over medium heat.  Sprinkle chicken breasts with 1/4 teaspoon salt, 1/4 teaspoon pepper and 1/4 teaspoon crushed red pepper.  Add chicken to heated skillet and cook until golden and cooked through, about 15 minutes depending on size.  Try to only flip chicken once.  Remove from skillet and set aside.
  2. Add olive oil to same skillet and heat over medium.  Add garlic and tomatoes and stir until garlic is golden, 1-2 minutes.  Add water, vinegar, Italian seasoning, 1/4 teaspoon salt, 1/4 teaspoon pepper and 1/4 teaspoon crushed red pepper.  Continue stirring until tomatoes are softened, 2-4 minutes.
  3. Spoon tomato and garlic mixture over chicken breasts and enjoy!

Wednesday, August 6, 2014

Warm Tomato, Arugula and Bacon Panzanella Salad

Its tomato season just about, before you know it tomatoes will be coming out of your ears. Don't worry though because this month on the blog its all about tomatoes!


This is a really simple recipe to throw together. You could even cut it down and make it for one person because the leftovers don't keep. Soggy bread problems, ya know? Speaking of bread problems, this is the perfect salad for day old bread. You want the bread to be a bit dried out so it takes its time absorbing the dressing.

This recipe can really be adjusted to your own tastes as well. Add as much or as little arugula or basil as you want. Play around with it a little bit. Trust your instincts! Add more tomatoes if you want. It is your salad after all. This is just a good foundation to build off of.


I love me some roasted tomatoes. They get all jammy and soft. Delicious. This recipe creates that feeling without having to turn the oven on. The tomatoes get fried up quickly in some bacon fat and they leave behind all their juices in the pan that will make up the bacon dressing eventually.

Surprisingly the bacon isn't over powering as you might expect. It gives just the right amount of salty bacon flavor and crunchy topping.The vinegar and mustard add nice balance to the dressing. You could easily use green onions or shallots in replace of the leeks. I just happened to have bought leeks the day before at the farmers market. 


Overall this is a really easy and beautiful salad to throw together for friends. The crispy bread with the juicy tomatoes and rich bacon and spicy arugula go so well together. Try adding some mint for a little extra freshness with the basil. More tomato recipes to come this month! Enjoy!

April


Ingredients:
1 french baguette or french round, cut into 1 inch cubes 
6 slices smoke bacon (3 ounces), cut into 1/4 inch pieces
1 1/2 pints tomatoes, halved
1 leek, sliced

1 tablespoon lemon juice
1 1/2 tablespoons balsamic vinegar
3 1/2 tablespoons olive oil
1 tablespoon Dijon mustard
Salt, to taste
Pepper, to taste

2 handfuls of arugula
Handful of basil

Buratta, mozzarella or goat cheese to serve

Instructions:
  1. Preheat the oven to 300 degrees F. Spread bread in one even layer on a rimmed baking sheet and toast bread in oven for 15 minutes or until the bread is crispy, but not browned. Meanwhile, fry bacon over medium heat, until crispy. Using a slotted spoon, remove bacon from pan, reserving 1 tablespoon of bacon grease. Add the halved tomatoes, cut side down to the pan, cooking over medium heat for 3-5 minutes or until softened and slightly caramelized. Remove the tomatoes, using a slotted spoon again, and set aside. 
  2. Over medium heat, add a tablespoon of oil to the pan and saute the leeks until softened and lightly golden, about 5-7 minutes. Turn off the heat and add the lemon juice, balsamic vinegar, remaining olive oil and dijon mustard. Whisk it all to combine (it will be thick and clumpy, that is okay). Season to taste with salt and pepper. 
  3. In a large bowl, add half the bread and top with half the tomatoes, arugula, basil and dressing. On top of that add the remaining bread and vegetables and dressing and toss to combine. Serve immediately and garnish with some bacon, buratta (or cheese of your choice) and a drizzle of balsamic vinegar.


Friday, July 25, 2014

Zucchini Bread

Back in May when I was picking out the seedlings to plant in my garden, I grabbed one for a zucchini mound kind of on a whim.  I had mostly planned out my garden ahead of time and hadn't been planning on growing zucchini, but boy I'm sure glad I did.


It's been a major confidence booster every since the start.  It was kind of unnerving when two weeks after planting my very first garden, the tomatoes and cucumbers all looked like they were dying but the zucchini was clearly growing.  And when I saw those first blossoms appear, I knew I must be doing something right.  I go one day to find that an actual little zucchini was growing (holy cow I can grow my own food!) and four days later when I go back the same one is now 16 inches long, 4 inches in diameter ripe for the picking.  Talk about success!


That first zucchini that I grew is the special ingredient that went into this zucchini bread.  I knew that I had a lot of the vegetable on hand so I chose to double the recipe and put both of my bread pans to good use.  Two loaves of bread only ended up using about a third of my giant zucchini, plus the four other ones that are sitting in my kitchen right now; I think I've got a lot of roasting to do.


Makes one loaf.

Ingredients:
  • 3/4 cup whole wheat flour
  • 3/4 cup all purpose flour
  • 1/2 cup sugar
  • 1 teaspoon cinnamon
  • 1 teaspoon baking soda
  • 1/2 teaspoon ground nutmeg
  • 1/4 teaspoon salt
  • 1/3 cup canola oil
  • 1/3 cup unsweetened applesauce
  • 2 large eggs
  • 1 1/4 cups coarsely grated zucchini
  • (Optional) 1/3 cup walnuts or chocolate chips
Directions:
  1. Preheat oven to 350 degrees.  Grease loaf pan.
  2. In a large bowl, mix together dry ingredients (flours, sugar, cinnamon, baking soda, nutmeg, and salt).
  3. In a different large bowl, whisk together oil, applesauce, and eggs.  Then stir in the zucchini.
  4. Stir the wet ingredients into the dry ingredients.  Stir in optional additions, such as walnuts or chocolate chips, if desired.
  5. Pour batter into greased loaf pan.  Bake 50-60 minutes, or until a toothpick inserted into the center comes out clean.
  6. Cool on wire rack for 15 minutes before removing bread from pan.

Monday, July 7, 2014

Farmer's Market Stir Fry with Peanut Sauce


I work on the Capitol Square which is also home to the Dane County Farmer's Market on Saturday mornings.  It's said to be the largest produce only farmer's markets in the country which means tons of selection, but also lots of crowds.  Since I'm no longer living in the downtown area, I rarely make the trek on Saturday mornings, but I have gotten in the habit of taking a break at work to head to the much smaller, Wednesday markets.

This past week at the market it seemed like there was a really good variety of vegetables at some great prices, so as I was walking around I decided to get ingredients to make a stir fry.  I had to take a couple laps around the stalls to get all my supplies and ended up with summer squash, green onion, broccoli, asparagus and sugar snap peas.  I also took home a head of lettuce and a couple khalorabi, all for only $13!  Usually when I make stir fry I go with a spicier szechuan sauce, but decided to go with a subtler peanut sauce this time.  It still put lots of flavor in the dish and didn't leave out a little spicy kick either.

Hope you enjoy!

Kelsey


Ingredients:
  • 2 cups brown rice (measured before cooking), cooked
  • 2 chicken breasts, cut into 1 inch pieces
  • Choice of seasonal vegetables (I used sugar snap peas, green onion, asparagus, summer squash and broccoli)
  • Desired amount of peanut sauce (I used about half, or a little over 1/4 cup)
  • Olive oil
For the peanut sauce:
  • 1/4 cup rice vinegar
  • 1/4 cup soy sauce
  • 2 teaspoons granulated sugar
  • 4 teaspoons peanut butter
  • 2 tablespoons water
  • 2 teaspoons Asian chili garlic paste
Adapted from Food and Family.

Directions:
  1. Prepare peanut sauce by mixing ingredients in a small bowl.  Heat in microwave in 20 second increments, stirring in between,  until peanut butter is no longer in large clumps. (It's okay if it's not completely melted into the mixture, the hot skillet will take care of that later.)
  2. Drizzle olive oil in skillet (or wok if you have one) and cook chicken.  Set aside.
  3. Pour desired amount of peanut sauce in skillet and sauté vegetables until they begin to soften.  Add chicken to mixture and stir until coated with sauce.
  4. Serve over rice.
Linking up with Time to Sparkle.

Monday, June 16, 2014

Broccoli Salad

I love cookbooks.  I especially love cookbooks with big, colorful pictures and glossy pages.  I love flipping through them, looking at all the pretty pictures.  Oooing and ahhhhing over them.  Putting sticky notes in all the recipes I plan on making but almost never do because I always default to finding them on the internet instead.


As much as I love all the pretty pictures and glossy pages of a Giada cookbook, there's something to be said about a good old church cookbook.  The kind where all the parish member submit their family recipes and then it's sold as a fundraiser.  It's filled with lots of comfort food, simple, home cook type recipes that isn't usually found in those book publisher deal cookbooks.


When I asked my mom for her recipe for broccoli salad, she sent me a picture of two pages from the church cookbook and told me she took bits and pieces from each of the four broccoli salad recipes to make her own.   I took her advice.  Keeping the mayonnaise, vinegar and sugar dressing, but substituting some Greek yogurt in as well.  The broccoli and bacon was standard, but I decided to throw in raisins, red onion and cashews as well.  The dressing ended up being a little on the generous side, so if your looking to stretch the recipe a little farther or just have some extra broccoli sitting around, I think you could easily use 3.5-4 cups of broccoli bites.

Enjoy!
Kelsey


Ingredients
  • 3 cups broccoli, cut into bite size pieces
  • 10 strips of bacon, crumbled
  • 1/2 cup light mayonnaise
  • 1/2 cup plain fat free Greek yogurt
  • 3 tablespoons sugar
  • 2 tablespoons apple cider vinegar
  • 1/2 cup raisins
  • 1/2 cup diced red onion
  • 1/2 cup cashews
Directions
  1. In a small bowl, stir together mayonnaise, yogurt, sugar and vinegar.
  2. In a large bowl, combine broccoli, raisins, onion and cashews.  Mix in dressing until salad is evenly coated.
  3. Chill in refrigerator until ready to serve.

Thursday, April 24, 2014

Broccoli Cheddar Grilled Cheese


I've been inactively watching nature shows on PBS for the past hour or three while putzing around on the Internet and editing these here photos. Not a lot has been learned, but I have noticed that the music has a very ominous almost spooky thing going on. The scientists and narrator's voices also have a similar vibe happening. Why is this? Has anyone else noticed this?

Maybe it is time for me to change the channel. They must be going for that feel. After all, science can have a sort of awesome and ominous quality to it. Right? Enough of my ramblings about the production qualities of PBS nature shows and more about grilled cheese.


April is grilled cheese month and quite possibly the best month EVER. I don't care if it rains a lot. It is named after me and involves warm cheese between delicious carbs. Enough said.

Broccoli cheddar soup is up there on my favorite soups list. Roasted broccoli is also like vegetable candy for me. It gets all crunchy and roasty on the outside. You can sometimes find me on a wild Friday night drinking wine, watching trashy TV and shoveling a whole head or two of roasted broccoli in my face. You should try it sometime. I live a wild life. No big deal.


I roast extra broccoli and grate extra cheese in anticipation of snacking while I make my sammie. You should do the same. Snacking is inevitable. The addition of the Havarti adds a good melty and creamy quality to the sandwich, mimicking the creaminess of soup.  While the cheddar is obviously necessary to the sandwich and adds a good sharpness.

I have made this sandwich using both sourdough and whole wheat bread, they are equally as good. Go ahead and make your life a bit easier and use whatever bread you have on hand. Celebrate the end of the best month ever and grilled cheese month with this sammie; you won't regret it.

April
 
Ingredients:
Roasted broccoli:
1 head of broccoli
1 tbsp extra virgin olive oil
Kosher salt
Pepper

Sandwich:
1/4 cup roasted broccoli, chopped
2 slices sourdough or french bread
1/3 cup extra sharp cheddar, grated
1/4 cup Havarti, grated
Onion powder
Garlic powder
Pepper
1 tablespoon unsalted butter, softened

Instructions:
Broccoli:
Preheat the oven to 425 degree Fahrenheit. Cut the broccoli florets into bite sized pieces. Toss the broccoli with the olive oil, generous pinch of salt and freshly ground black pepper. Spread the florets evenly onto a baking sheet and roast for 20 minutes or until tender and beginning to brown slightly.

Sandwich assembly:
Spread 1/2 tablespoon of butter on both pieces of bread. Flip the slices over (the buttered sides are the ones that are going to hit the pan) and place half the grated cheddar on one piece of the bread. Add the chopped broccoli on top of the cheddar. Sprinkle a pinch of onion powder, garlic and generous pinch of pepper on top of the broccoli. Then add the Havarti, remainder of cheddar and final piece of bread.

Heat a heavy bottomed skillet over low heat. Carefully transfer the sandwich to the skillet and cook until the bread is toasty and golden on both sides and the cheese is gooey and melty. About 7 to 10 minutes. Remove from the pan and let sit for a few minutes before enjoying.

Thursday, April 10, 2014

Dijon Brussels Sprouts

Brussels sprouts are more of a fall and winter vegetable, but you can get them all year round and they are green. Green is a very spring like color, right? I think so and that is what I am going for. This here little recipe came about around new years time. Its been a long time since I've updated the blog regularly, but I had not forgotten about it! I'm always thinking and creating.


My New Year's Eve plans were pretty disorganized and last minute. Most of my friends were doing dinner or something that didn't involve me with their boyfriends. Silly couples. I decided to hell with them and planned to make myself a steak and brussels sprouts.

Just when I had come to terms with spending the start of my new year with a steak and bottle of wine, my married friends got down with the steak dinner plan to start the night. This is how these dijon sprouts came to be.


We were crunched for time. It was "late". There were places to go and people to see. My friends brought mushrooms, bread, brie and steaks. For the sake of time we decided to combine the only two veggies we had into one dish. Dinner came together in 30 to 40 minutes, snacking on cheese and drinking wine can be distracting.

Shredding the sprouts is the most time consuming part, but I've made this three or four times, using several different methods. I've used my mandolin, food processor slicing blade and pre-shredded brussels sprouts from Trader Joe's. You could also slice them carefully with a knife. Up to you. I prefer the mandolin or food processor. The texture is more delicate and frilly. Using a food processor is probably the quickest. Just trim off the stems and toss 'em in there.


Slice up some shrooms. Use any kind you want. As many as you want. I've used pre-sliced variety packs of mushrooms, little bellas and shitakes. Don't like mushrooms? Don't use 'em. Try adding a extra cup of brussels sprouts.

Cooking time is maybe 7 to 10 minutes. No time at all. More than enough time to throw some meat in a hot pan to go along with your brussel sprouts. I would recommend starting the meat before the brussel sprouts though. Just a thought.


This is so easy and flexible that it is really up to you. It was my go to dinner side for a few months. I went through a phase of eating steak and these for dinner anytime I had company. It got rave reviews every single time.

April


Ingredients:
4 ounces sliced mushrooms
1 tablespoon unsalted butter
1 teaspoon olive oil
3 cups shaved brussels sprouts (about 6 ounces)
1 3/4 teaspoons whole grain Dijon mustard
Freshly ground black pepper
Kosher salt

Instructions:

In a medium skillet, heat the butter and olive oil over medium heat. When the butter is melted, add the mushrooms and saute for 2 to 3 minutes.

Add the brussels sprouts, Dijon mustard and a generous pinch of freshly ground pepper; toss the mixture together and cook until softened, 3 to 5 minutes. Salt to taste (my Dijon mustard was fairly salty so I added only a pinch). Transfer to a plate or bowl and enjoy.


LinkWithin

Related Posts Plugin for WordPress, Blogger...