Thursday, May 31, 2012

Strawberry-Rhubarb Pie


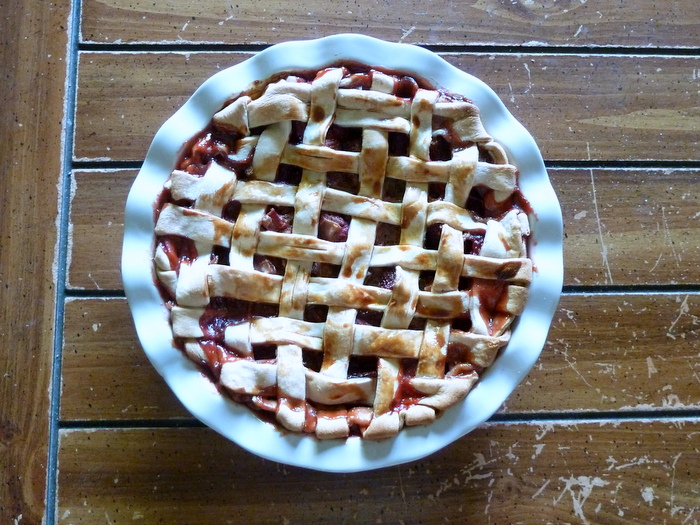
For Mother's Day this year I volunteered to make dessert for our family dinner and asked my Mom what she wanted me to make.  She said anything with rhubarb.  Ironically, I had just been telling my roommates about how I was going to buy rhubarb the next time I went to the farmer's market and make a strawberry-rhubarb pie.  I borrowed Brittany's pie pan and off I was making my first ever pie!  The family gave it rave reviews.  Unfortunately, the lattice top did not permit for attractive pictures after the pie was cut.


Recipe from Epicurious.

Ingredients

  • 2 9-inch pie crusts (I used store bought crusts)
  • 3 1/2 cups 1/2 inch thick slices trimmed rhubarb (about 1 1/2 lbs untrimmed)
  • 1 16-ounce container of strawberries, cut in half with green leaves removed (about 3 1/2 cups)
  • 1/2 cup packed brown sugar
  • 1/2 cup sugar
  • 1/4 cup cornstarch
  • 1 teaspoon ground cinnamon
  • 1/4 teaspoon salt
  • 1 large egg yolk beaten to blend, mixed with 1 teaspoon water
Directions
  1. Preheat oven to 400 degrees.
  2. Combine rhubarb, strawberries, brown sugar, sugar, cornstarch, cinnamon, and salt in a bowl.  Gently toss.
  3. Place one pie crust in a 9-inch pie dish.  Depending on your pie dish there should be some overhang.  Trim overhang to about 3/4 of an inch.
  4. Spoon filling into crust.
  5. Lay the other pie crust out on the counter and cut into 14 strips about 1/2-3/4 inch wide.
  6. Now make the lattice top.  Lay every other strip evenly spaced across the pie.  Fold back every other strip and lay a new strip down in the opposite direction.  Fold strips back.  Fold back the other strips and place a new one down.  Repeat until the remaining seven strips have been woven in.  Trim excess dough from strips. (Watch a video on how to make a lattice top here.)
  7. Tuck any excess crust or strips under and seal crust.  Crimp decoratively as desired.
  8. Brush egg and water mixture over top of pie.
  9. Place pie pan on a baking pan in case pie filling overflows.  Bake for 20 minutes.  Reduce temperature to 350 degrees and bake for another 1 hour and 25 minutes.  Let cool.

Tuesday, May 29, 2012

Challah Bread

Challah back ya'll! This bread is awesome and you must try making it. I made this the other week to test out a recipe, give it a dry run. It was this months Daring Bakers challenge, hosted by Ruth from Crafts of Mommyhood. I wanted to try to a recipe other than what was supplied, hence the practice recipes and dry runs. A bad habit of mine is to not read the full recipe, just look at ingredients and not amounts or blindly follow the recipe.


The first recipe I made called for close to 8 cups of flour. Didn't think twice about that crazy amount of flour until my stand mixer started to make strange noises, get real hot and have screws fall out. I like to think the screw was already feeling loose and this was just the last straw. I ended up kneading this by hand, good thing I lift weights.

Despite that little mishap (my stand mixer is fine, in case you were worried), the bread was yummy. A little dry, but it didn't stop my brother from eating practically all of it. Since it was a bit on the dry side and I gave away 3/4 of it to my brother (I can't have that much carb temptation in my presence), a new recipe was in order.


Found it (see below)! This guy is super moist, dense and not too sweet. Made this one at the parents, while home for Memorial day. weekend. There were a lot of nasty looks given by my brother, after I most of this loaf. I'm really not as good of a sharer as I seem or think to seem I am. 

After eating most of the loaf, it was decided this bread is on the healthy side of the fence. At least close to it. There is no butter, a little sugar and no butter. The rest is eggs, flour, water and a little oil. If there isn't any butter it has to be healthy, right? You probably don't need to have this sort of conversation with yourself, if you don't eat the whole loaf.

If you do eat the whole loaf, its okay not just because there is no butter. This bread is not fussy or complicated. Easy peasy. The hardest part is waiting for it to rise and not eating  it all imediately. You've been warned though, its eat the whole loaf in one sitting good.

xo

April

Adapted from Epicurious
Ingredients:
3 3/4 cups all purpose flour
2 1/4 teaspoons instant yeast or one envelope
3/4 cup warm water
2 large eggs, plus 1 for glazing
1/2 cup vegetable oil
1 1/2 teaspoons salt
3 tablespoons sugar
1 tablespoon honey

Instructions:
  1. Combine 3/4 cup of the flour and yeast in the bowl of a stand mixer, whisking by hand to combine. Then add the warm water and whisk until smooth and let stand 10-20 minutes until foamy and fragrant. 
  2. Add the eggs, oil, salt, sugar and honey to the mixture and whisk by hand again until well incorporated. Place the bowl on your stand mixer, fitted with a dough hook attachment. Add the remaining 3 cups of flour, mixing until the dough does not stick to the sides of the bowl. If the dough is too wet or dry add a little flour or water. Knead the dough on medium speed for 5 minutes.
  3. Cover the bowl with plastic wrap and let it rise for 1-2 hours or until doubled in size. At this point it can also be placed covered, in the refrigerator for up to 24 hours. If refrigerated the dough with take about 30 to 60 minutes longer to rise. 
  4. After the dough has doubled in size, punch it down and place it on a clean work surface. Divide the dough into 3 equal portions, rolling each out into a 1-foot long strand that is slightly thicker in the middle and thinner at the ends. Lay the three strands side by side, pinching them together and then braiding them together, pinching it closed and tucking it under the loaf. Beat 1 egg yolk together with a  teaspoon of water and brush the loaf lightly with it, reserving the mixture for another coat right before baking. Let the bread rise for 1 1/2 hours or until a finger indentation remains after being lightly pushed.
  5. Preheat the oven to 350F. Brush the loaf with the remaining egg wash and bake for 30-40 minutes, until it is nicely browned and the internal temp is 180F. Enjoy and challah back if you like it!


Monday, May 28, 2012

Chocolate Upside-down Cake


This is one of my all-time favorite chocolate desserts for more than one reason. It is super simple, has little ingredients, and a rich flavor. However, it's at the top of the list because it is close to my heart. This recipe was rarely made for special occasions or on holidays. It was a recipe my mom would make for my sisters and me when we needed a pick-me-up or when we all craved some delicious chocolate! It is the ultimate chocolate comfort food.

For the past couple of years, no one in the family has made Chocolate Upside-down cake. My mom passed away the summer before my senior year of high school. I guess we all stayed away from this recipe because it was too hard. This passed Mother's Day, I made Chocolate Upside-down cake for the first time without my mom. It was bittersweet. However, today I see this dessert as a way to preserve a memory of a wonderful mother that will always be missed.   


Chocolate Upside-down Cake

Ingredients

Cake:
3/4 c. white sugar
3 Tbsp. cocoa
1 1/2 Tbsp. melted butter
1/2 c. milk
1 1/2 tsp. baking powder
1/8 tsp. vanilla extract 
3/4 c. chopped nuts (optional) 

Sauce:
1/2 c. white sugar
1/2 c. brown sugar
3 Tbsp. cocoa
1 1/3 c. boiling water

Instructions
1. Preheat oven to 300 degrees.
2. Mix cake ingredients in a large bowl.
3. Pour into a 2 quart baking dish.
4. Mix sauce ingredients in the same bowl and pour on top of the cake batter. 
5. Place in oven and bake for 45 minutes.
6. Sprinkle cocoa on top if desired and serve warm.
7. Enjoy!


Wednesday, May 23, 2012

Breakfast Sammie with Avocado, Siracaha and Swiss


Summer is officially here. The rest of the world and calendar may disagree with me, but it is here in full force for me. I had big dreams for a "its summer, lets celebrate with this bomb-tastic ombre cake" blog post. This post is not an ombre cake and school has officially been done and summer started last week Thursday. Can you say recipe failures? The post was going to go something like celebrate summer with this delicious show-stopping cake and I would tell you about all my big summer plans and aspirations. When the cake failed, I decided I would make a cocktail. That also failed. I decided to turn to what I know for a little success.


I LOVE breakfast sammies. My favorite breakfast meal is hands down a breakfast sammie. They involve bread, cheese and a oozy-gooey-yummy fried egg. Those three things can make anyone's morning bright, yummy and wonderful for at least the 10 minutes it takes to make and eat it. Need more moments of wonderfulness, make it for lunch or dinner.


This sammie, to some people, may sound a bit strange. I don't know why they think that, it is a breakfast sammie at its best. My advice is to go with an aged swiss (Hook's 3 year Swiss is a good choice). Aged swiss cheese is just better. If you have the extra minute to spare, grate your cheese for exceptional melt-ability. The Siracha compliments everything beautifully with its sweet and garlicky heat.


On days when I am feeling healthy, I use egg whites and no bacon. There are other days where I can't resist the deliciousness of a runny yellow yolk. It is the avocado, Siracha and swiss that makes this breakfast sammie a knock out.

xo
April

Ingredients:
1 slice bacon, fried
English muffin, toasted
1/2 California avocado, sliced
1/4 cup aged swiss cheese, grated
1 egg
Siracha

Instructions:

  1. Fry your bacon over medium to medium-low heat, reserving some bacon grease to cook the egg. Add the egg to the frying pan, cooking to your desired doneness (I vote over easy, runny goodness!). Place the grated cheese and bacon on top (this helps the bacon to stay put while you eat) of the egg after it has been flipped.
  2. Place the toasted English muffin on a plate, placing the avocado on the bottom half. Remove the egg from the pan, placing it on top of the avocado. Finish the sammie off with Siracha and enjoy!
 “Join Dine & Dish and Cookin’ Canuck for the California Avocado 4th of July Blast, sponsored by the California Avocado Commission.”


Sunday, May 20, 2012

Grilled Chicken Breasts with Red Chile Oil

Summer weather is finally here to stay and so is this chicken. My dad LOVES this chicken. It has pretty much become a staple in our summer repertoire. Is it bad that I made this for mothers day, last weekend, when it is my dads favorite? My mom doesn't dislike, so I will go with its okay. Since this dinner was truly a family affair, it was rough trying to snap some pictures. My brother was hovering like a ravage beast. Apparently no one feeds him? When I was finally done, he polished off his chicken breast in record breaking speed. My dad jumped when I told him I was making this and my brother nearly chewed his hand off waiting to eat this; maybe it is a sign this is the perfect chicken for the men in your life.


The chicken gets brined, making it unbelievably juicy and moist. If you have never brined anything before, you don't know what you are missing. Make sure you let the water cool after you add the sugar and salt. If you don't, like me, nothing that terrible happens. It is probably just better to let it cool, not cooking the chicken slightly with boiling water. The little effort of a brine goes a long ways. The leftover chile oil is perfect on sweet potatoes too. If you don't want any leftover chile oil, half it. I recommend using it on veggies though or making chicken again this week!

xo

April

Courtesy of Fine Cooking
Ingredients:
For the chicken:
2 tablespoons granulated sugar
2 tablespoons kosher salt
2 cups water
6 boneless, skinless chicken breasts

For the chile oil:
1 tablespoon ground cumin
1 tablespoon ground coriander
1 teaspoon ground caraway seed
3 tablespoons ancho chili powder
1 teaspoon cayenne
2 garlic cloves, minced or grated on a micro plane
Salt
1 cup extra-virgin olive oil
1/2 teaspoon red wine vinegar

Instructions

  1. In a measuring cup, boil 2 cups of water combined with sugar and salt and stir to dissolve. Cool completely. Add the chicken breasts, cover, and refrigerate for 2 to 4 hours.
  2. To make the chile oil, combine all the ingredients in a medium mason jar (it is easier to mix as the spices and garlic settle) or measuring cup. Stir or shake before using. 
  3. Prepare a medium  gas grill. While the grill heats, remove the chicken from the brine, pat dry with paper towels, and let sit at room temperature.
  4. Toss the chicken in 4 tablespoons of the chile oil. Grill the chicken without moving until golden brown grill marks form, 4 to 6 minutes. Flip the chicken and grill until just cooked through. Transfer to a plate to rest a few minutes before serving. Serve and enjoy with the remaining chile oil on the side for dipping.


LinkWithin

Related Posts Plugin for WordPress, Blogger...